sKoolERP
V3.5
- By: FieldHawk Team
A set-up guide and general information to help you get the most out of sKoolERP.
Introduction
Thank you for purchasing sKoolERP. This document covers the installation, set up, and use of this system and provides answers and solutions to common problems and issues - we encourage you to read this document thoroughly
if you are experiencing any difficulties. If you have any questions that are beyond the scope of this
document, feel free to contact us
1. Getting Started
You can start using the product once you get the custom URL from the FieldHawk team.
1.1 Installation/ Implementation
sKoolERP cannot be implemented in an institute in a day or two. sKoolERP is an ERP.
There should be at least one sKoolERP admin who knows the sKoolERP application very well in the institute.
User should definitely go through the Work Flow of sKoolERP before starting using / implementing it1. Getting Started
Information in regard to the custom URL or Website integration can be obtained from-
Contact Us
You need to do this phase by phase. You need to enter the current students details and then run the application
with the basic modules of Events, Circular etc. Then go to Fee module, Exam module etc. Don't try to use all the modules from day one.
The sKoolERP admin needs to guide the other users of the application
1.2 6 Things You Should Know Before Starting using sKoolERP
1.You can login to the sKoolERP ERP using the User-name and Password provided . You can create Institution and other settings from there.
You can change the password once you login into the system.
2.Your logo needs to designed in 150*110 pixel dimension. If not, your logo may appear blurred or cropped.
3.You cannot send an SMS from your instance if you haven't set up a bulk SMS API integrated to sKoolERP.
You need to purchase a SMS API which can be integrated with the sKoolERP.
4.You can use sKoolERP.us for demo purpose or testing the application. Your main instance is not meant for testing.
The issue with this is, you may not be able to delete some specific junk data only because of dependency issue
(e.g batch cannot be deleted if students and subjects are added to that batch). The only way then is drop the entire DB,
which means you have to enter all the data from the start.
5.You can access sKoolERP from your custom domain. For this you need to add the CNAME and point to the server
where sKoolERP is hosted. Many a times users create a subdomain. You need to add CNAME / A Record and not subdomain.
FieldHawk team won't be doing this as the domain control panel comes under your authority level.
6.Correct format should be followed while using Data import / Custom import module so that data can be imported.
Otherwise it may result in error and data will not be uploaded. You should save the file as Excel only. You should enter
the mandatory fields and should enter in the recommended format only as told in the manual. Fields which needs to be created prior
to data upload should be created (courses and batches, employee department, position etc)
2. sKoolERP Features
2. Features
The System comes packed with features that control the ERP and extend the functionality of
School ERP. This section will document those features and how to use them successfully.
2.1 Navigation Menus
Lets begin with an overview of the sKoolERP School management system and the menus you
will use to begin taking control of the school Management.
Once you logged into the sKoolERP you will be able to quickly access key areas from the icon at the top right
or you can take full control of every detail through the main panel menu on the right side.
2.2 ERP Options
The ERP comes with a simple to use administration panel. You can access it by navigating to
Left side. The ERP options are conveniently spread over a number of tabs
and each tab contains the options that pertain to a particular area of the ERP feature.
There are following Modules in sKoolERP :
2.2.1 Dashboard : The dashboard displays consolidated information about the institution.
Settings : From here you can enter the information regarding your institution and academic settings
Academic : Under Academic you can find all the features like courses, batches, timetable exams, etc..
HR/Payroll : All the features related to HR and Payroll comes here.
Student : You can enroll students(Admission) and other student information from here.
Finance : Fees and Accounting related options come under here.
Library : All the features for library managemnet.
Transport :All your Transpot management can be done from here.
Hostel : Hostel Management
Message/SMS:The E-Mail and SMS setting can be done here.
Storage Management : You can do all the inventory management from here.
Performance : This module help you to view the students performance course wise or student wise.
Event : You can create Events to update the users from this module.
Integration : All the integrations done will appear here.
Reports : This section can be used to generate various reports.
Withdrawal. : upload your custom Logo and set margins and size for it.
3.Settings
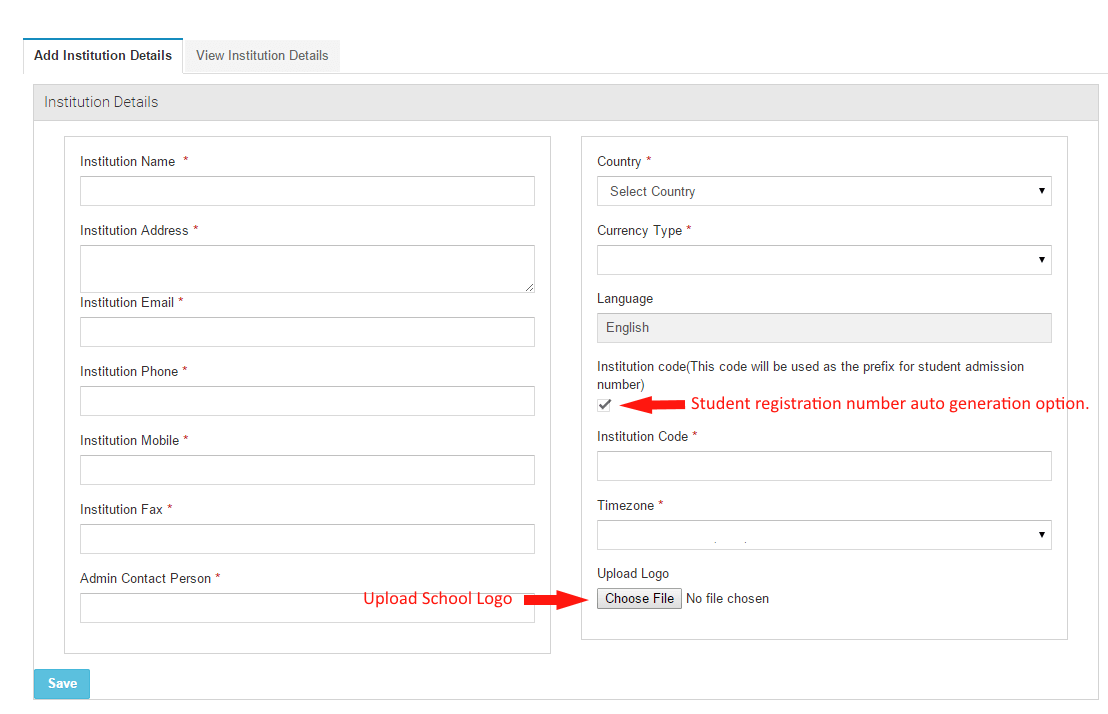
3.1.1 Institution Details
For set-up the Institution details you can navigate to Add institution details under settings.
Here you can add all the details regarding your Institution and you can upload the Institution logo from here.
Under institution code you have the option to select weather the student registration is auto generated or manually.
3.1.2 Academic details
Here you can add the present academic year.

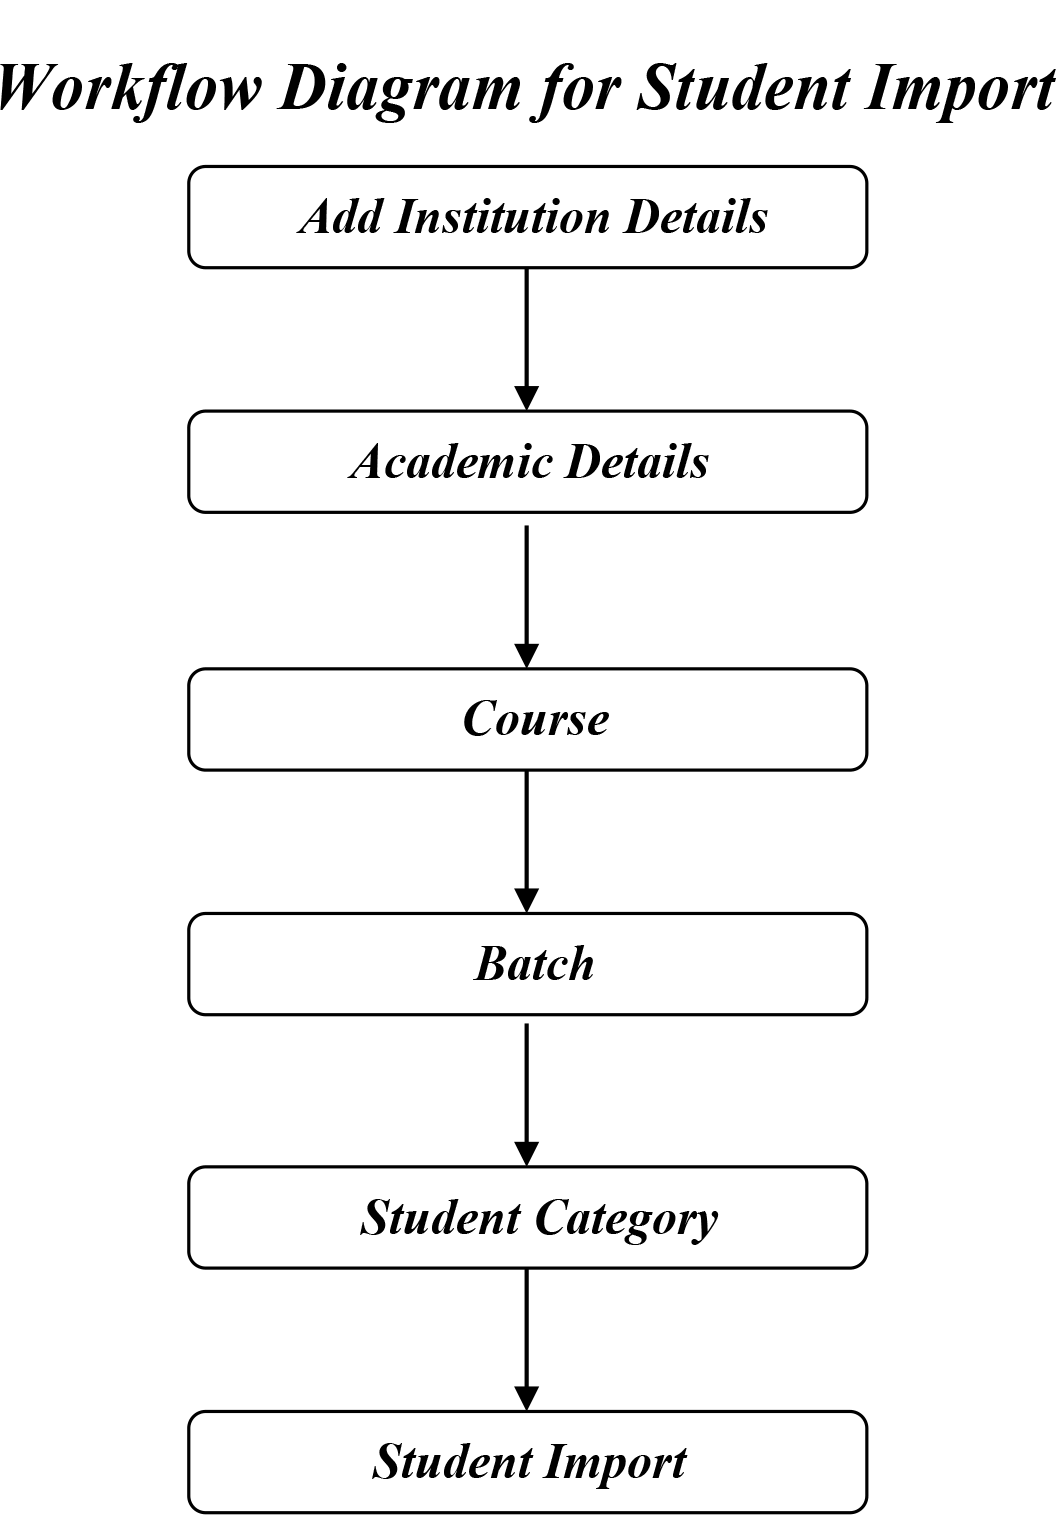
3.1.3 Student Import
To Import the student information, You can use the Excel Template., You can copy the mandatory fields like course, batch ,category...etc from the table given in the page.
Before importing the data into the system you have to create the basic data's like course , Batch, Student Category etc...

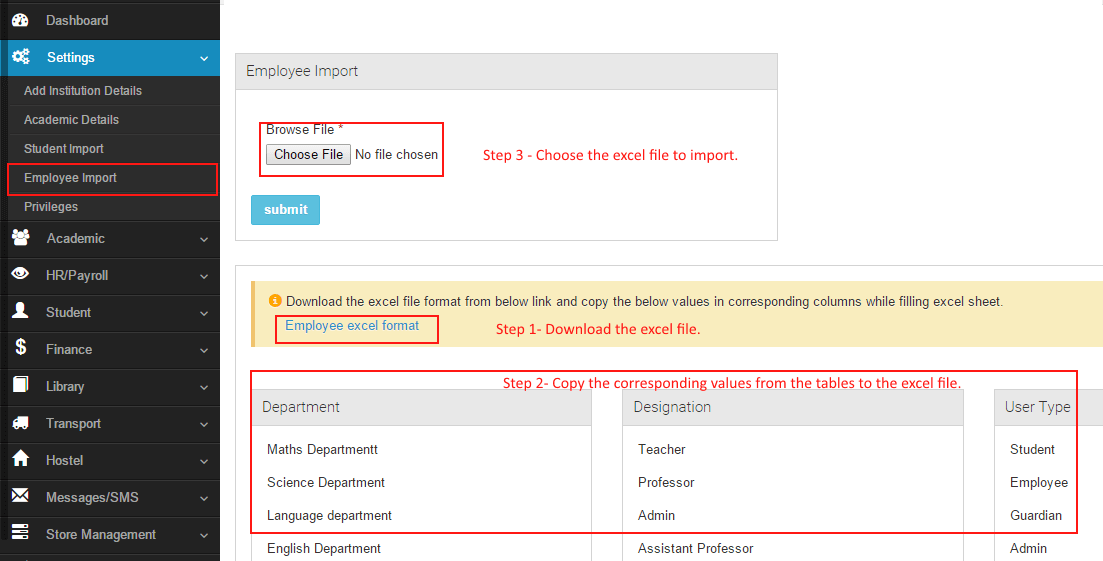
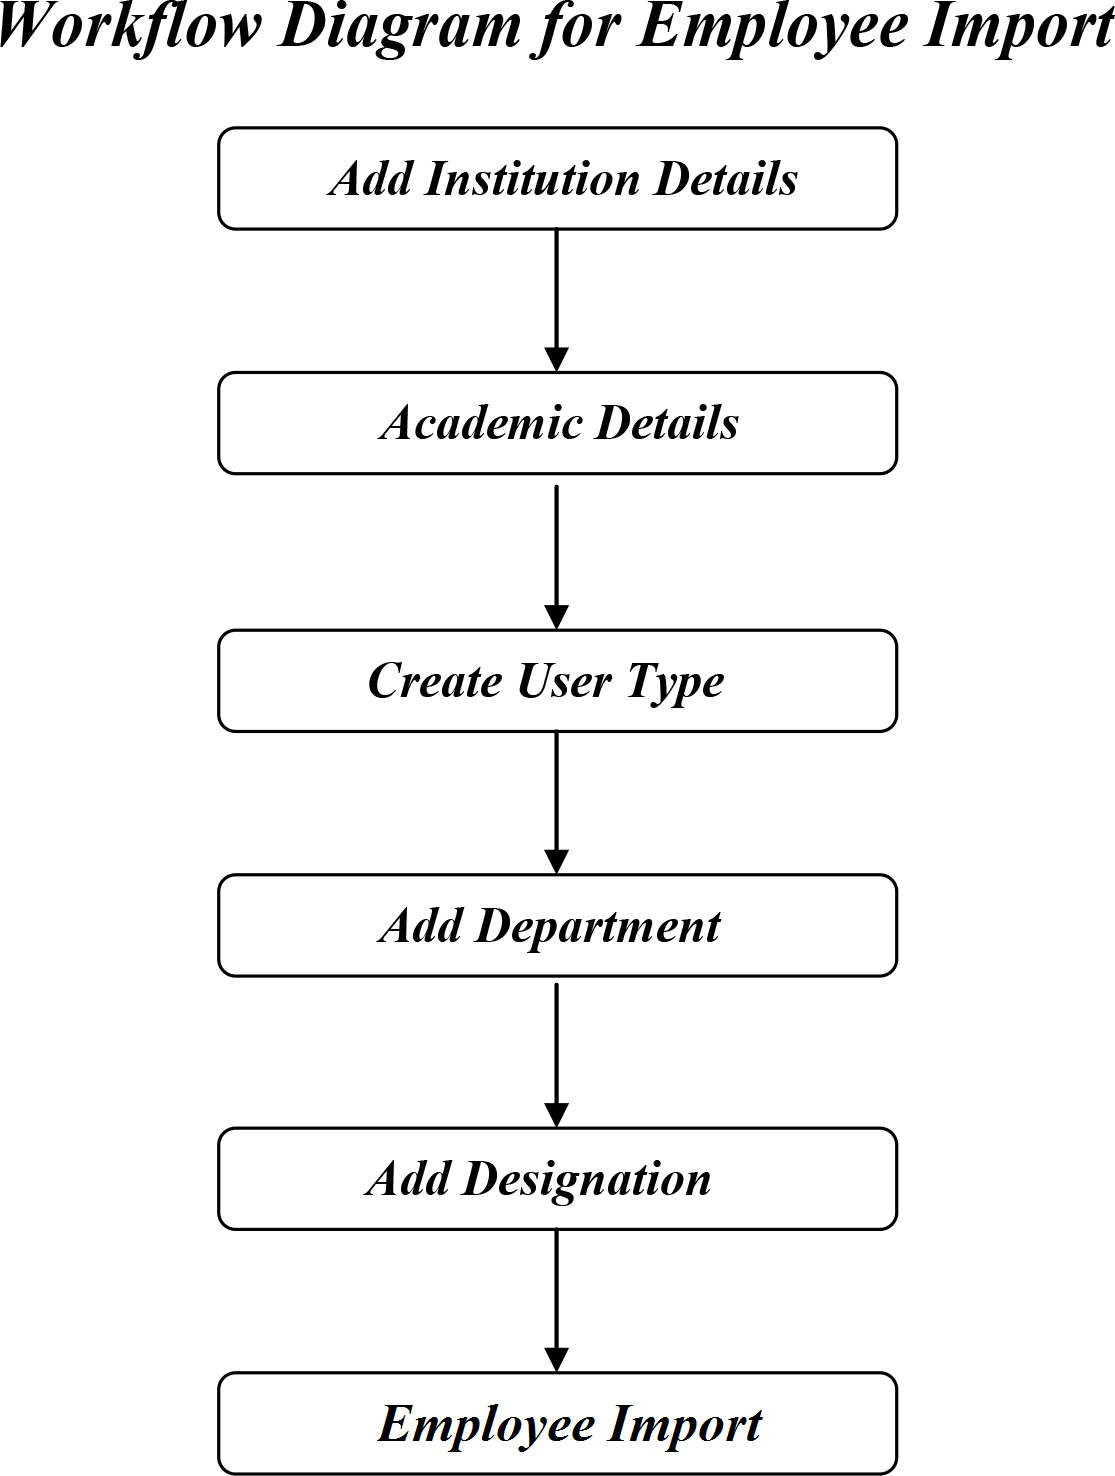
3.1.4 Employee Import
To Import the student information, You can use the Excel Template., You can copy the mandatory fields like course, batch ,category...etc from the table given in the page.
Before importing the data into the system you have to create the basic data's like course , Batch, Student Category etc...
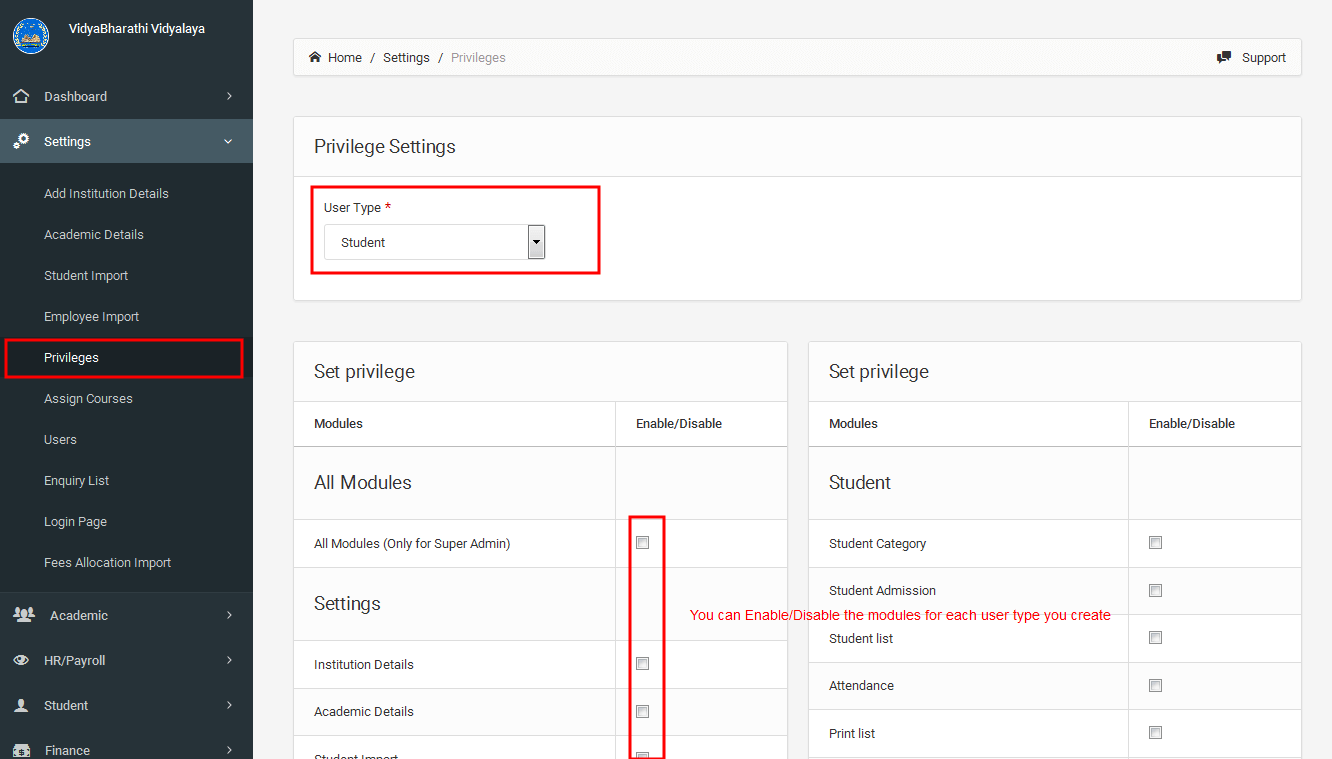
3.1.5 Privileges
To use the Privilege module you have to create user types under Employee Management (HR/Payroll--> Employee Management--> Add User Type).
Once you have created user types you can assign privileges to each user type by selecting the user type and then check the boxes corresponding
to the modules you want to give permission for that User types.
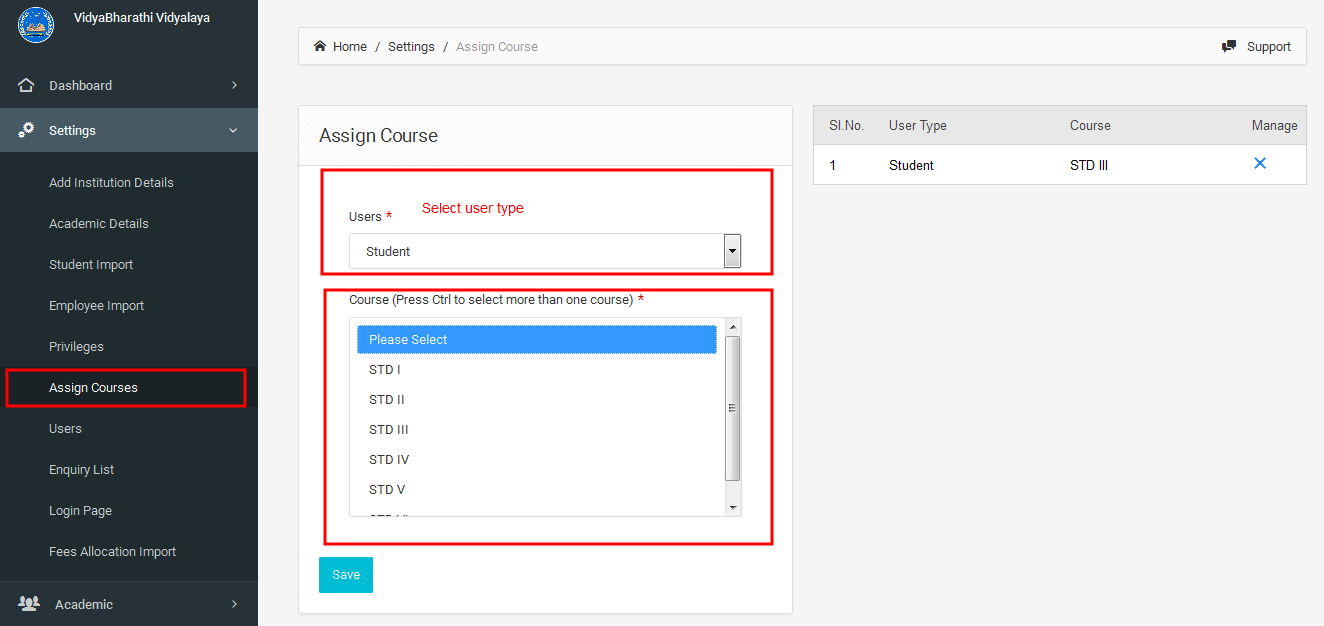
3.1.6 Assign Courses
Here you can assign course to the selected user.
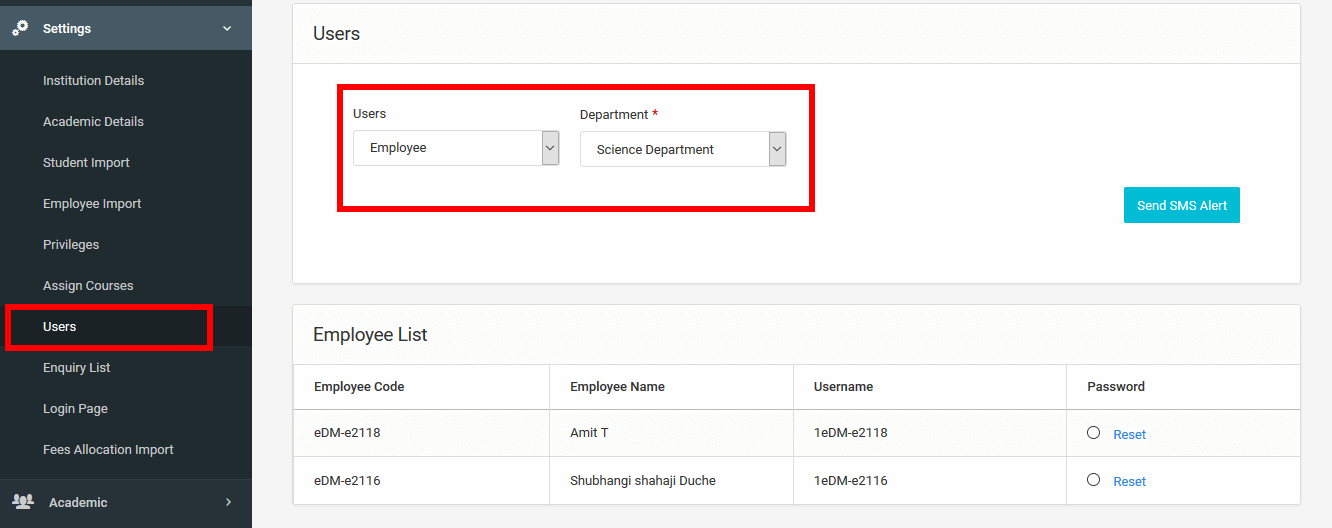
3.1.7 Users
Here you can view the registered users.
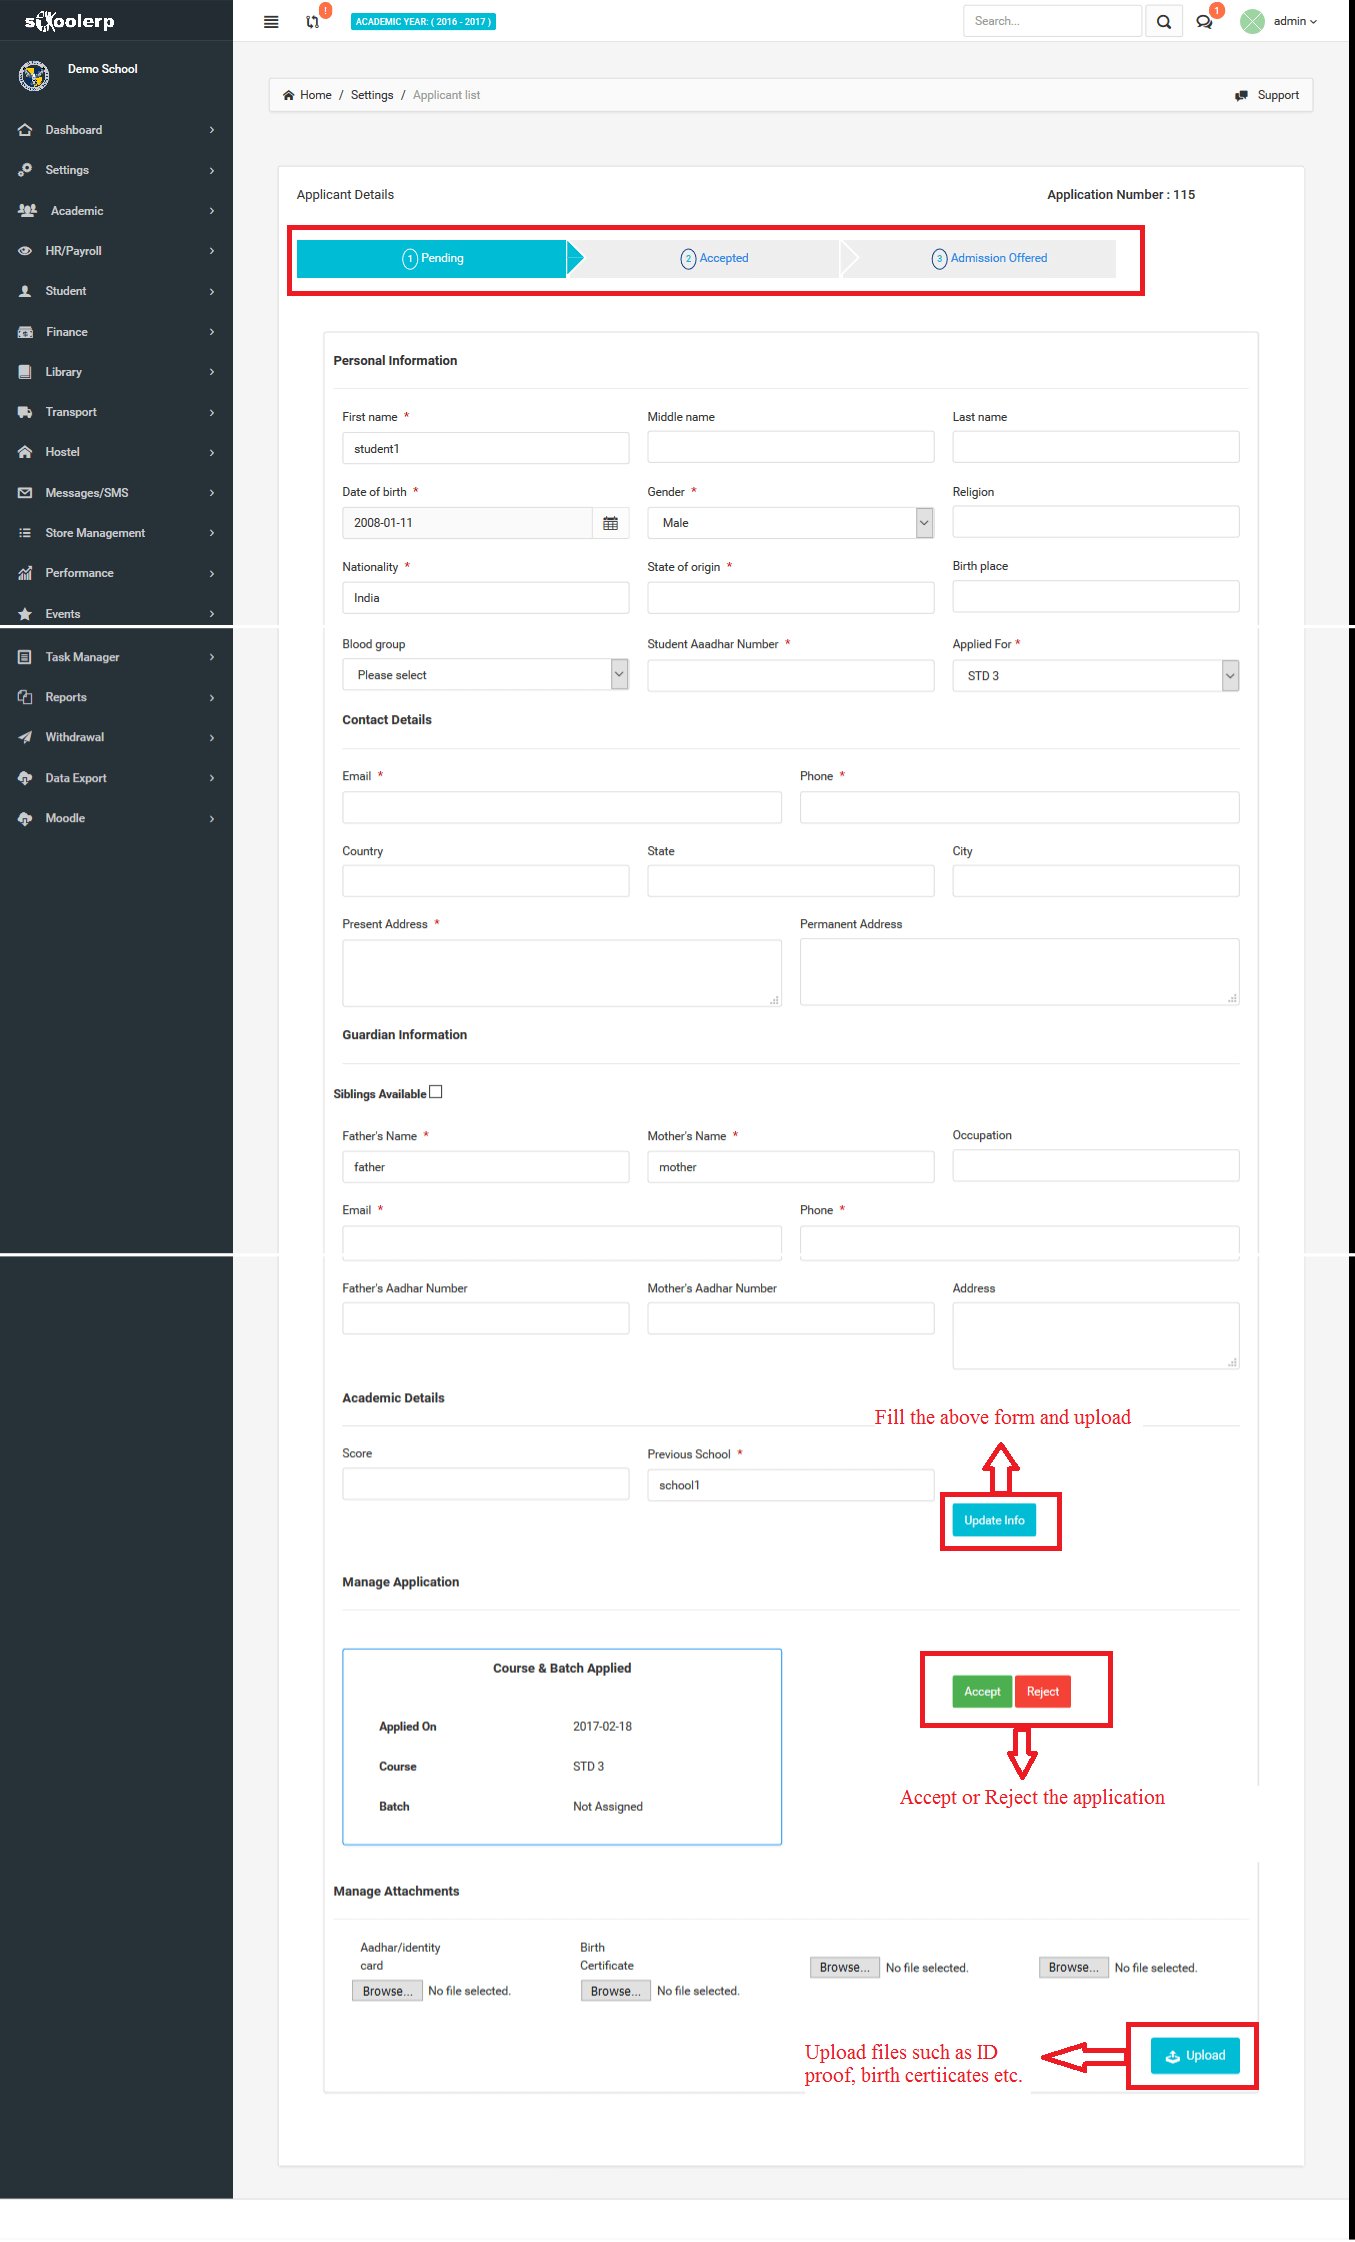
3.1.8 Applicant List
In Applicant list the list of the applications can be viewed and managed.
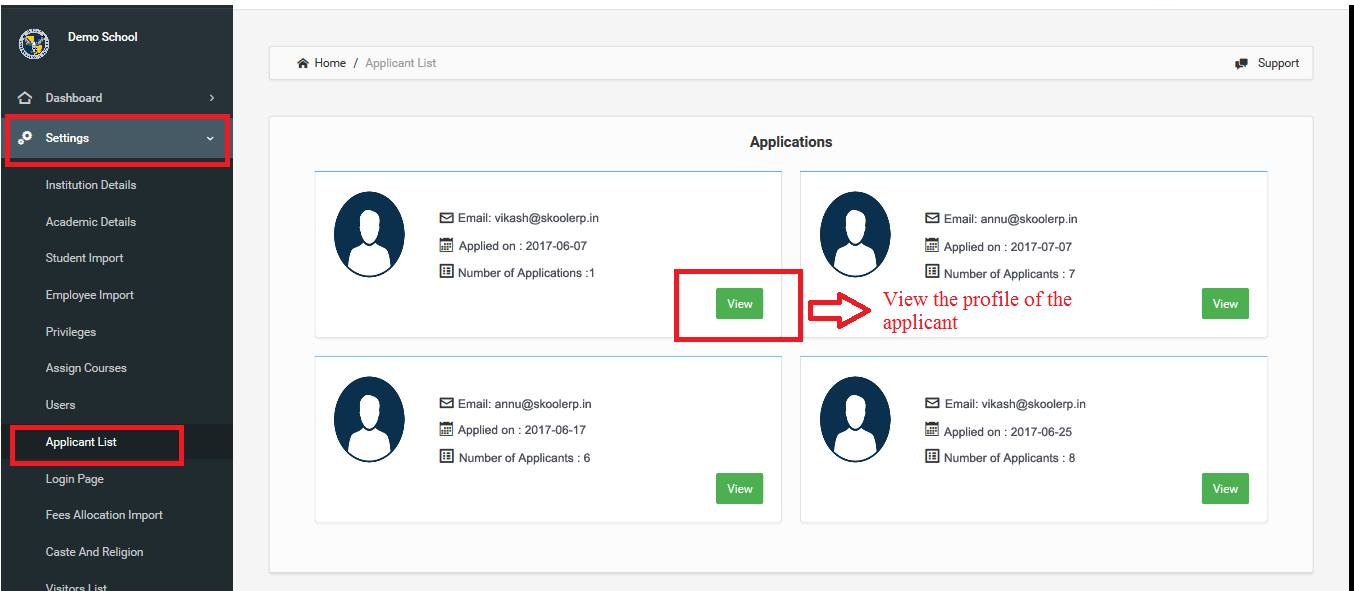
In the above figure, click the view button to view the profile of the applicant. The status of the applicant can be known, whether it is pending, accepted, rejected or admission offered as shown in the below figure.
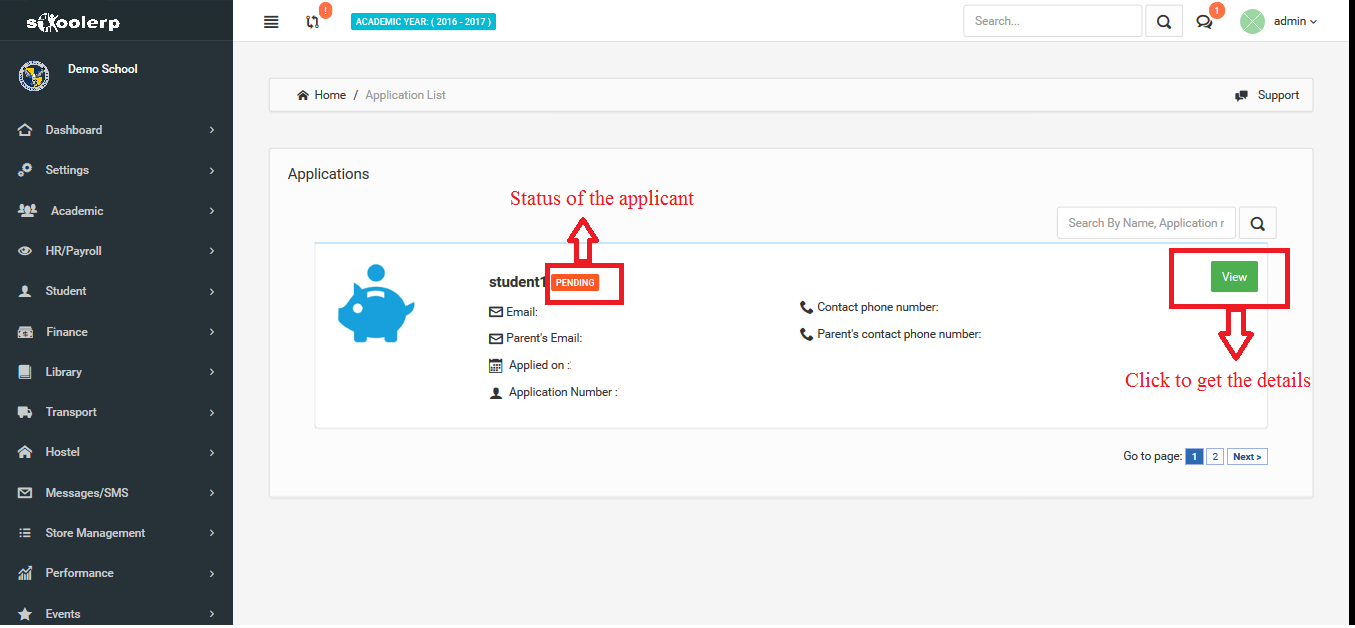
Click the view button to go to the details of the submitted application.
The form has to be filled and the required files has to be uploaded and the application can be accepted or rejected as per the requirement as shown in the below figure.
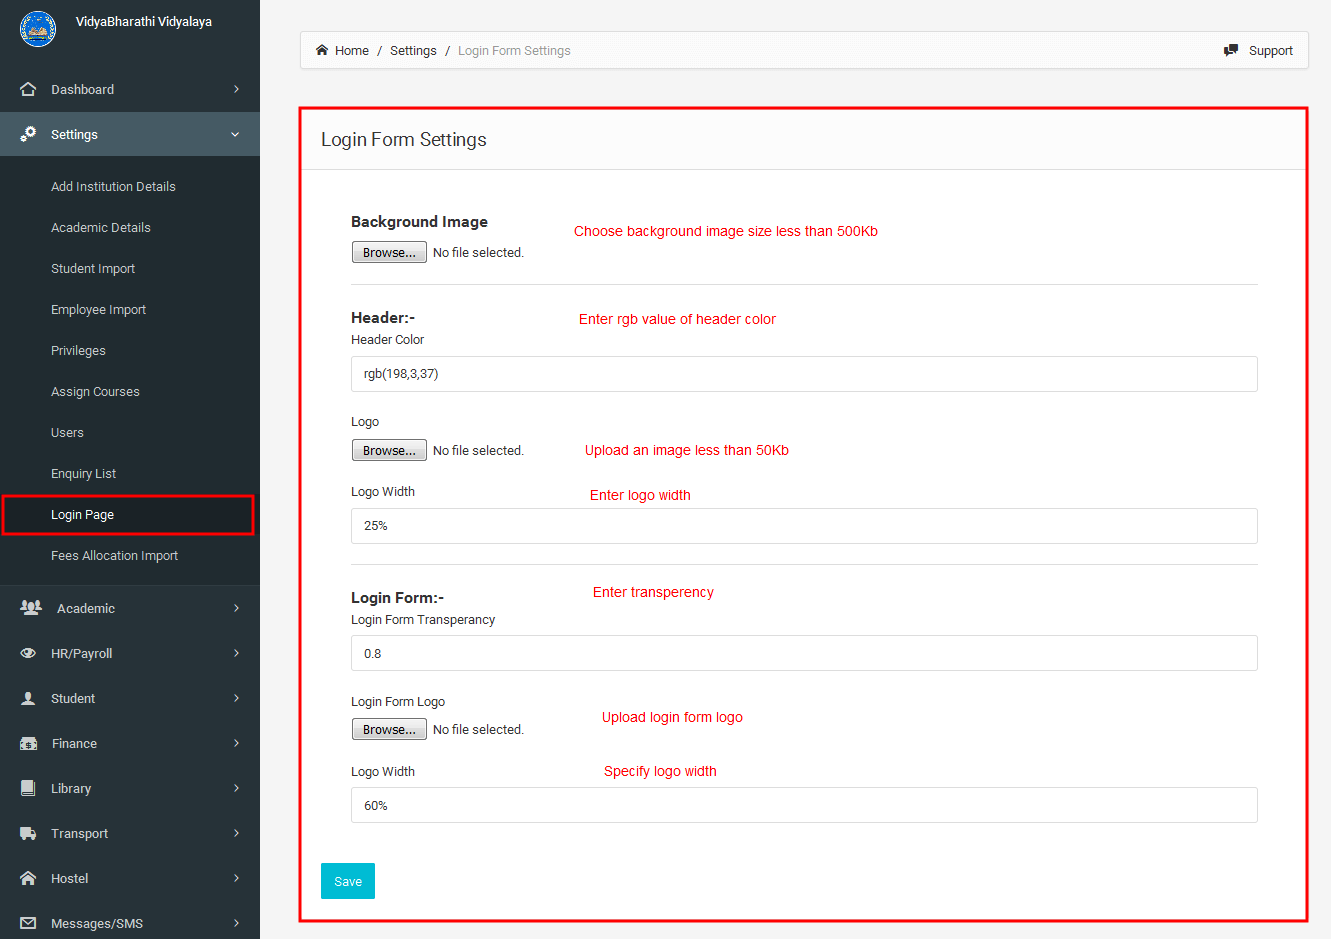
3.1.9 Login
Here you can personalize your login page.
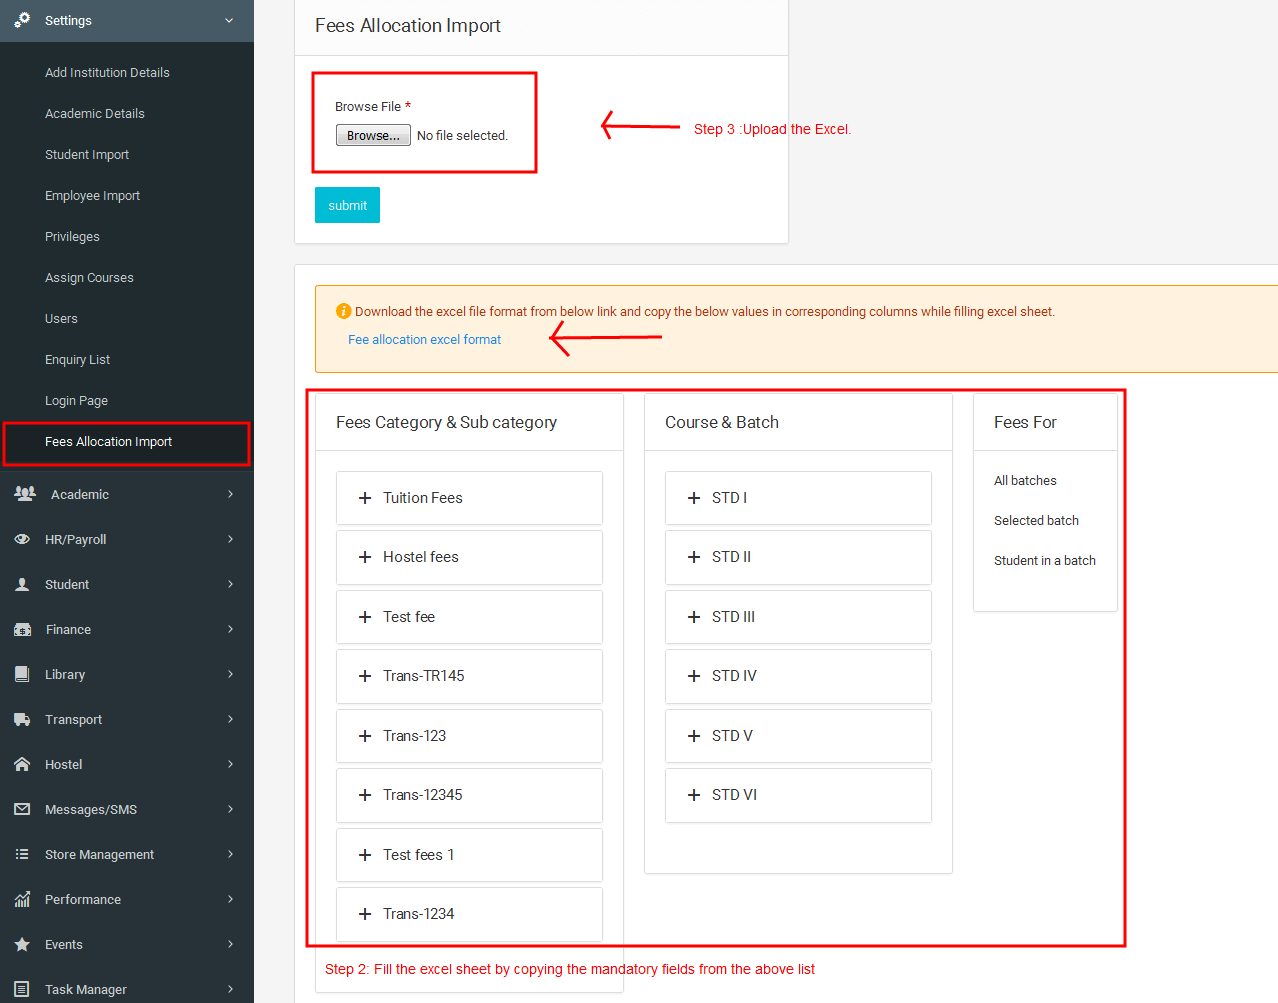
3.1.10 Fees Allocation Import
Here you can upload the details of fees allocations. For this, first you need to download the fee allocation excel format from the provided link and fill the excel sheet by copying the below values in corresponding columns. After filling the excel sheet, you can upload it.
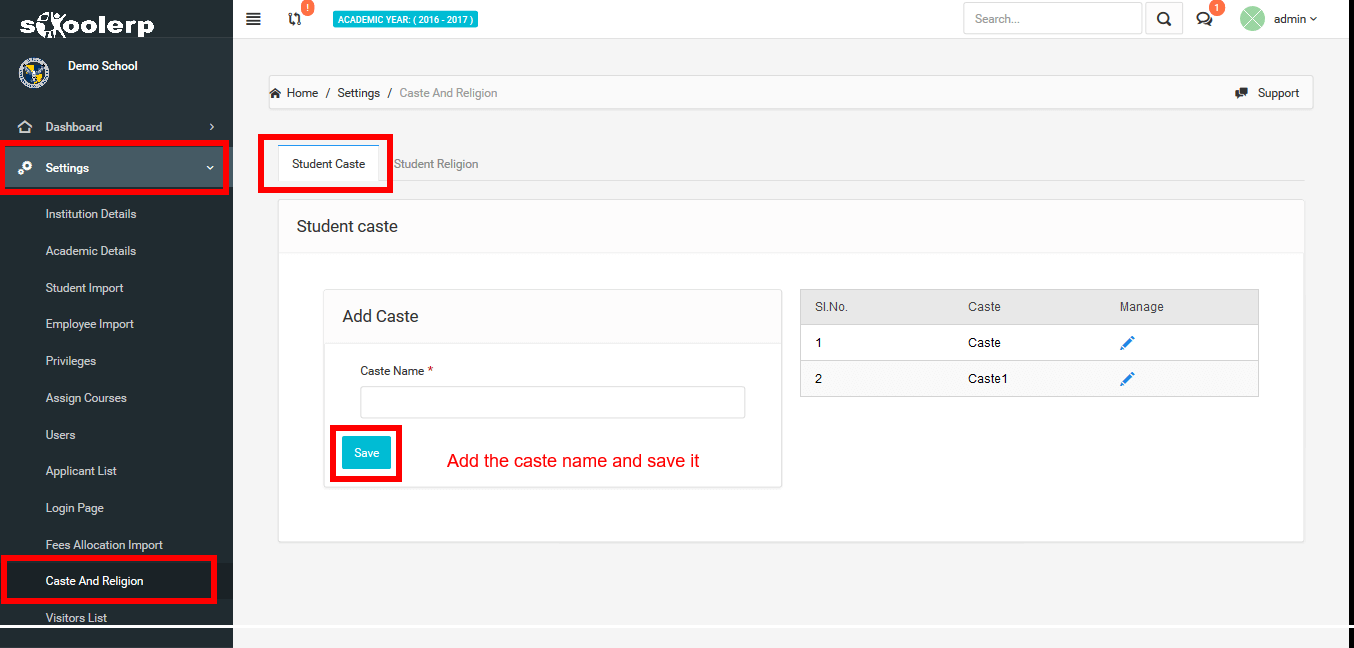
3.1.11 Caste and Religion
In this sub module you can add the caste and religion of the student by entering the name of the caste and religion.
3.1.12 Visitors list
Through Visitors list you can keep track of the visitors in your school.
In the login page, click Visitors button.
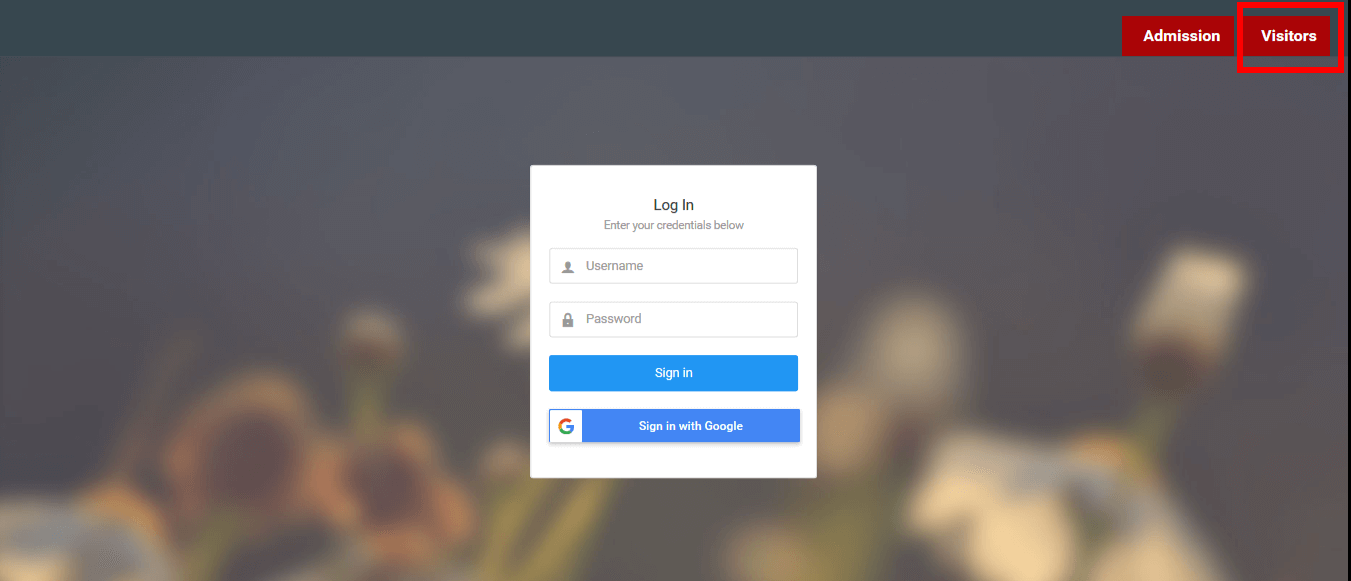
The below page will be available when clicked the Visitors button.
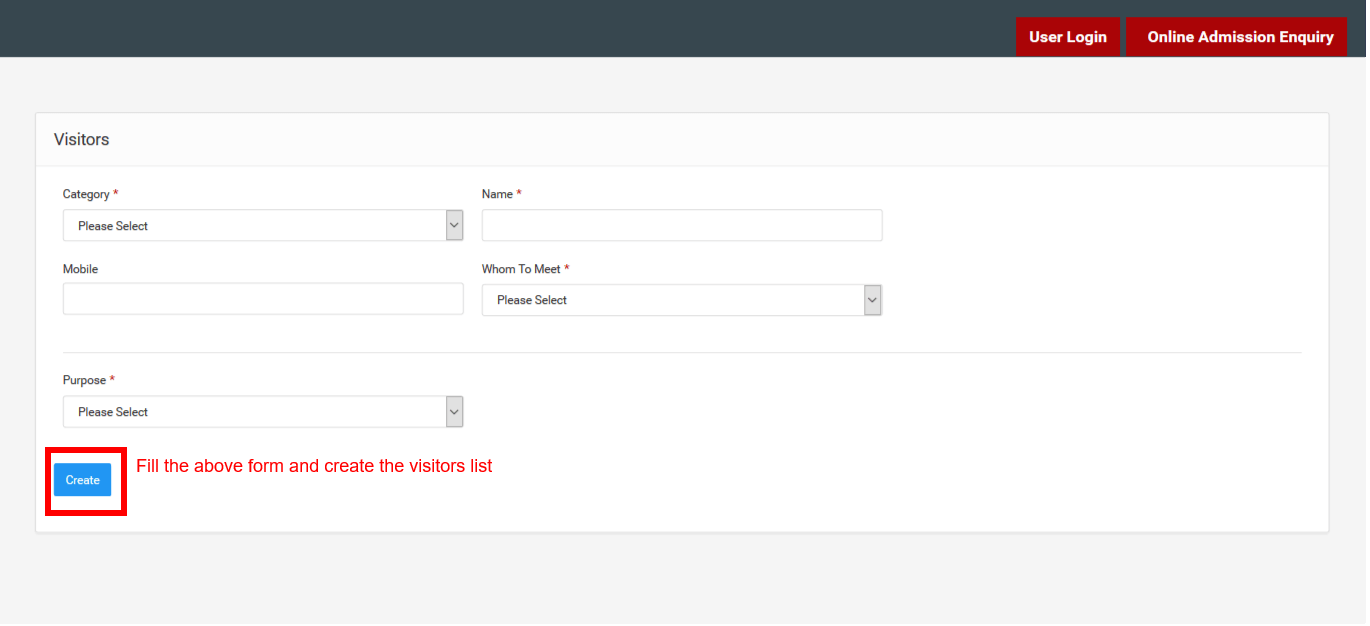
The Visitors list will be displayed after the creation of the visitors.

All the features for the Academic Managemnt are available under this module.3.2 Academic
3.2.1 Course and Batch
Under course and batch module you can create new courses and batches and assign class teacher for the courses and batches.
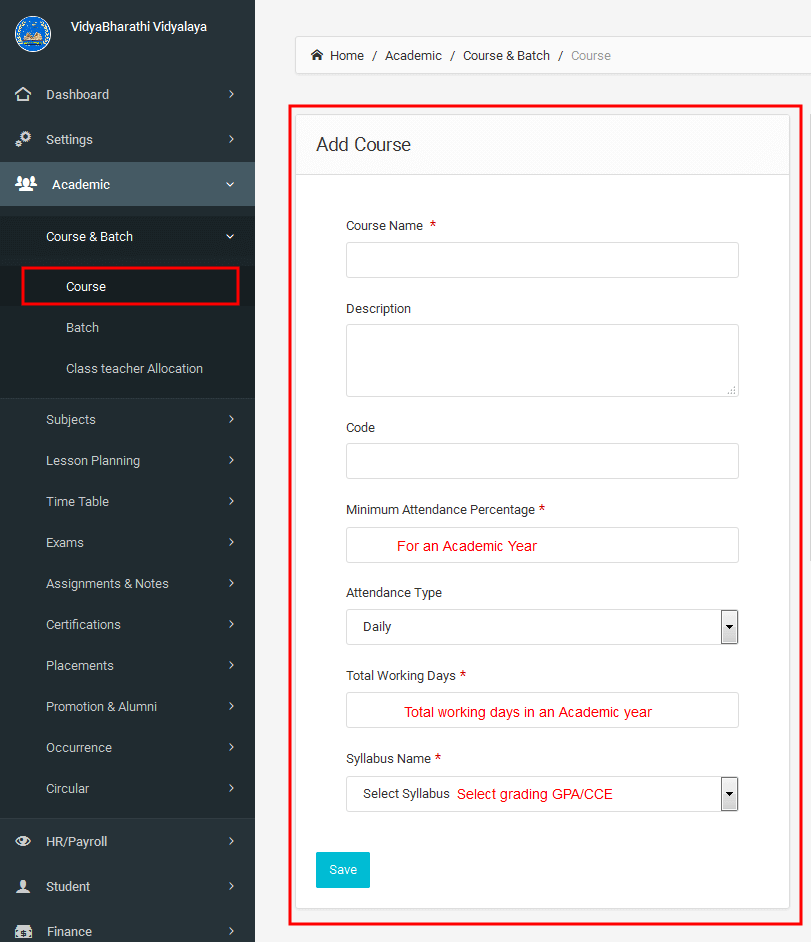
3.2.1.1 Course
Here you can create new courses under your institution .
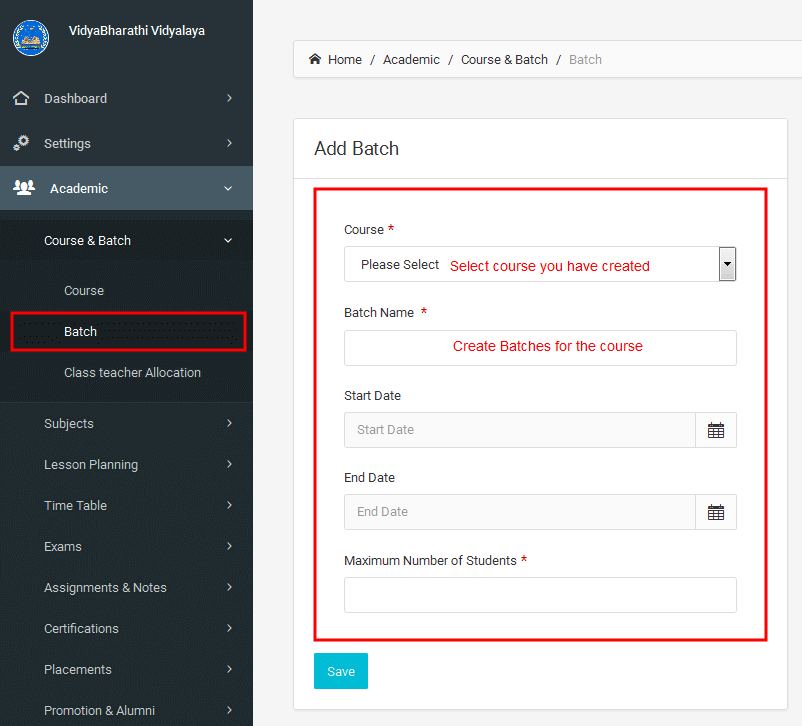
3.2.1.2 Batch
From here you can add different batches under the course you have created for the institution .
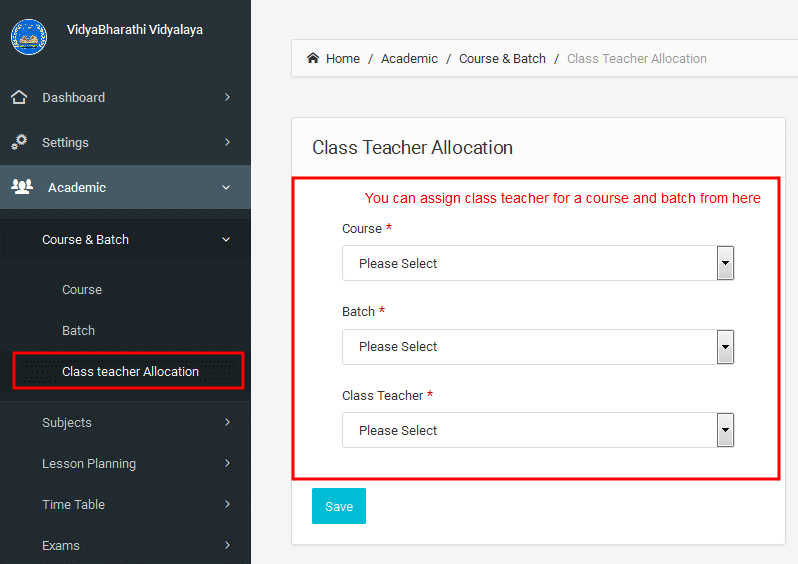
3.2.1.3 Class Teacher Allocation
You can assign class teacher for the batches you have created.
Please note in-order to assign an employee as class teacher you have to complete the process like assign the subjects to batches
and the subject allocation for the employees
3.2.2 Subjects
Under Subjects module you can create Subjects/ discipline in the institution and assign subjects to teacher and batches.
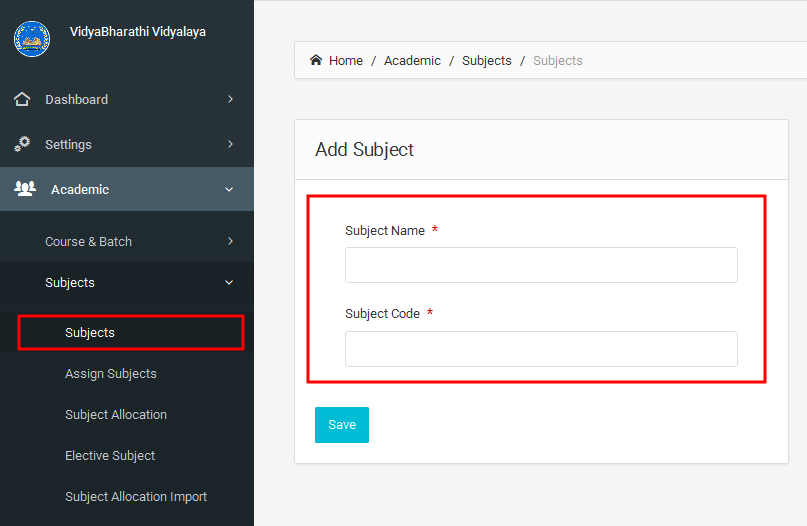
3.2.2.1 Subjects
From here you can add different subjects/ discipline in the institution and enter other details like subject code.
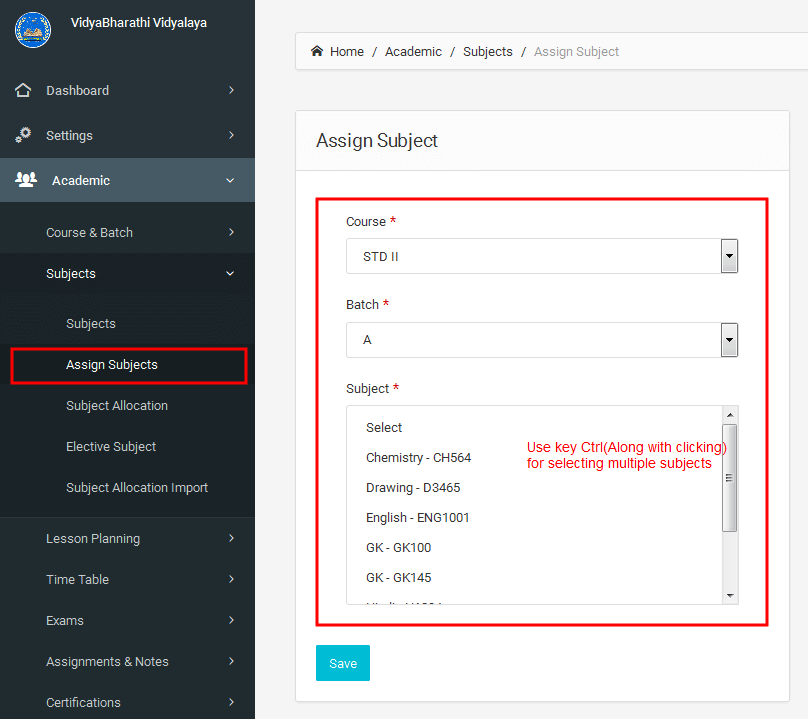
3.2.2.2 Assign Subjects
You can Assign/allocate subjets to batches. Use the Key Ctrl along with clicking for multiple selection of subjects.
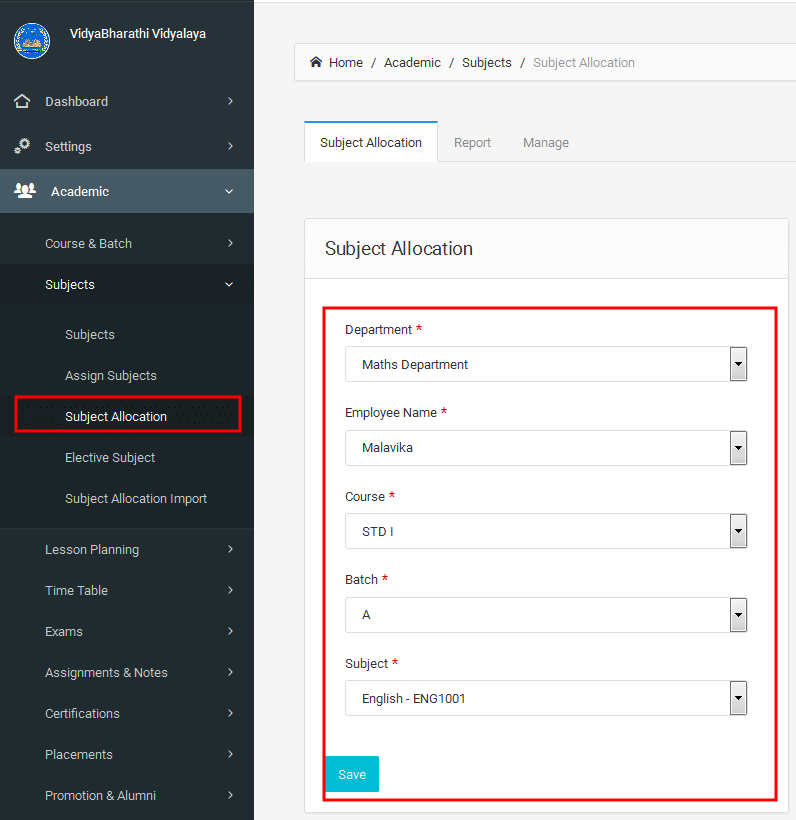
3.2.2.3 Subject Allocation
You can allocate subjects to teachers from here.
Please make sure you have allocated the subjects correctly, since this mapping will be used everywhere in the system for faculty identification
including the Timetable Creation.
3.2.2.4 Elective Subject Allocation
You can allocate Elective subjects to students from here.
Please make sure you have allocated the subjects correctly, since this mapping will be used everywhere in the system for Elective option Students identification
including the Timetable Creation.

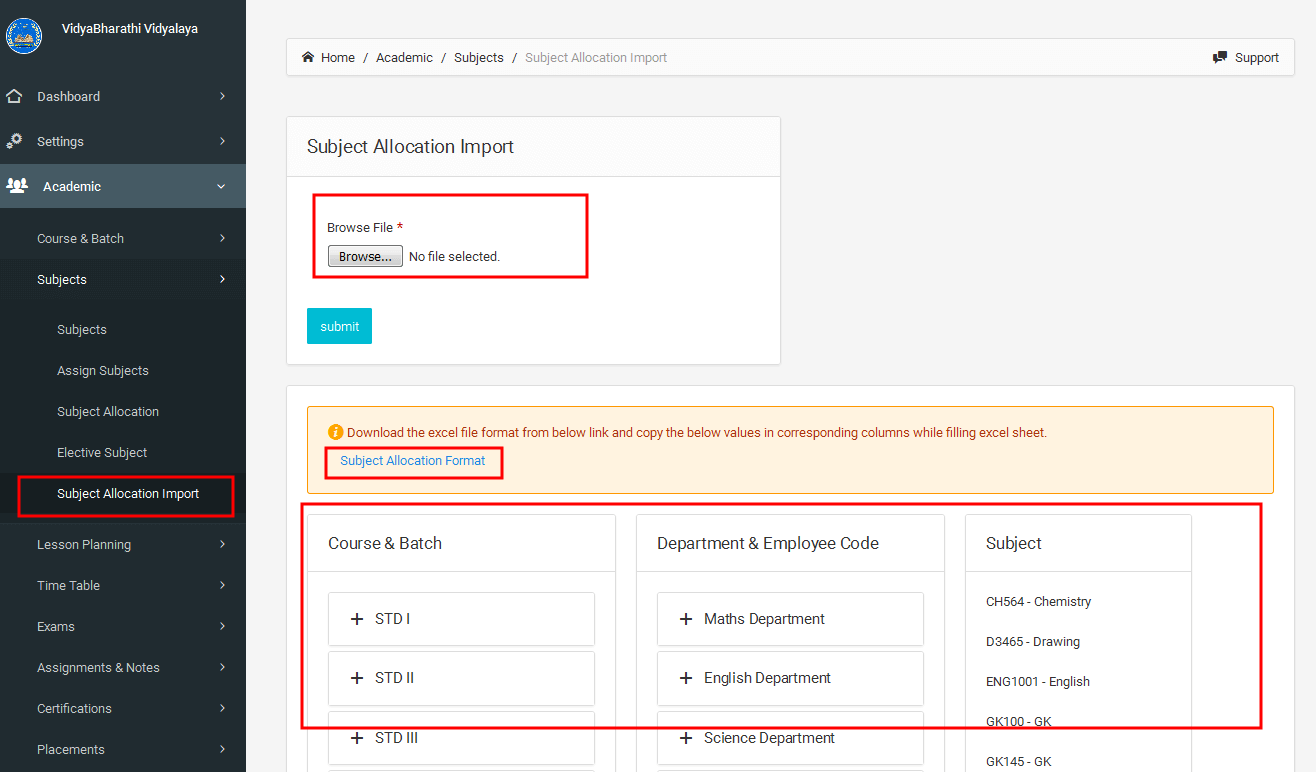
3.2.2.5 Subject Allocation Import
Here you can upload subject allocation details. For this, first you need to download the subject allocation excel format from the provided link and fill the excel sheet by copying the below values in corresponding columns. After filling the excel sheet, you can upload it.
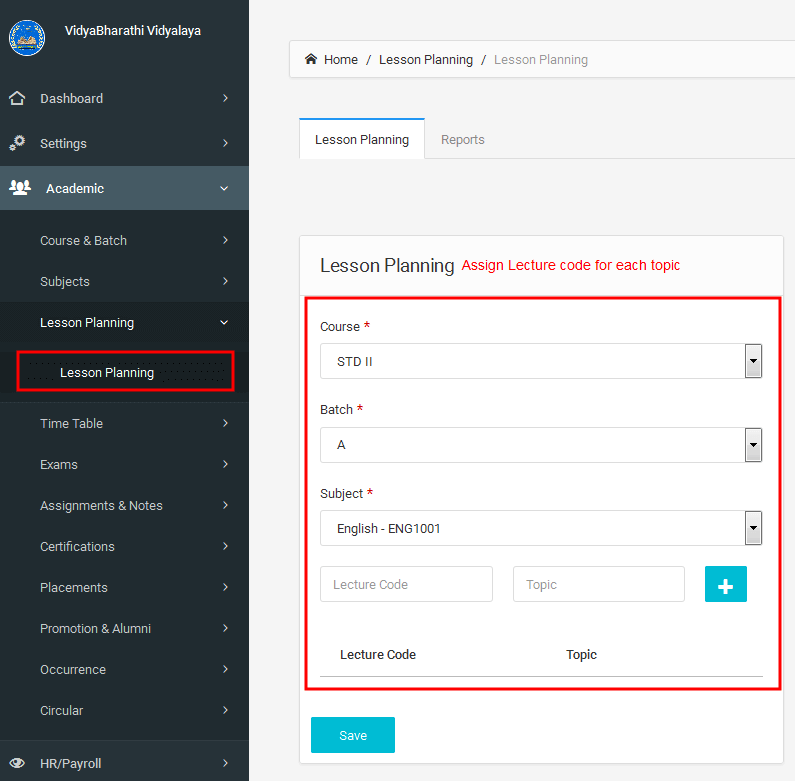
3.2.3 Lesson Planning
Under Lesson Planning module you can assign subjects for teachers.
3.2.3.1 Lesson Planning
From here you can assign subject and batch to lecture
3.2.4 Time Table
Under Time table module you can create time tables for batches. For setup Timetable for a Batch all you need to do is. Navigating to Set Timetable > Add New
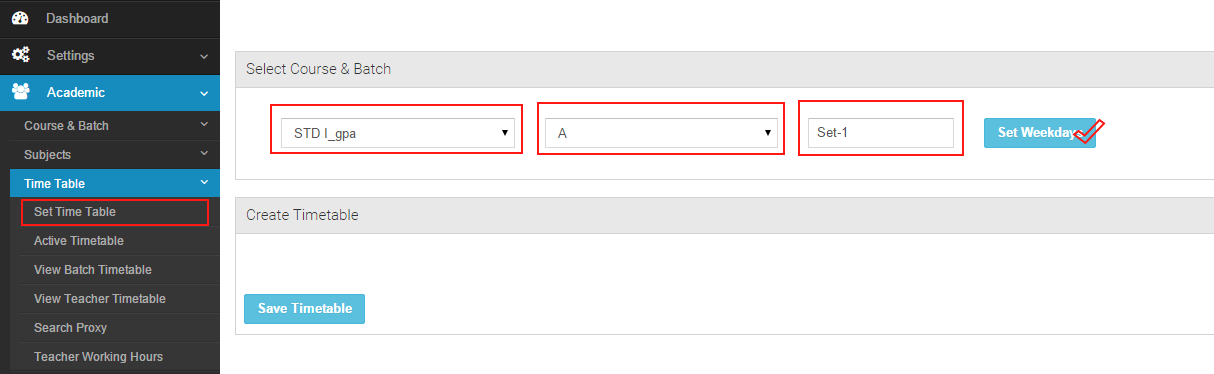
3.2.4.1 Set Timetable
Under this module you can create Timetable for Batches.
Step-1
You can select the course and batch from here and set a name for your timetable.
Step-2
Here you can s
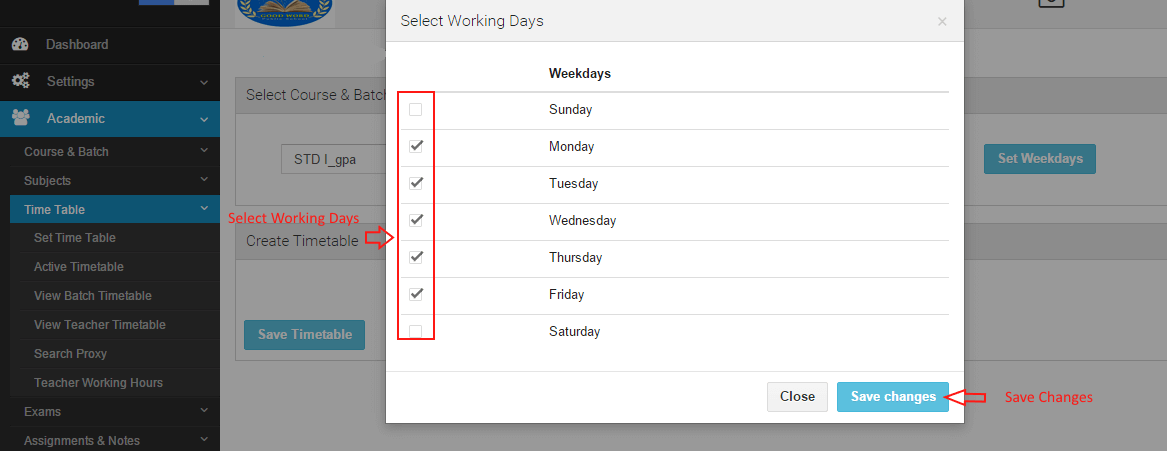
Step-3
From here you can assign the periods for each weekdays.
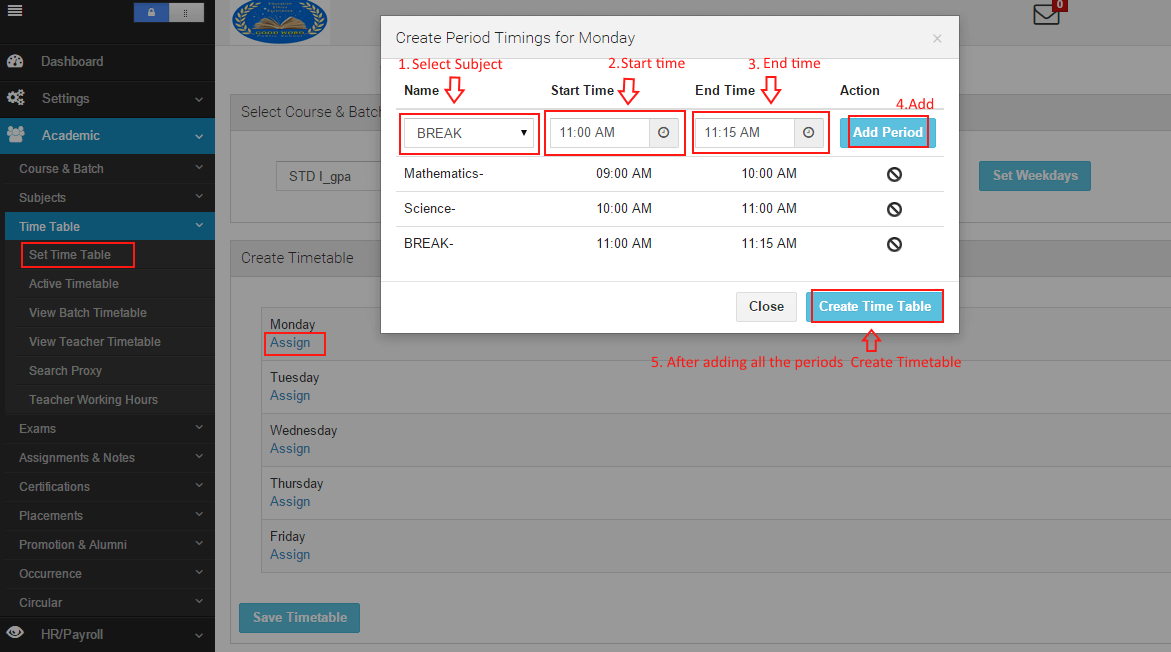
Step-4
Once you have done with the periods allocation you can assign faculty for each period.

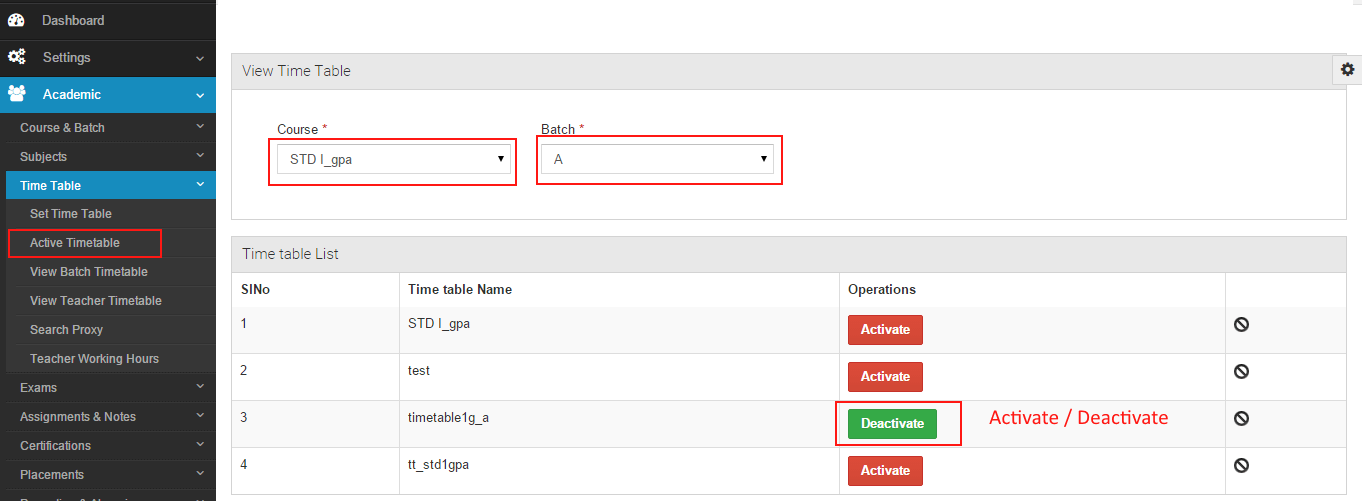
3.2.4.2 Active Timetable
Here you can set the Active timetable for a batch.
You can create multiple timetables for same batch and can use this module to set the current
active time table for the batch. Please not that at a time only one time table should be active in-order to avoid conflicts.
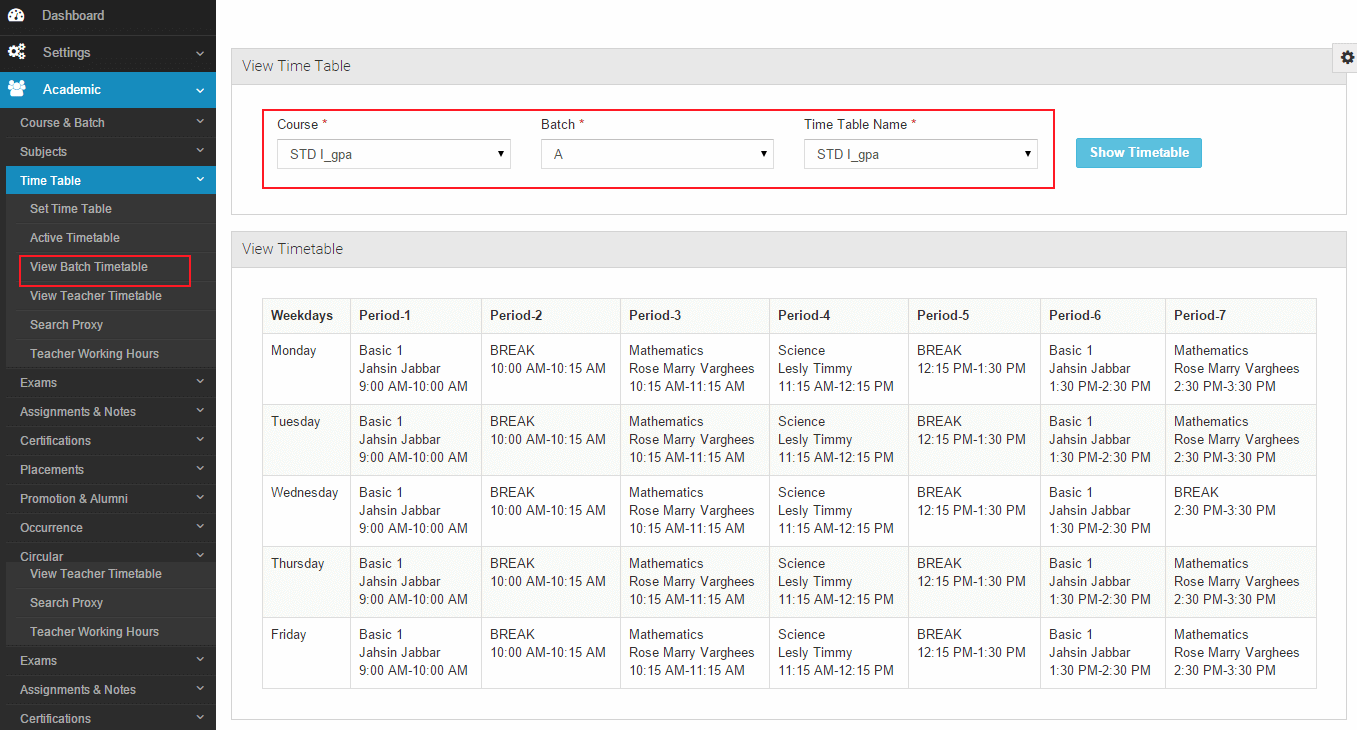
3.2.4.3 View Batch Timetable
Here you can view the batch timetable you have created.
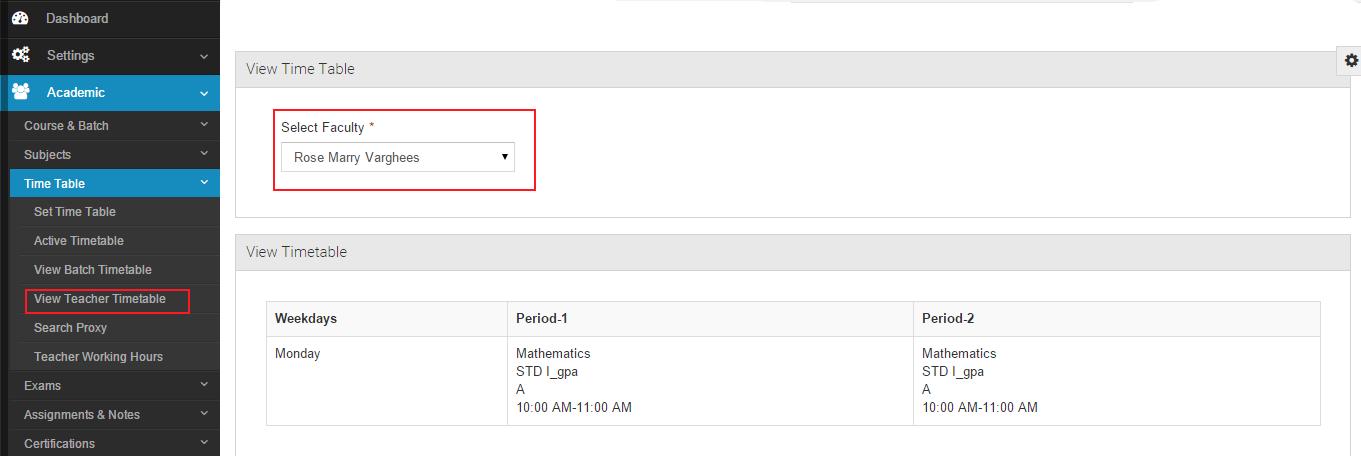
3.2.4.4 View Teacher Timetable
Here you can View the teachers timetable.
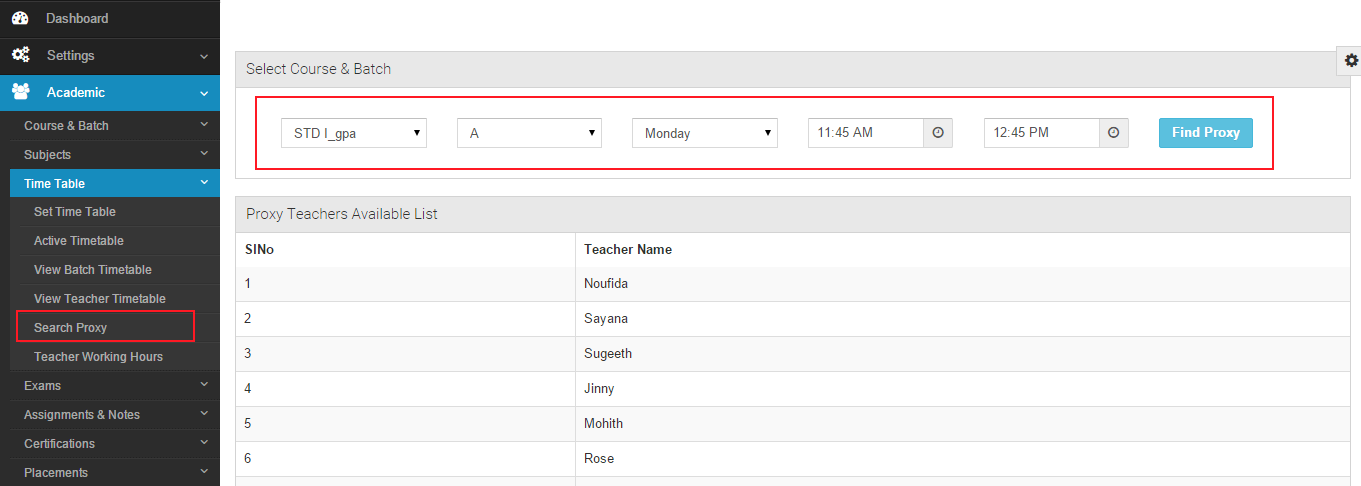
3.2.4.5 Search Proxy
This module will help you to find proxy teachers for a particular time period.
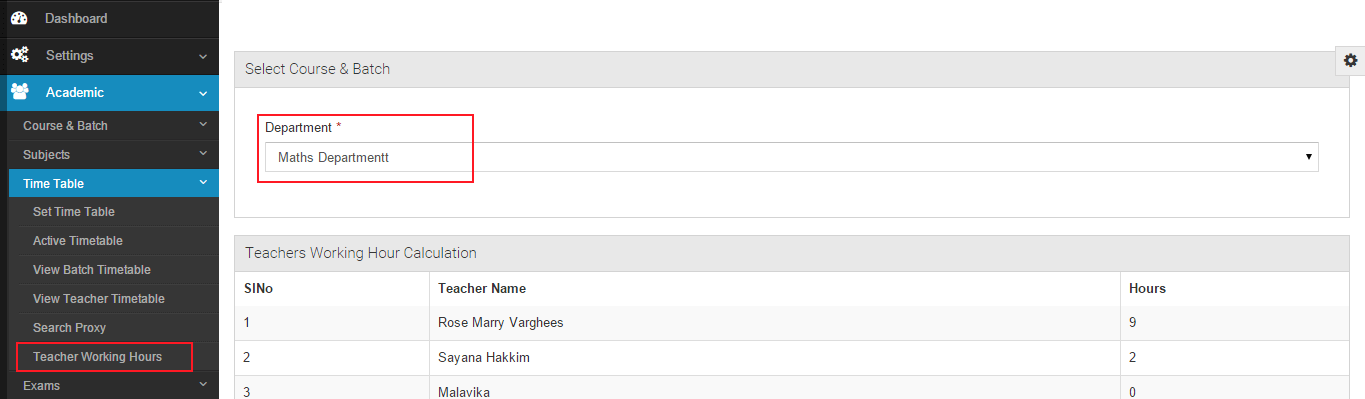
3.2.4.6 Teacher Working Hours
Helps you to calculate the working hours for teachers.
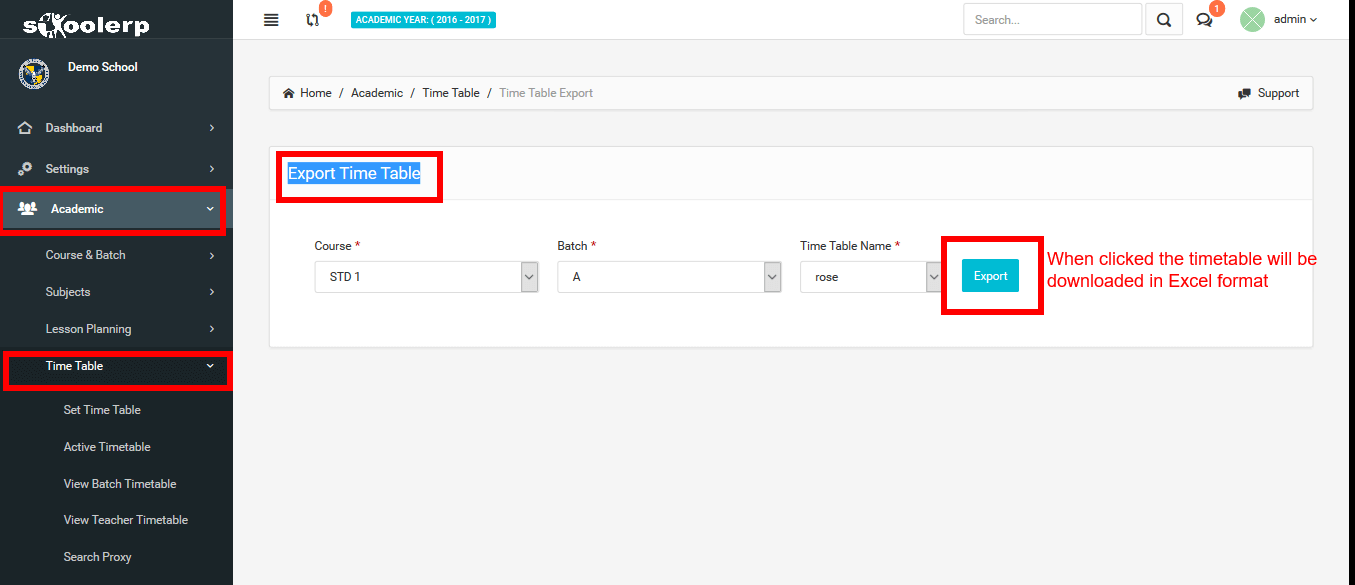
3.2.4.7Timetable Export
The timetable can be exported in Excel format for viewing and managing.
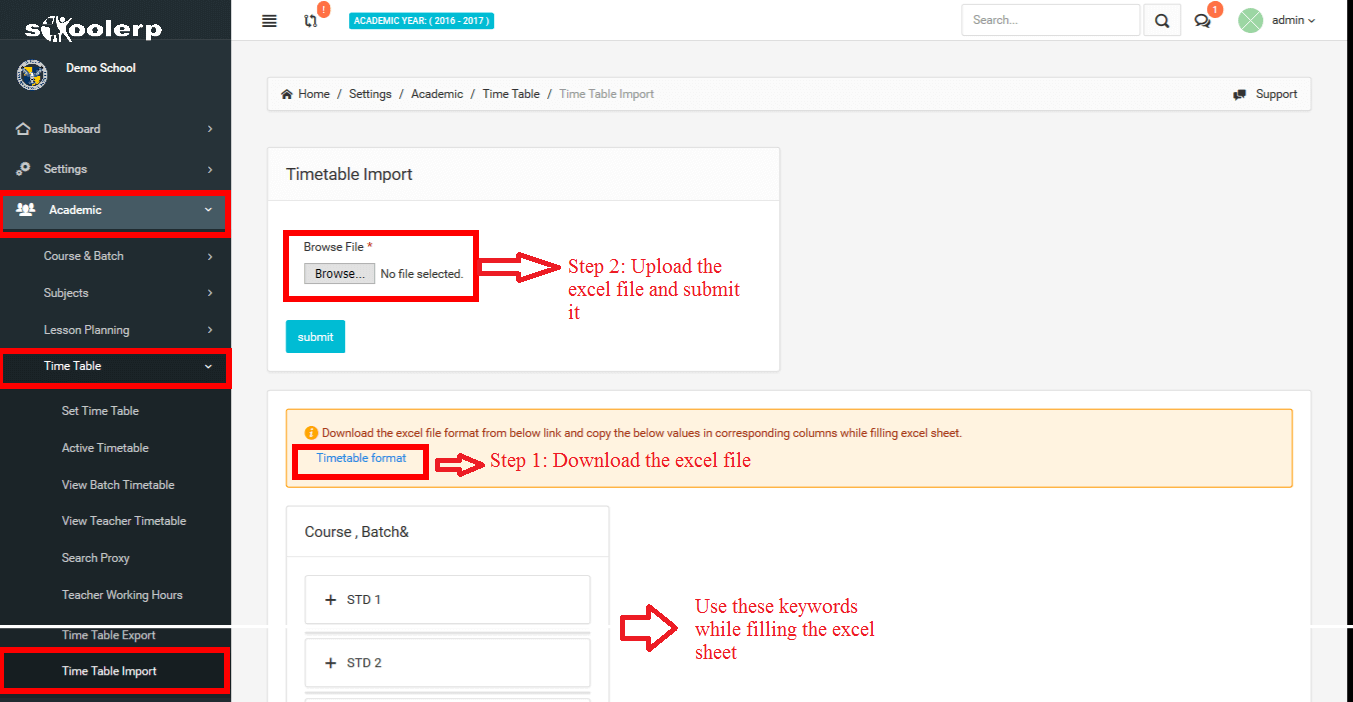
3.2.4.8Timetable Import
Here you can upload the details of the timetable. For this, first you need to download the Timetable excel format from the provided link and fill the excel sheet by copying the below values in corresponding columns. After filling the excel sheet, you can upload it.
3.2.5 Exams
Under this module you can create Timetable for Batches.
3.2.5.1 GPA
You can configure the GPA Grading from here.
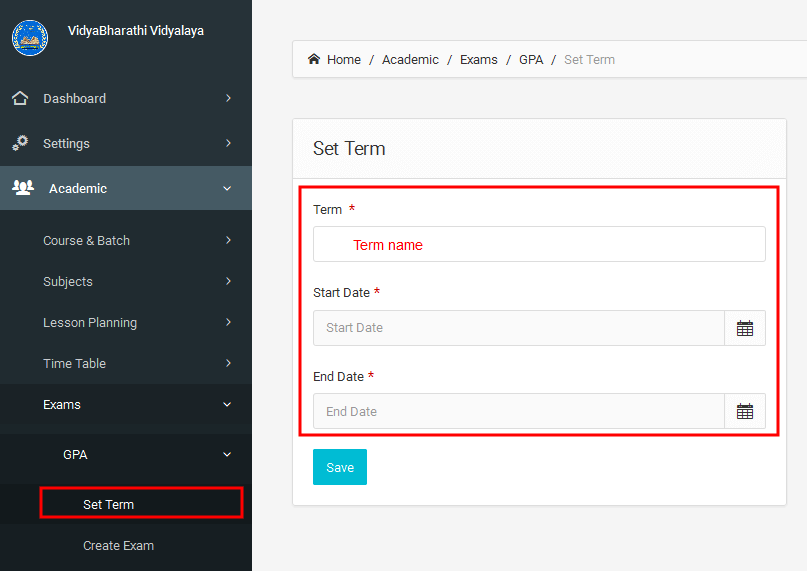
3.2.5.1.1 Set term
From here you can set up the terms for the academic year.(for ex: Term-1, Term-2, etc...)
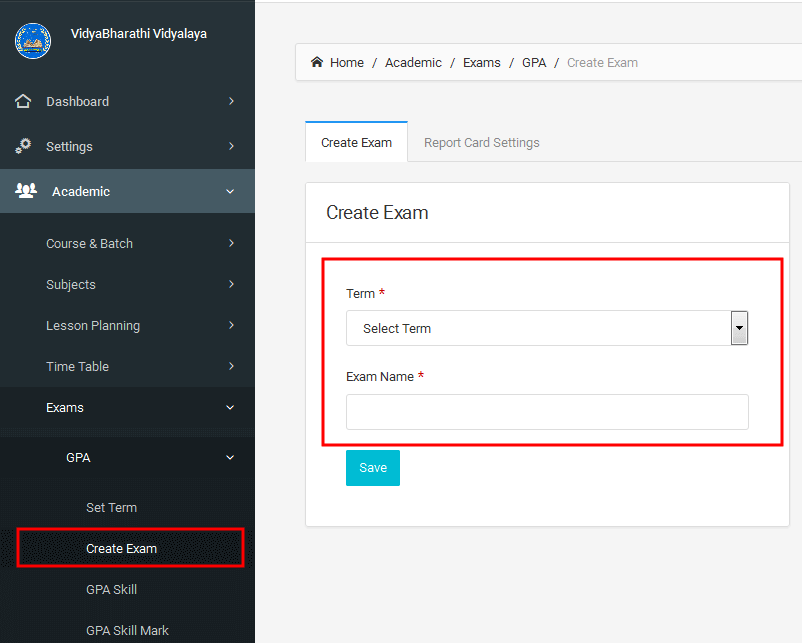
3.2.5.1.2 Create exam
Here you can set up the exams under terms you have created.
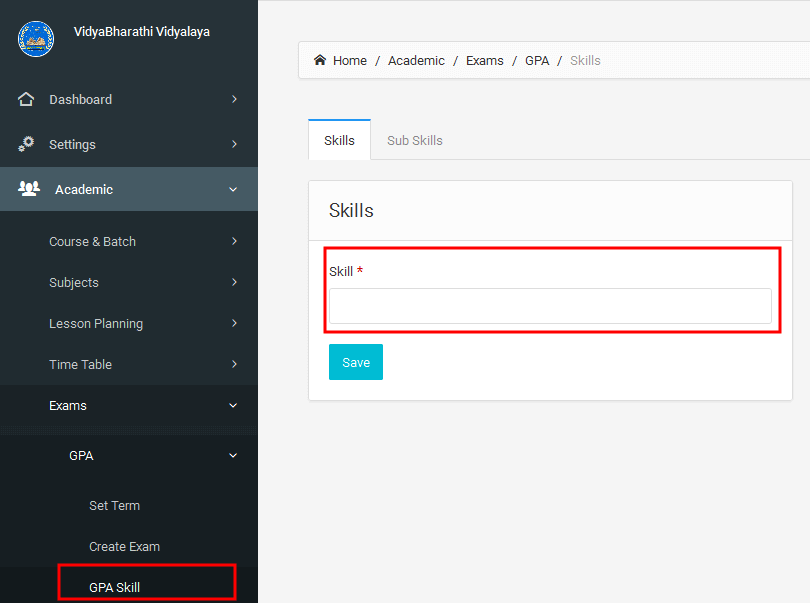
3.2.5.1.3 GPA Skill
Here you can add the skills required for GPA calculation.
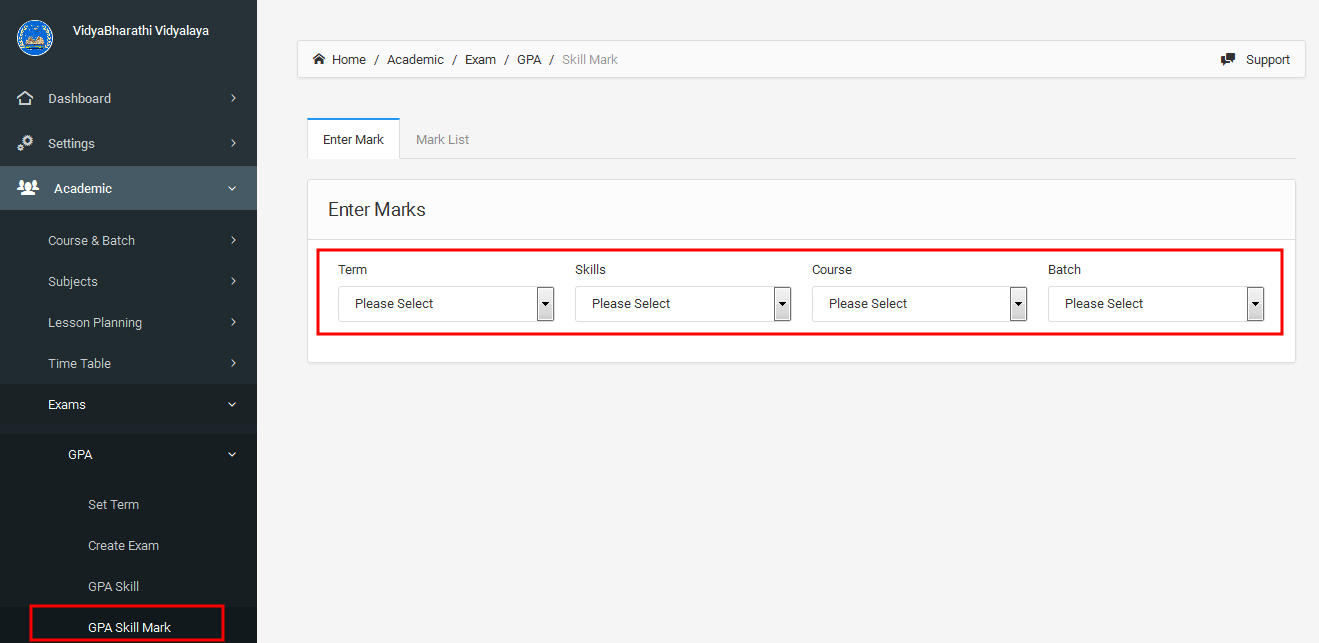
3.2.5.1.4 GPA Skill Mark
Here you can enter marks for the GPA skills you created.
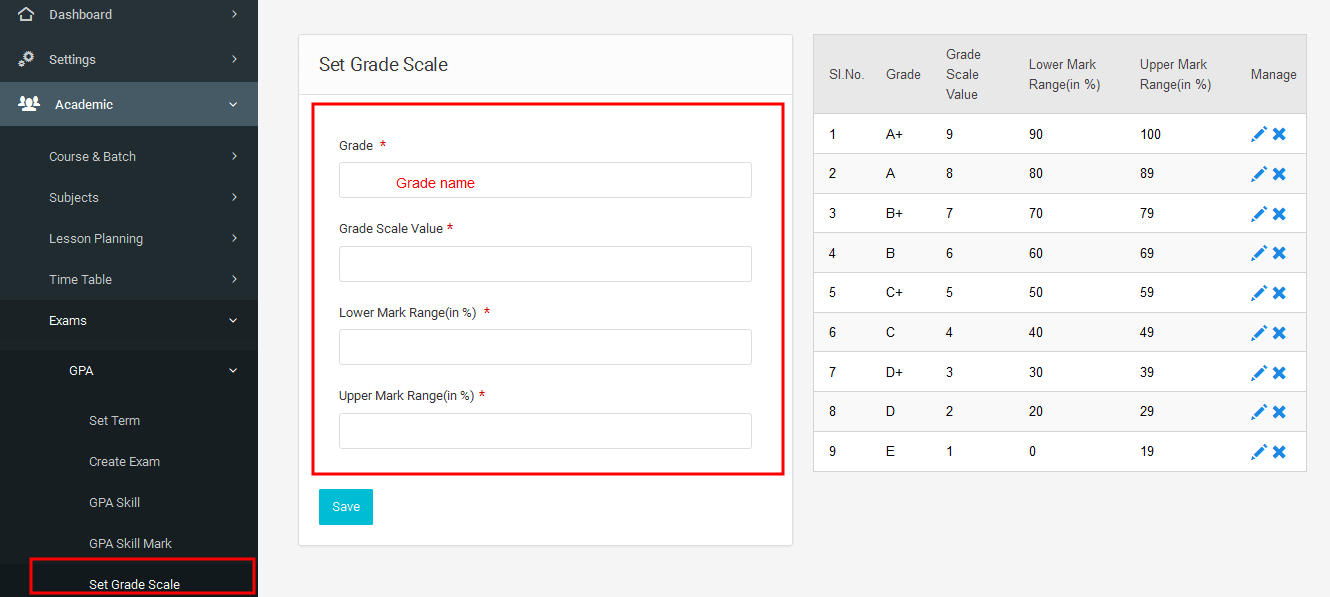
3.2.5.1.5 Set grade scale
Set the Grade scale for the exams, Specify the upper and lower range for each grades.
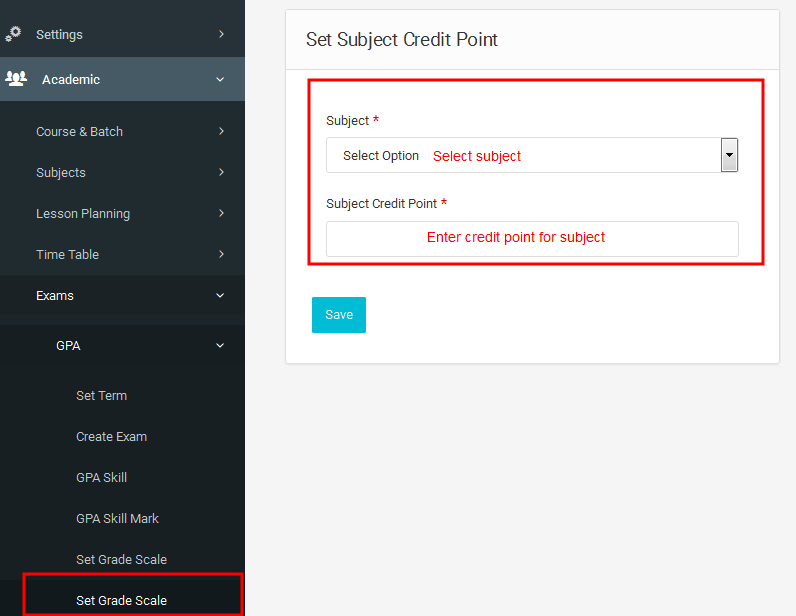
3.2.5.1.6 Set subject credit point
You can set up the credit point for each subject from here.
3.2.5.1.7 Total mark %
Under this module you can mention the weightage given to the written exam and the Assessment exam.

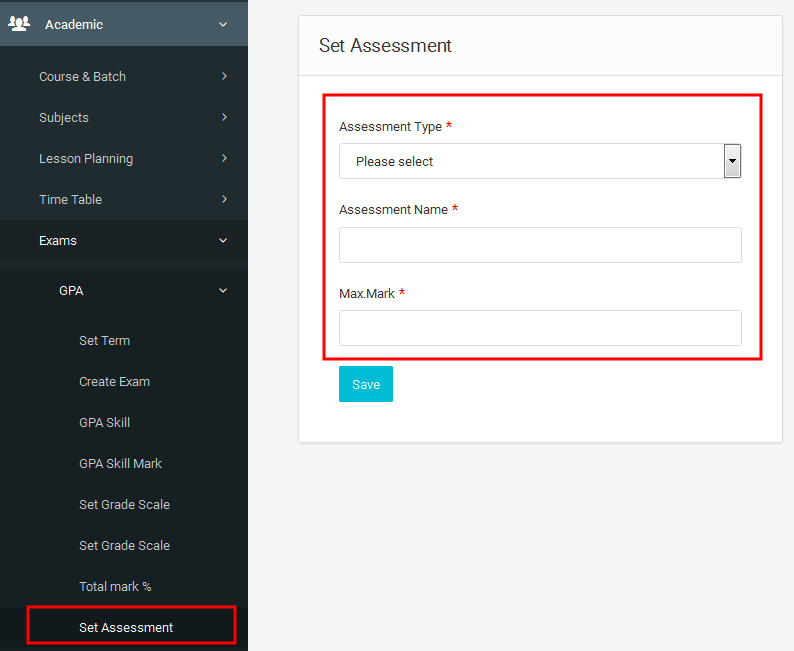
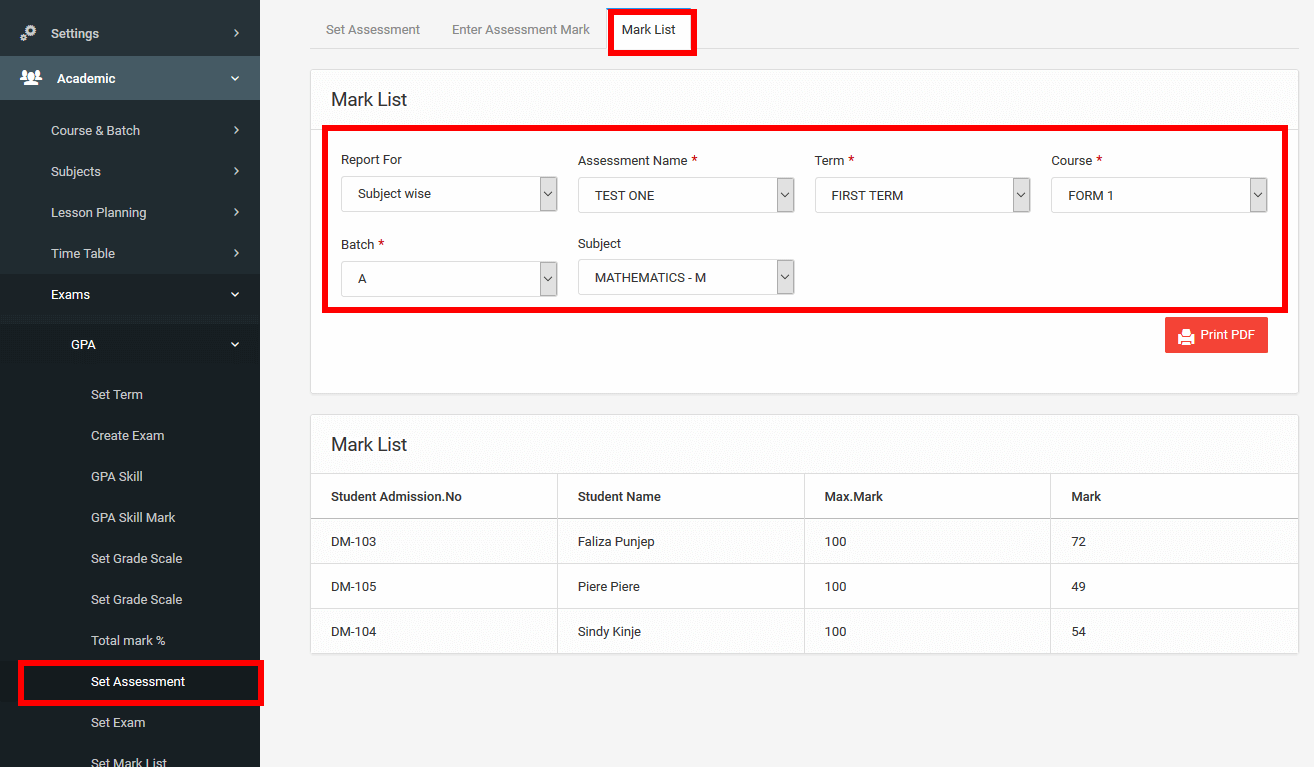
3.2.5.1.8 Set assessment
This module will help us to create assessment .
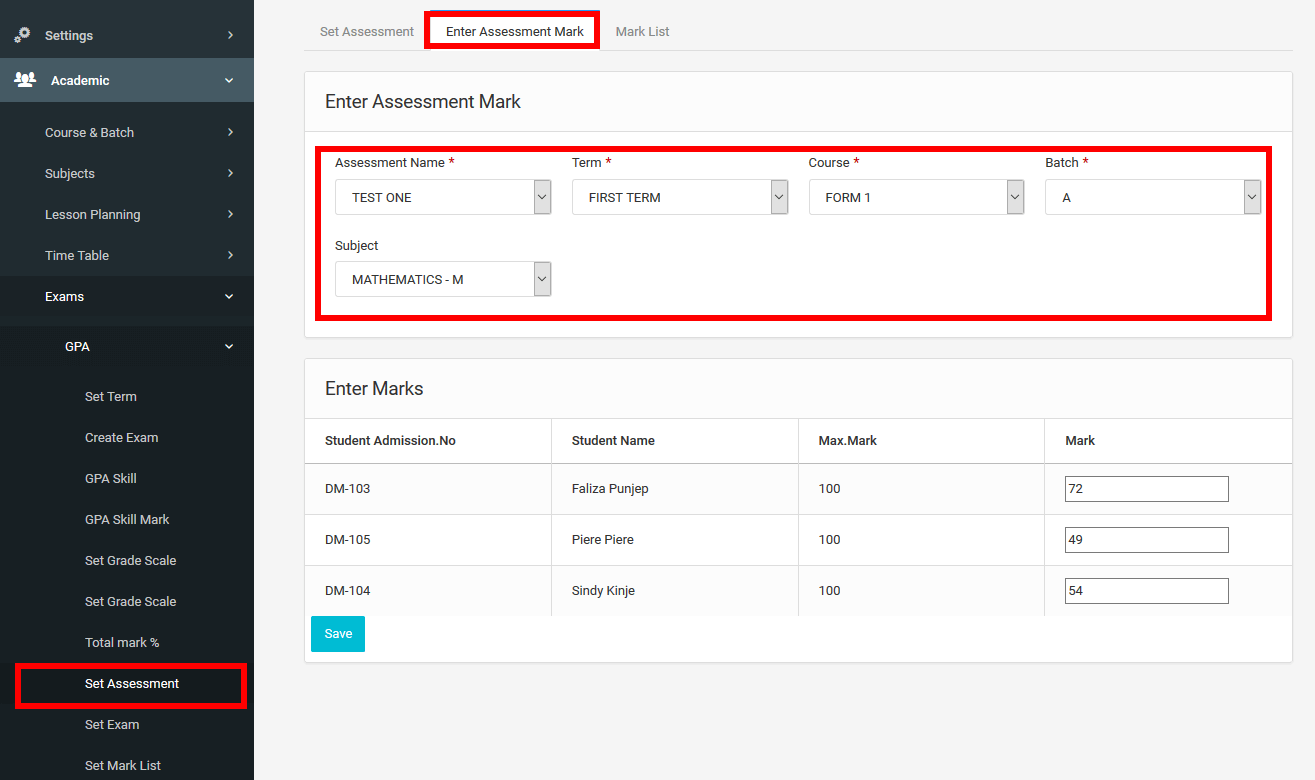
Here we can enter the assessment marks for the students from the selected batch.
Here we can generate mark list in subject wise or in student wise.
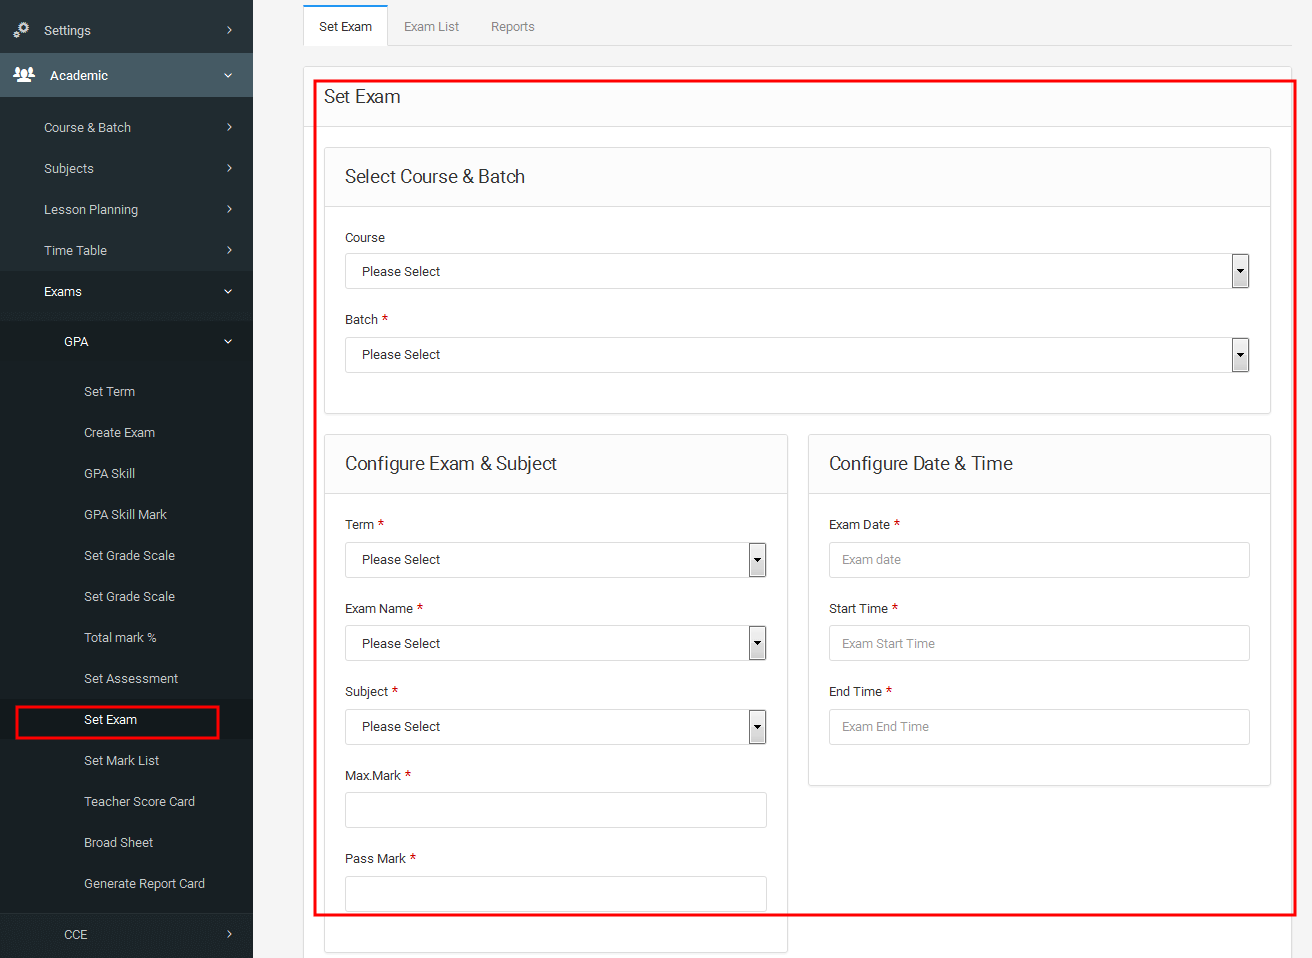
3.2.5.1.9Set Exam
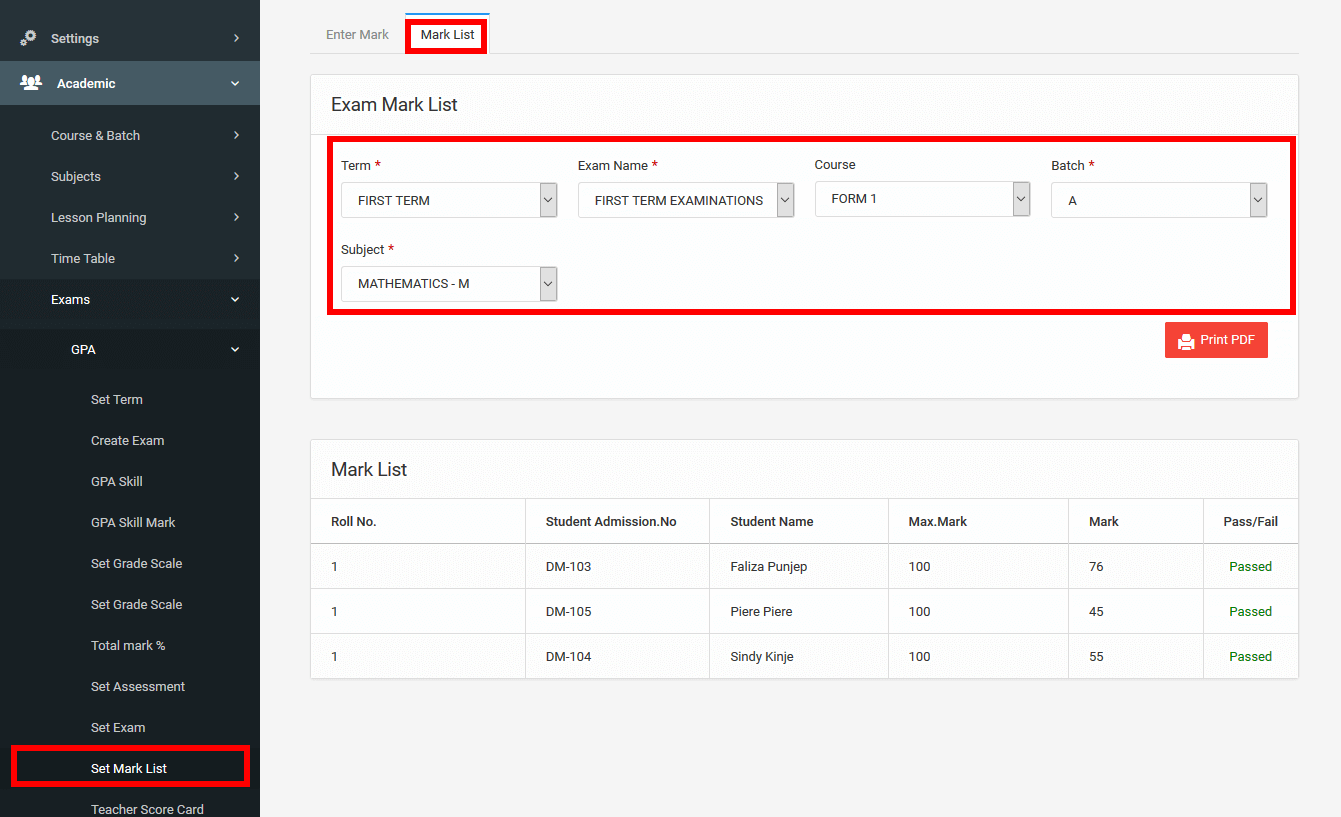
3.2.5.1.10 Set Mark List
Here we can enter subject wise marks for each student.
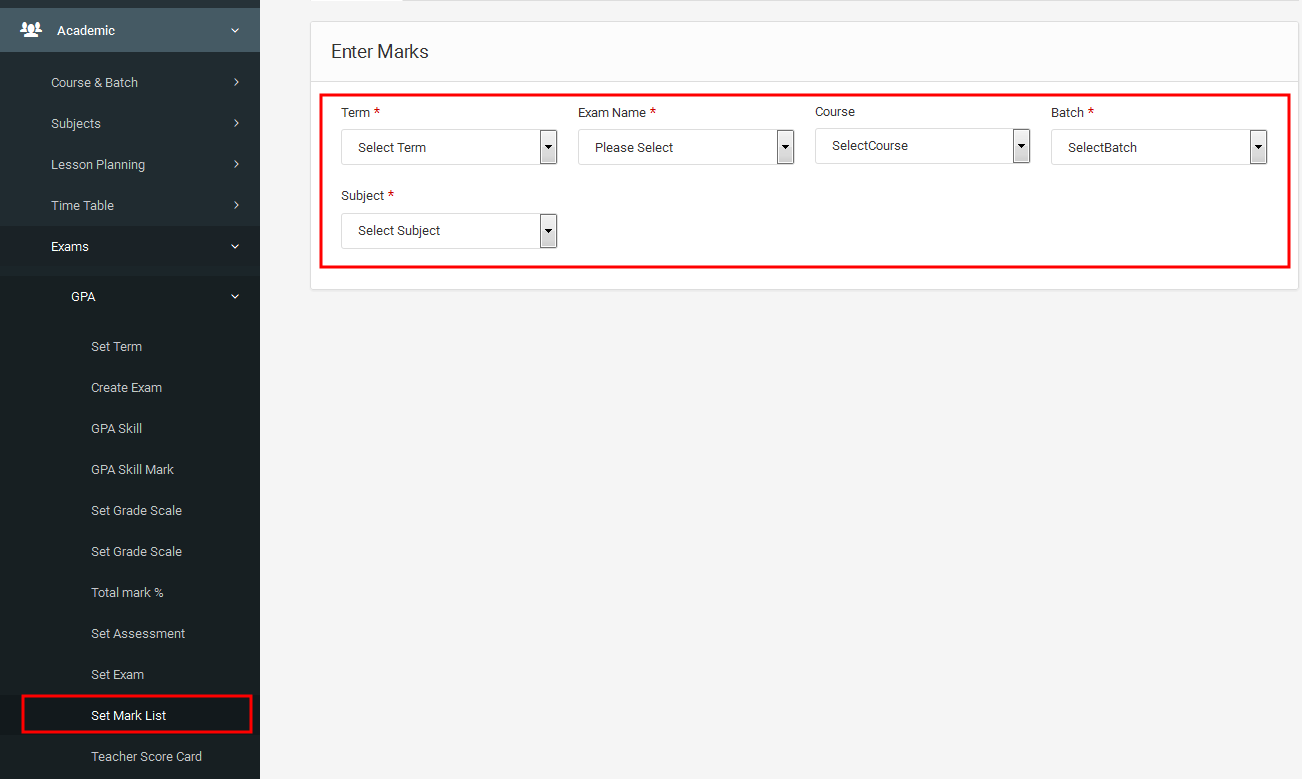
We can generate subject wise mark list for each student..
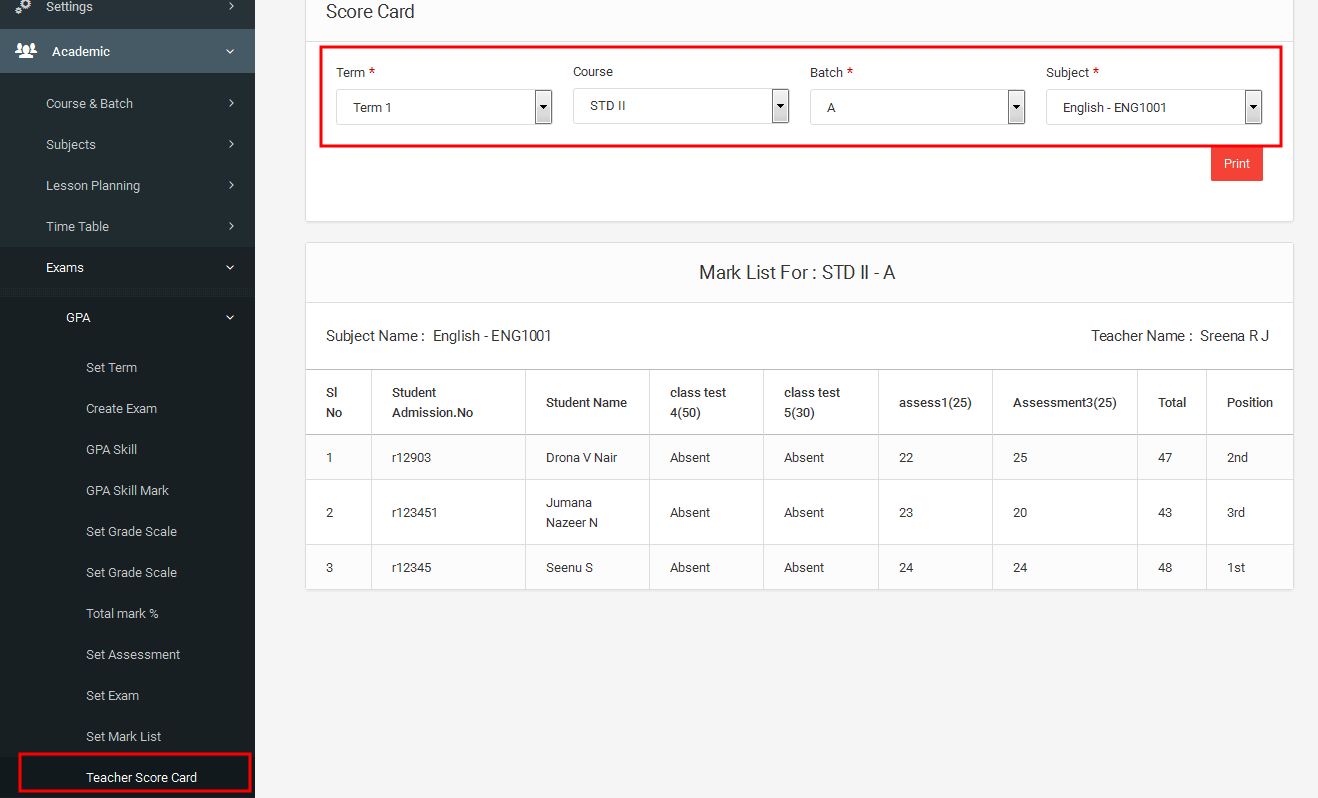
3.2.5.1.11Teacher Score Card
Here we can see the subject wise marks of students given by the subject teacher .
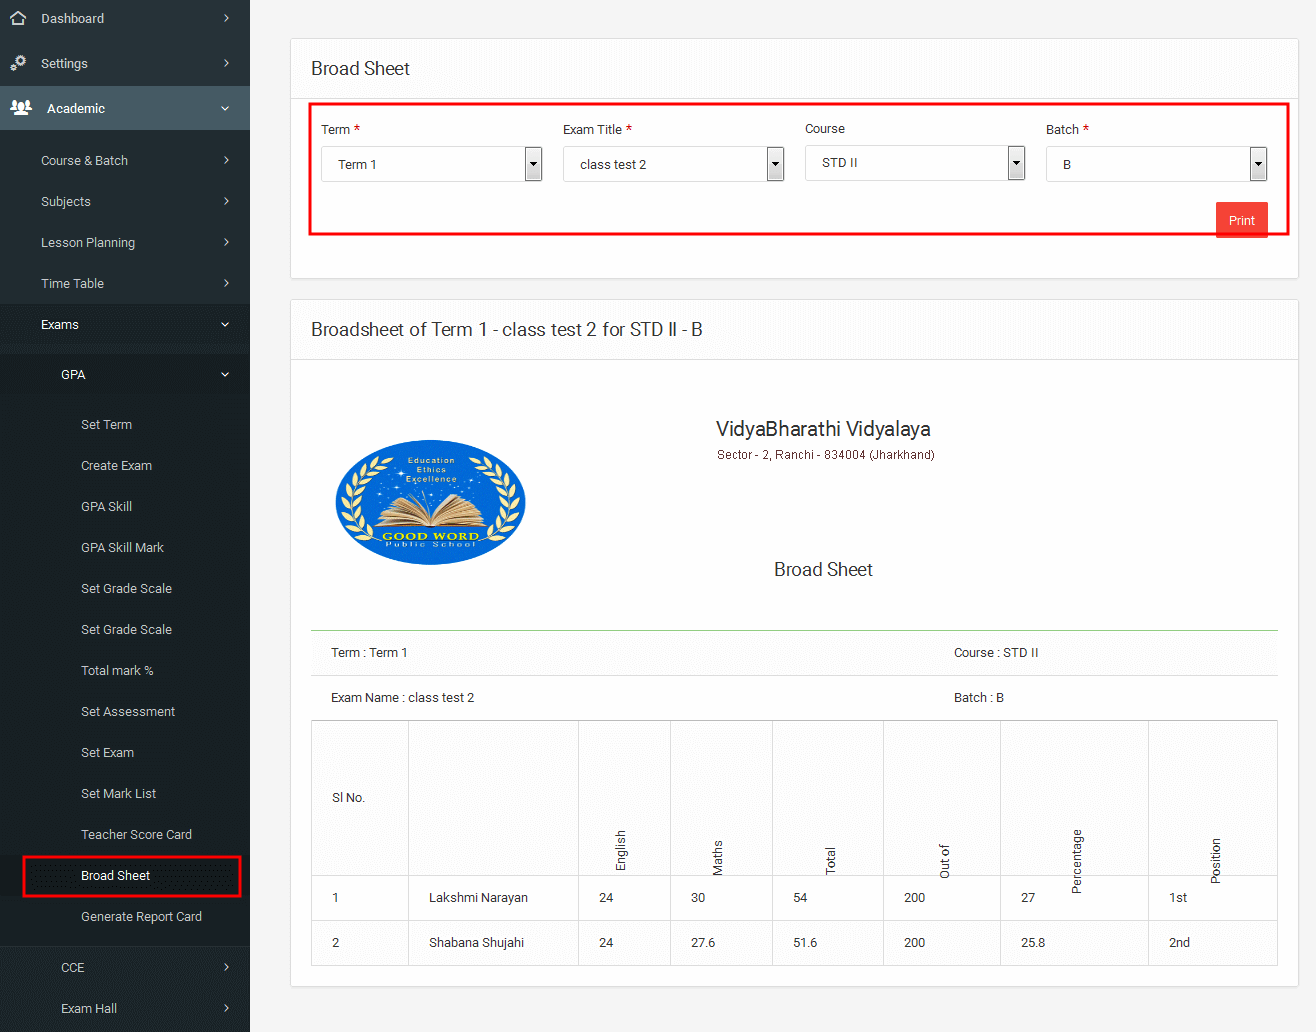
3.2.5.1.12 Broad sheet
Here you can generate Exam scorecard reports of the selected batch.
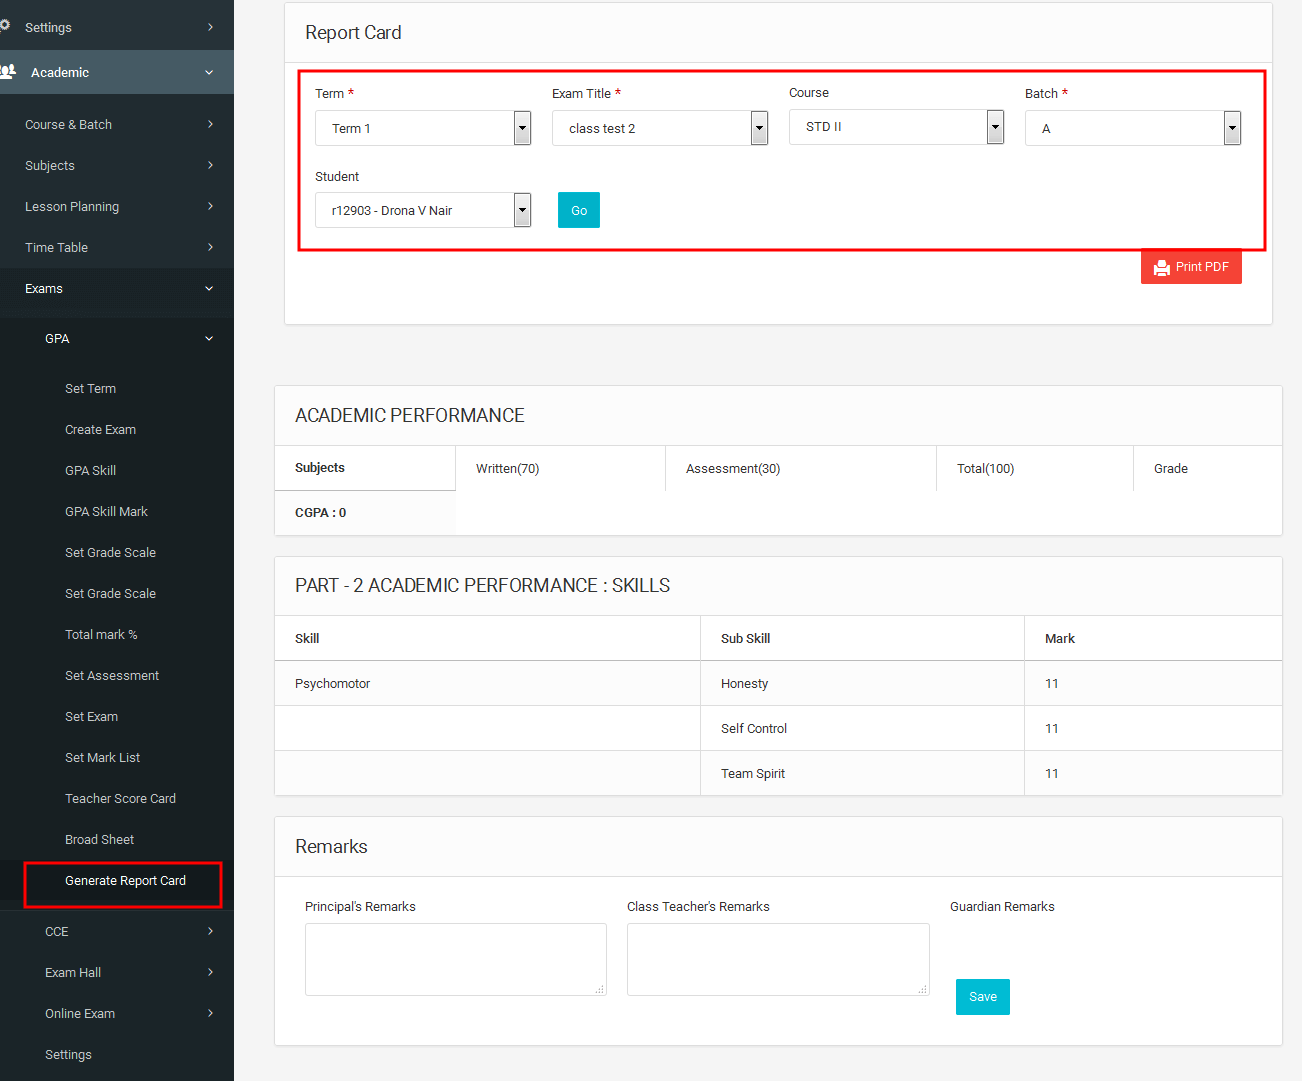
3.2.5.1.13 Generate report card
From here we can generate report card for the selected student.
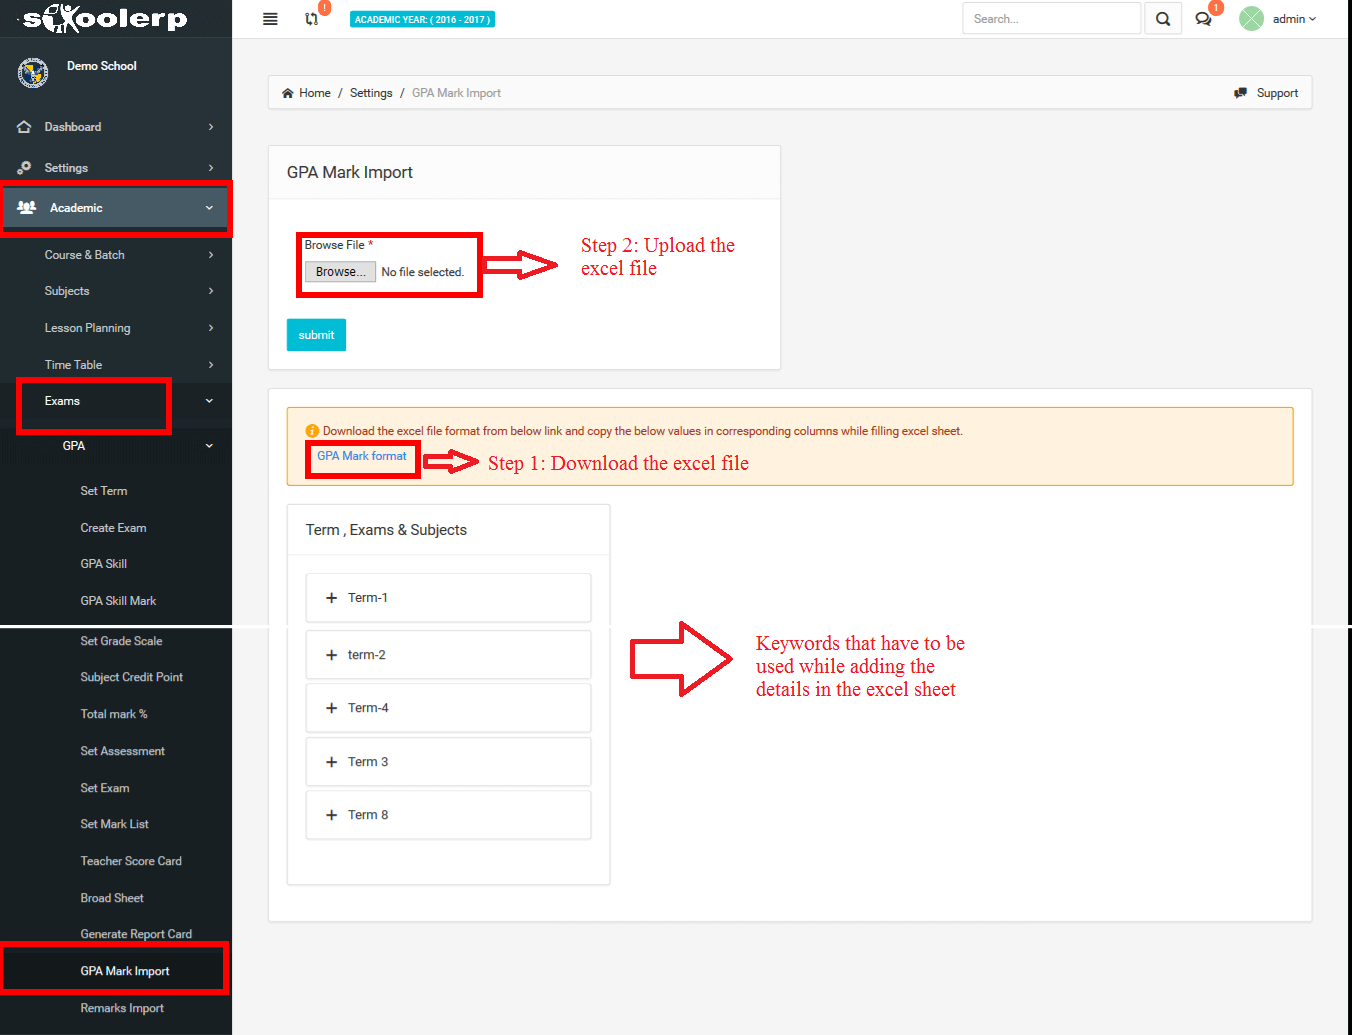
3.2.5.1.14GPA Mark Import
In GPA Mark Import, one can add mark details of a particular course & batch by downloading the excel file and adding the details according to the keywords provided in the bottom of the same page.
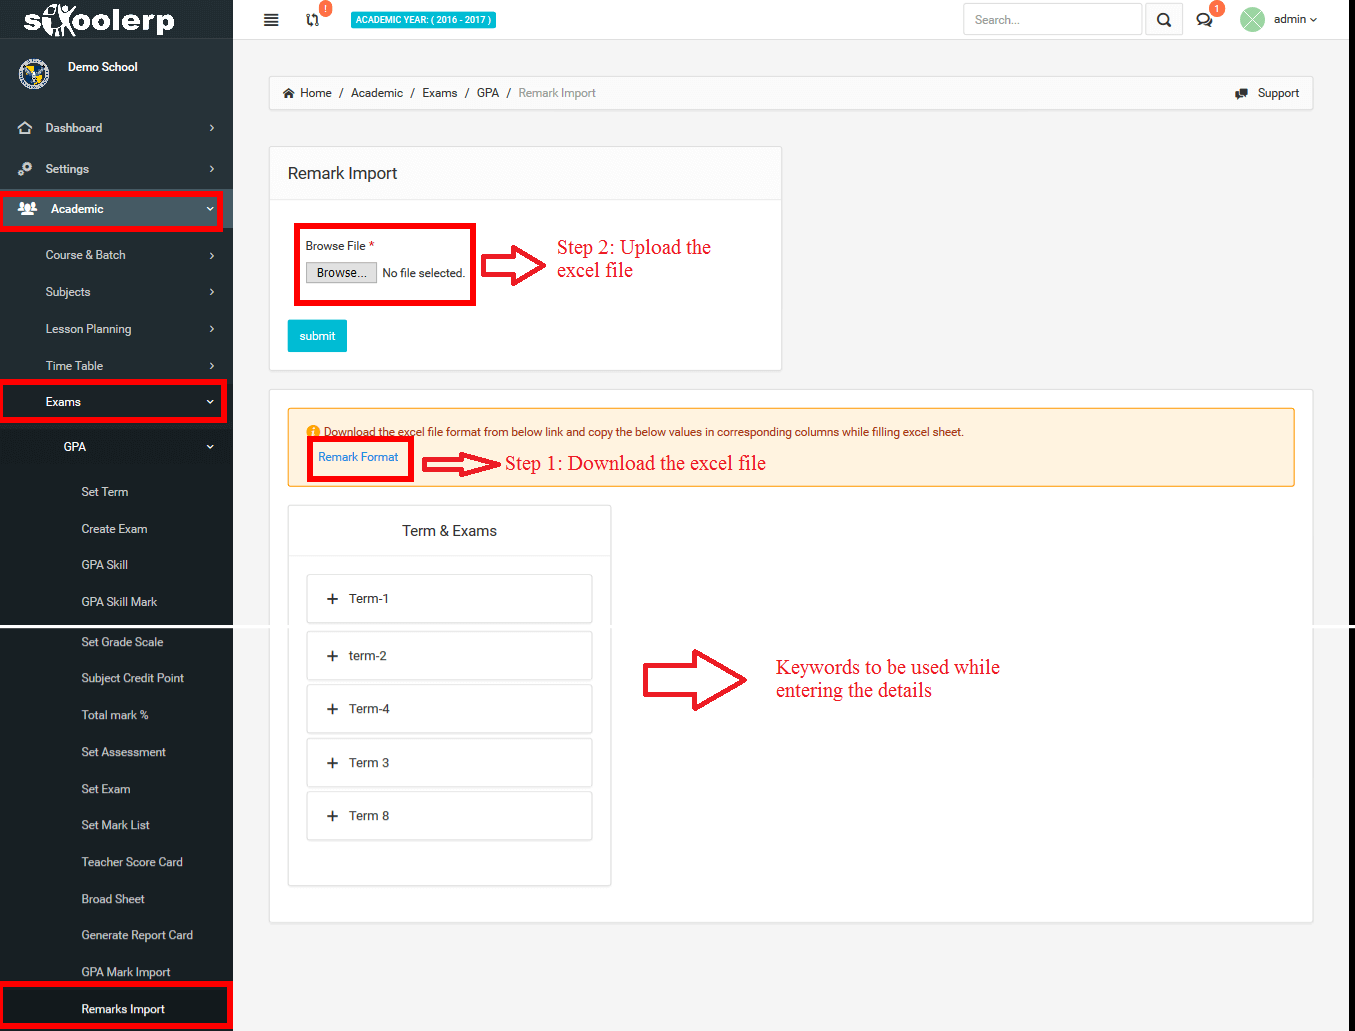
3.2.5.1.15Remarks import
In GPA Remarks Import, one can add remarks details of a particular course & batch by downloading the excel file and adding the details according to the keywords provided in the bottom of the same page.
3.2.5.2 CCE
Continuous and Comprehensive Evaluation
3.2.5.2.1 Initial Settings
This module will help you to find proxy teachers for a particular time period.
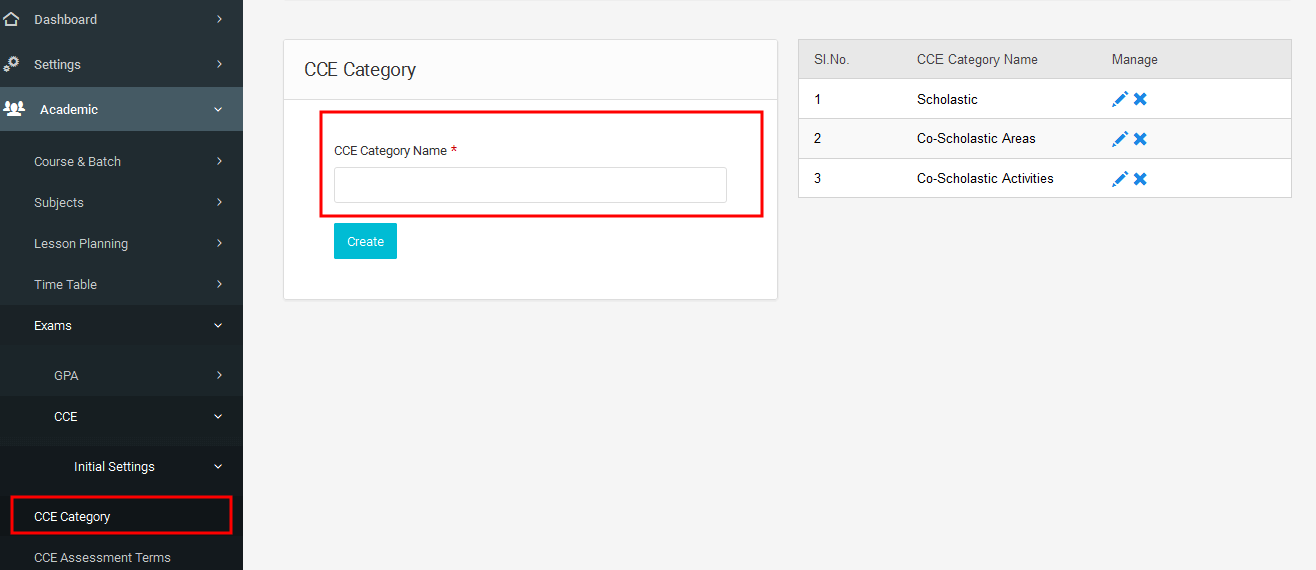
3.2.5.2.1.1 CCE Category
CCE covers both scholastic subjects as well as co-scholastic areas such as performance in
sports, arts, cultural activities and social equality. CCE category defines what are the areas used to
evaluate the students.
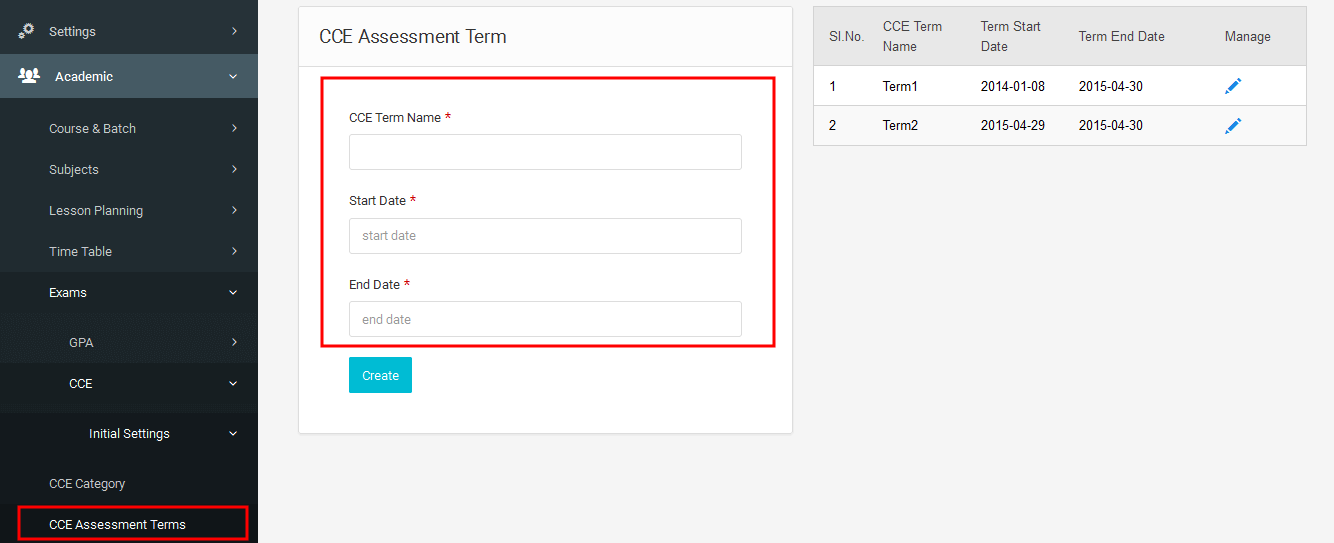
3.2.5.2.1.2 CCE Assessment Terms
CCE assessment terms define the division of the academic year. Typically CCE has two terms, namely term-1 and term-2
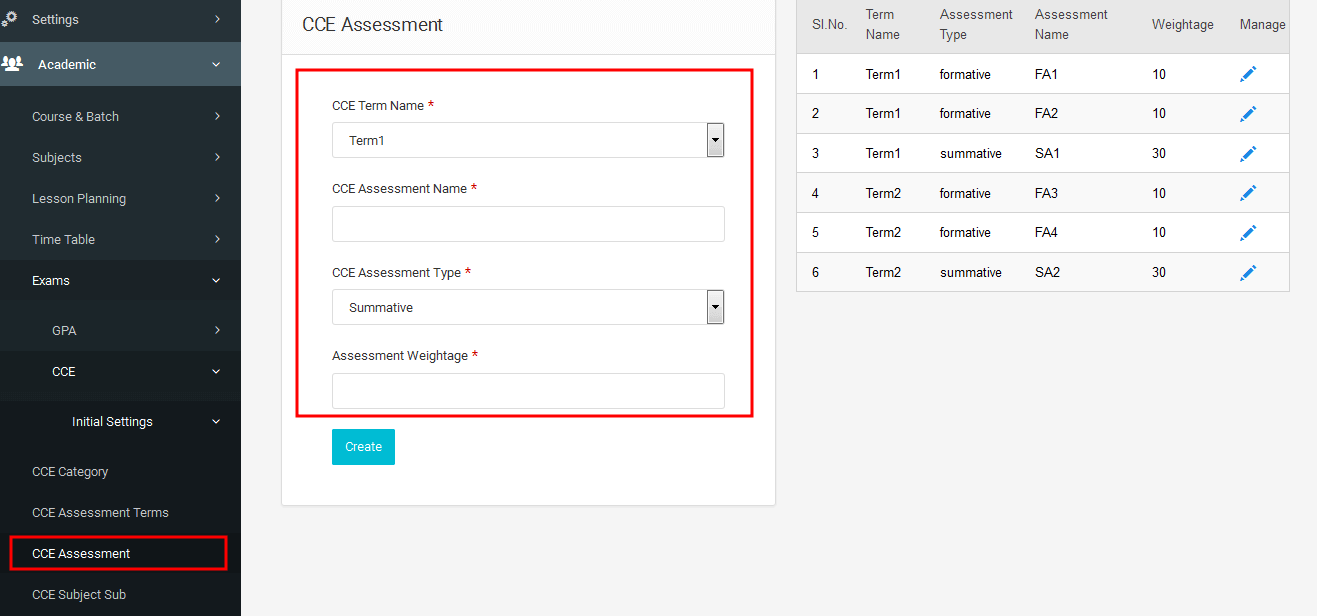
3.2.5.2.1.3 CCE Assessments
CCE assessments indicate how many assessments are there in each term for scholastic area and whether the
assessments are formative or summative.It also includes the weightage for each assessment.
Typically CCE has 2 formative assessments and one summative assessment in each term.
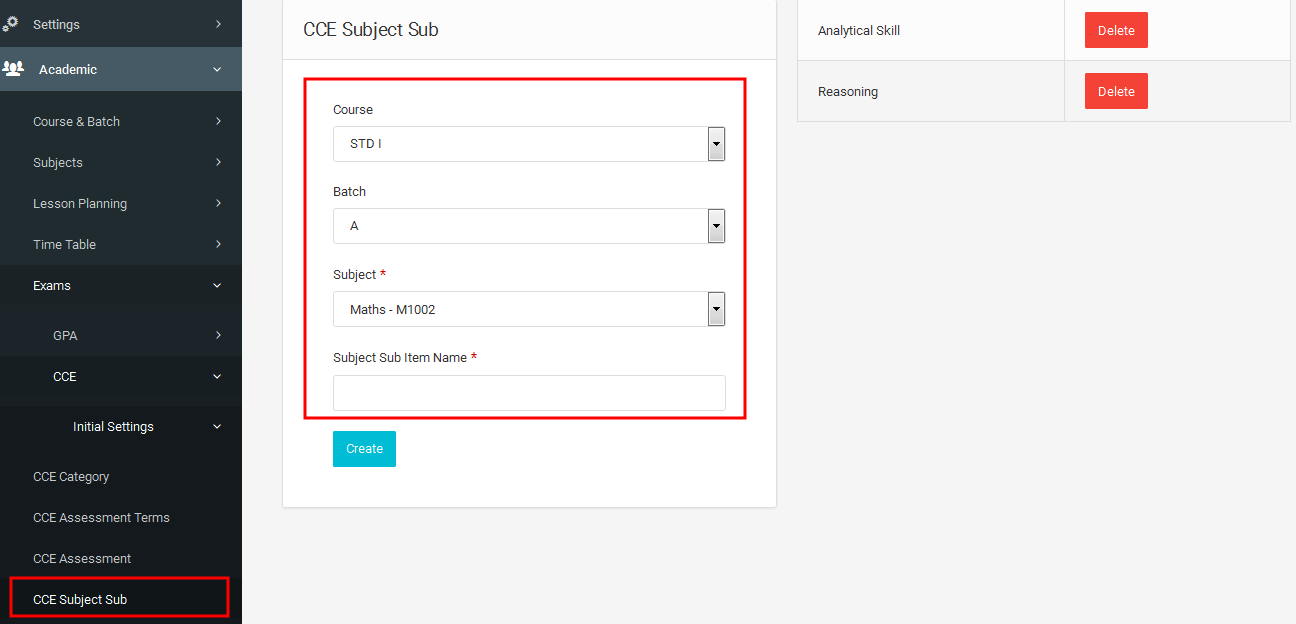
3.2.5.2.1.4 CCE Subject Sub
CCE subject sub defines the subdivision of subjects. And there should be at least one subdivision for each subject.
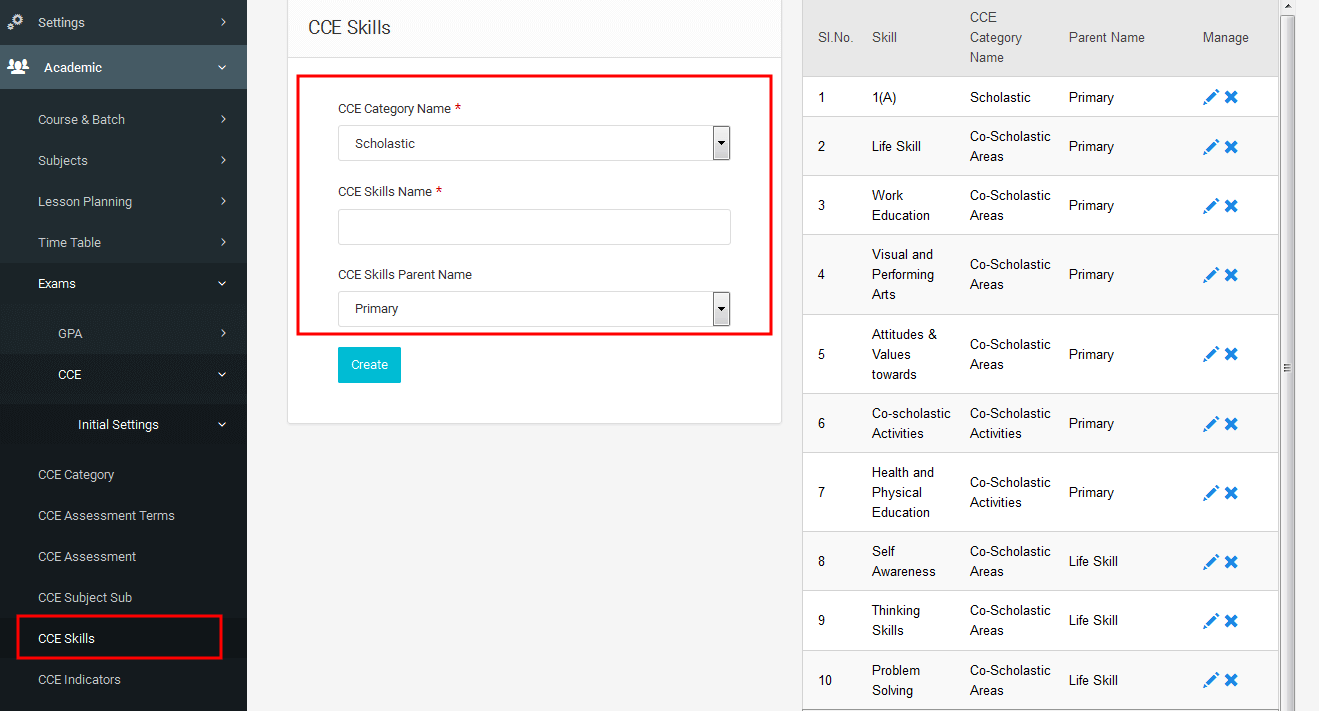
3.2.5.2.1.5 CCE Skills
The CCE skill name contains the division for co-scholastic areas.
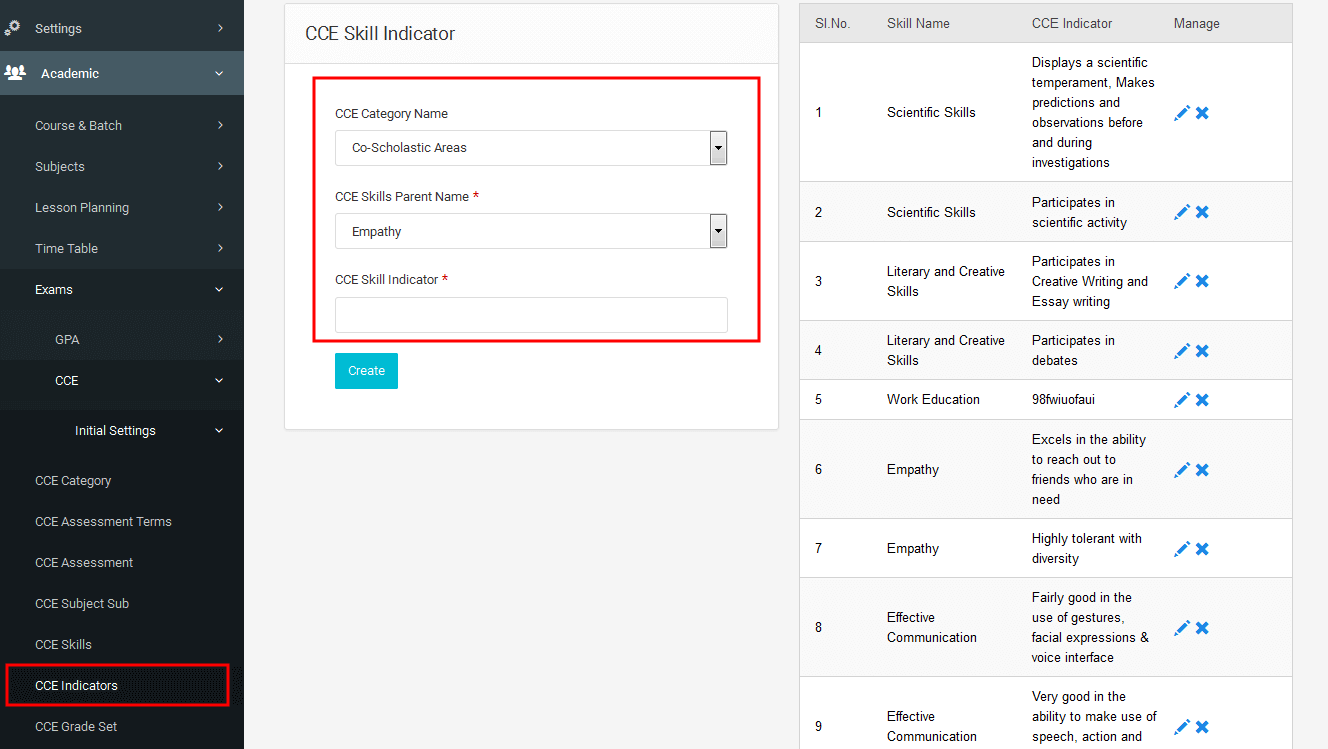
3.2.5.2.1.6 CCE Indicators
CCE indicators are used to specifying indicators for the concerned skill.
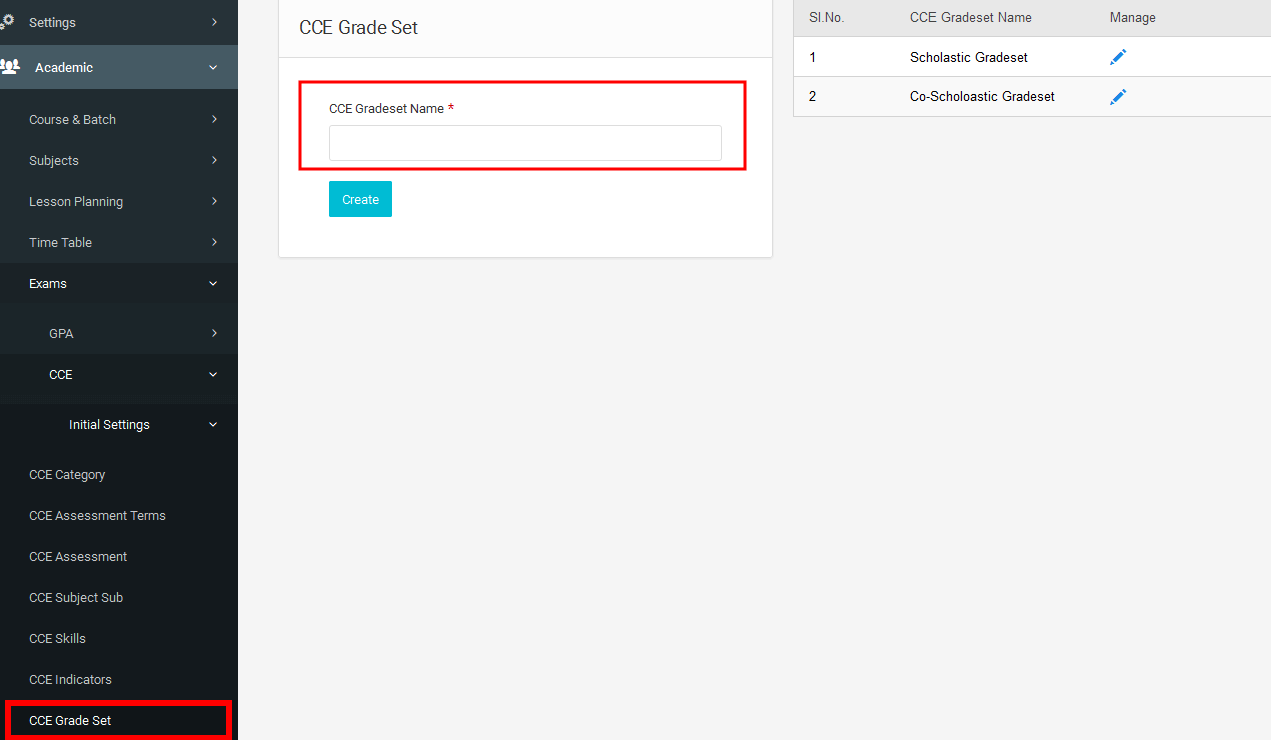
3.2.5.2.1.7 CCE Grade Set
Grade-sets are used to define a name for set of grades. It is like a package of grade and this
set can be assigned to various skill for further evaluation process.
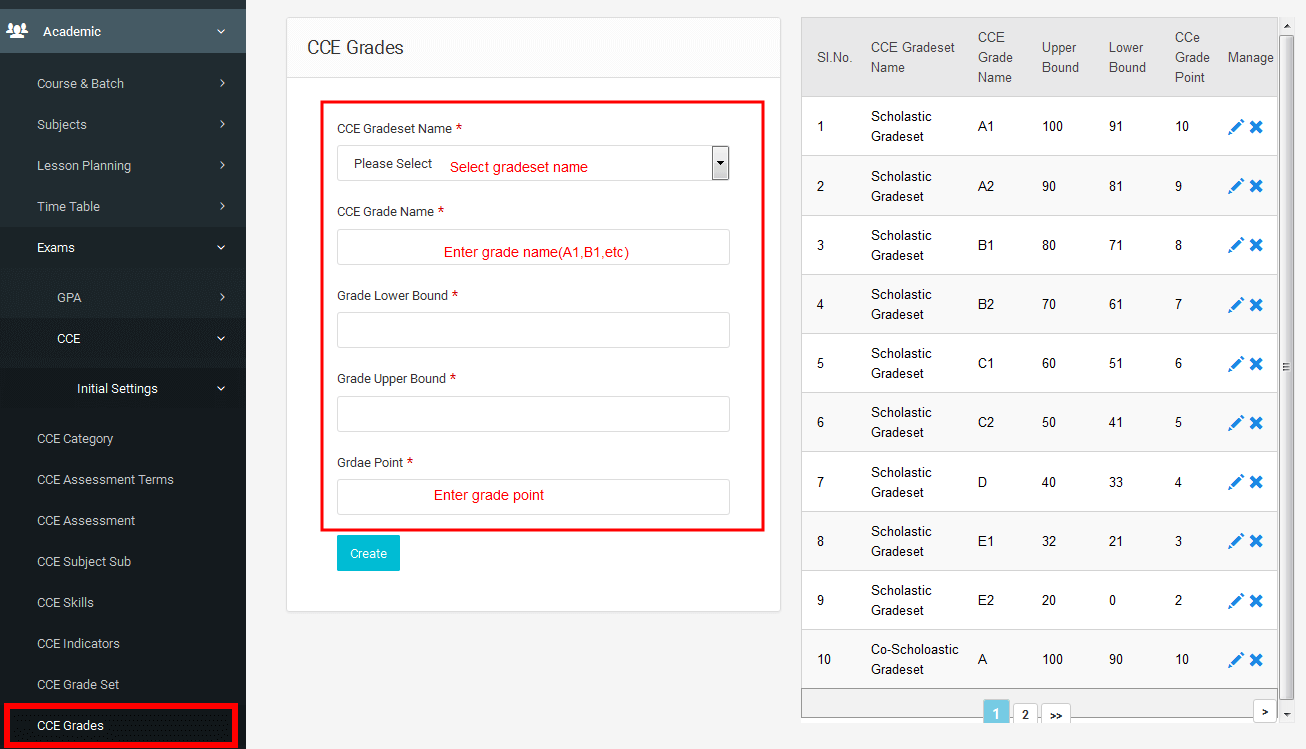
3.2.5.2.1.8 CCE Grades
Set the Grade scale for the exams, Specify the upper and lower range for each grades.
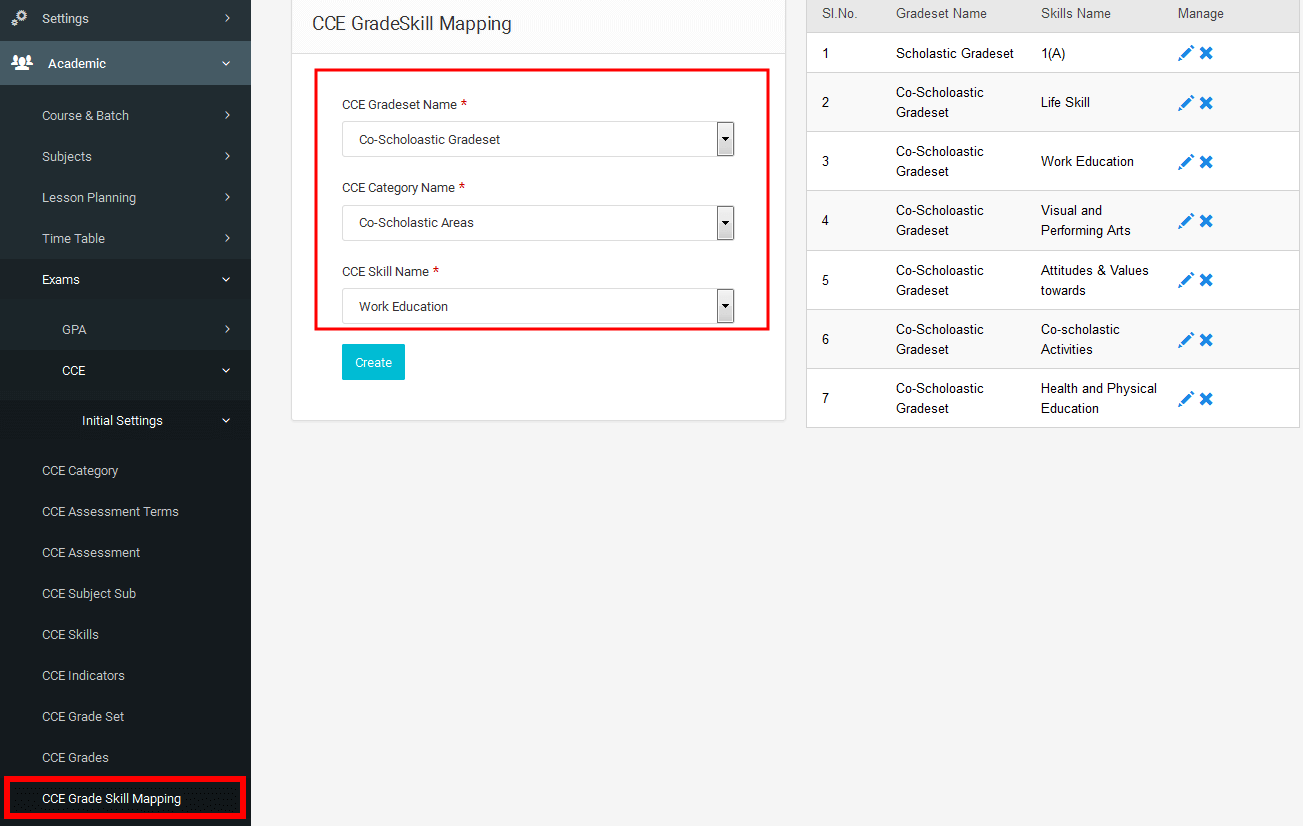
3.2.5.2.1.9 CCE Grade Skill Mapping
CCE grade skill mapping maps each garde-set to skills for using grades in evaluation process.
You can select each grade set and corresponding skills from the drop down given.
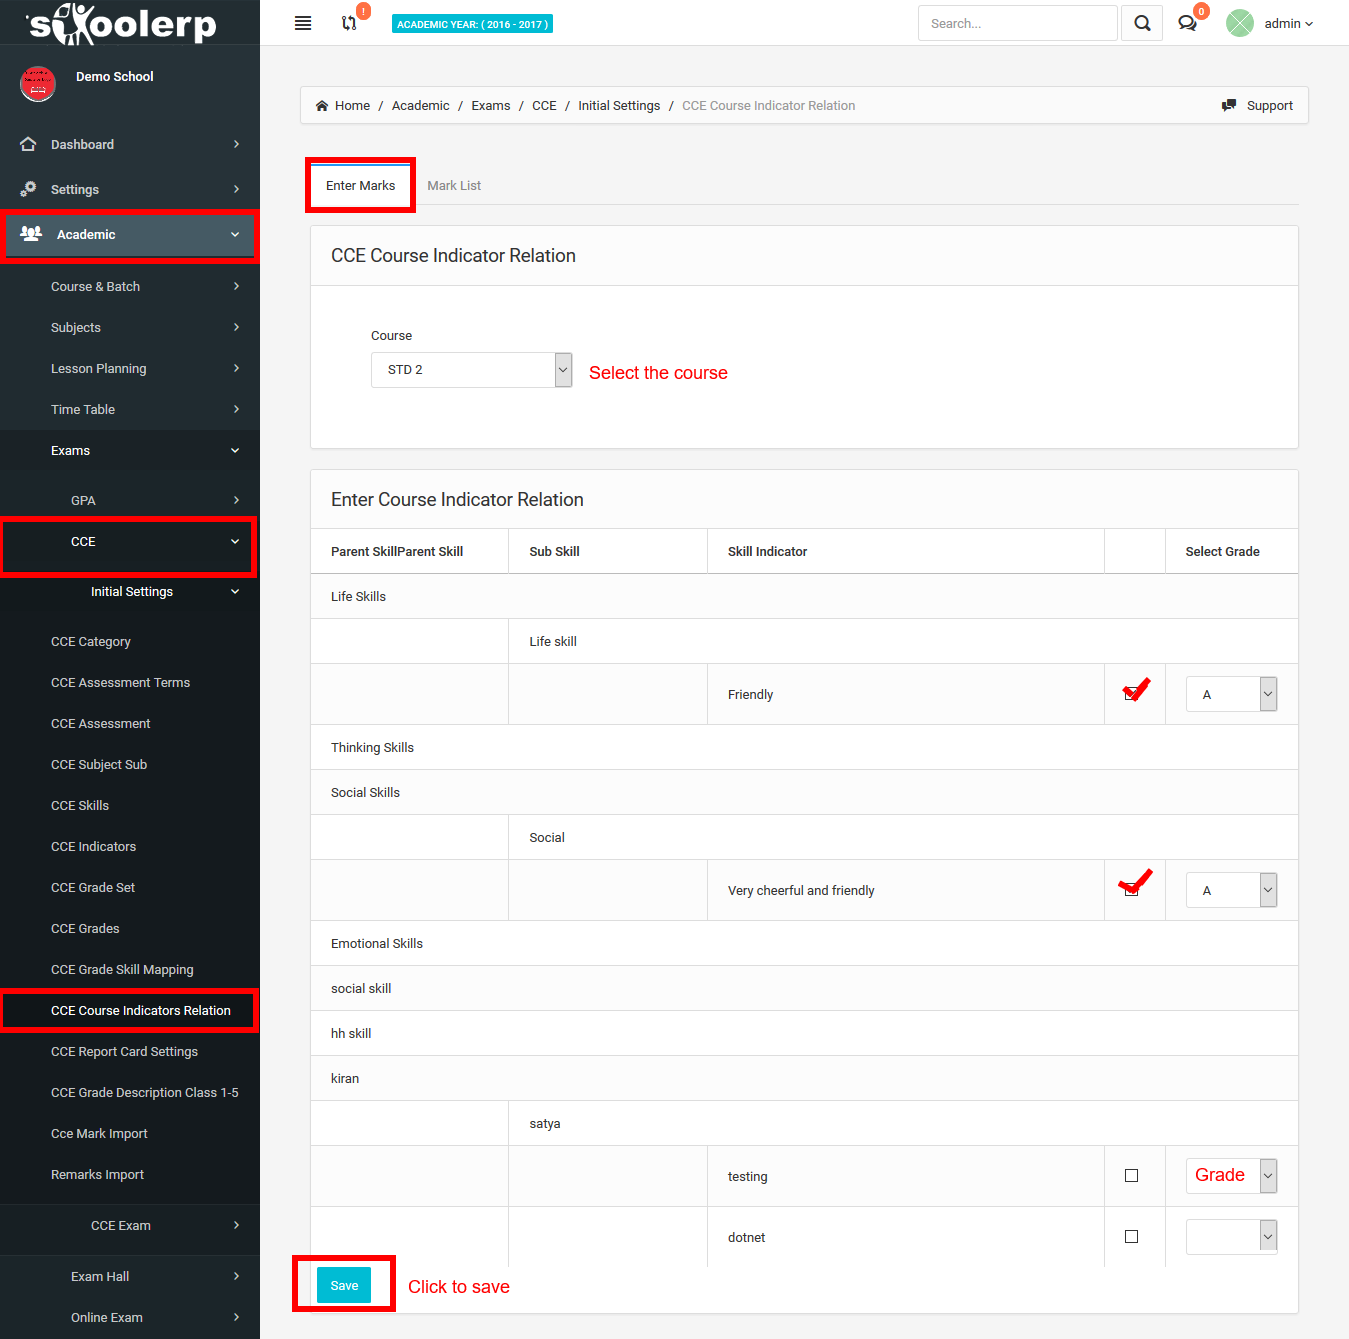
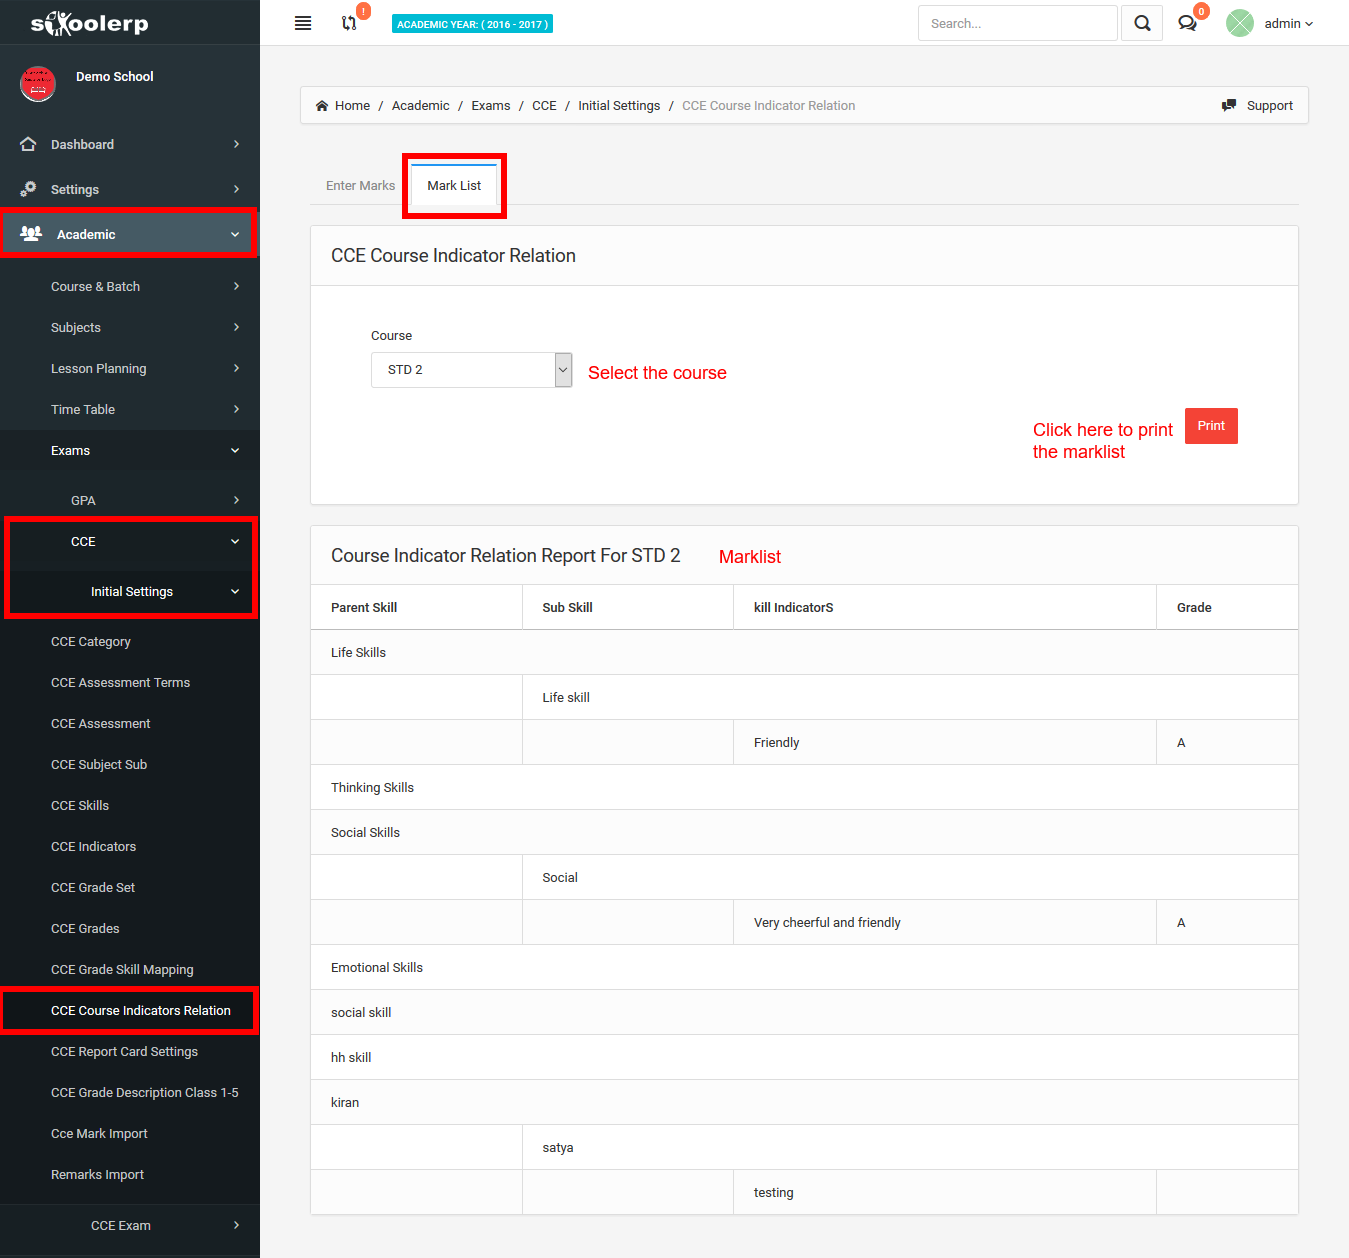
3.2.5.2.1.10 CCE Course Indicators Relation
CCE Course Indicators Relation is a module in the CCE that is meant for mapping the indicators for course and grading different skills for courses.
3.2.5.2.1.11 CCE Report Card Settings
Here we can personalize the CCE report card.

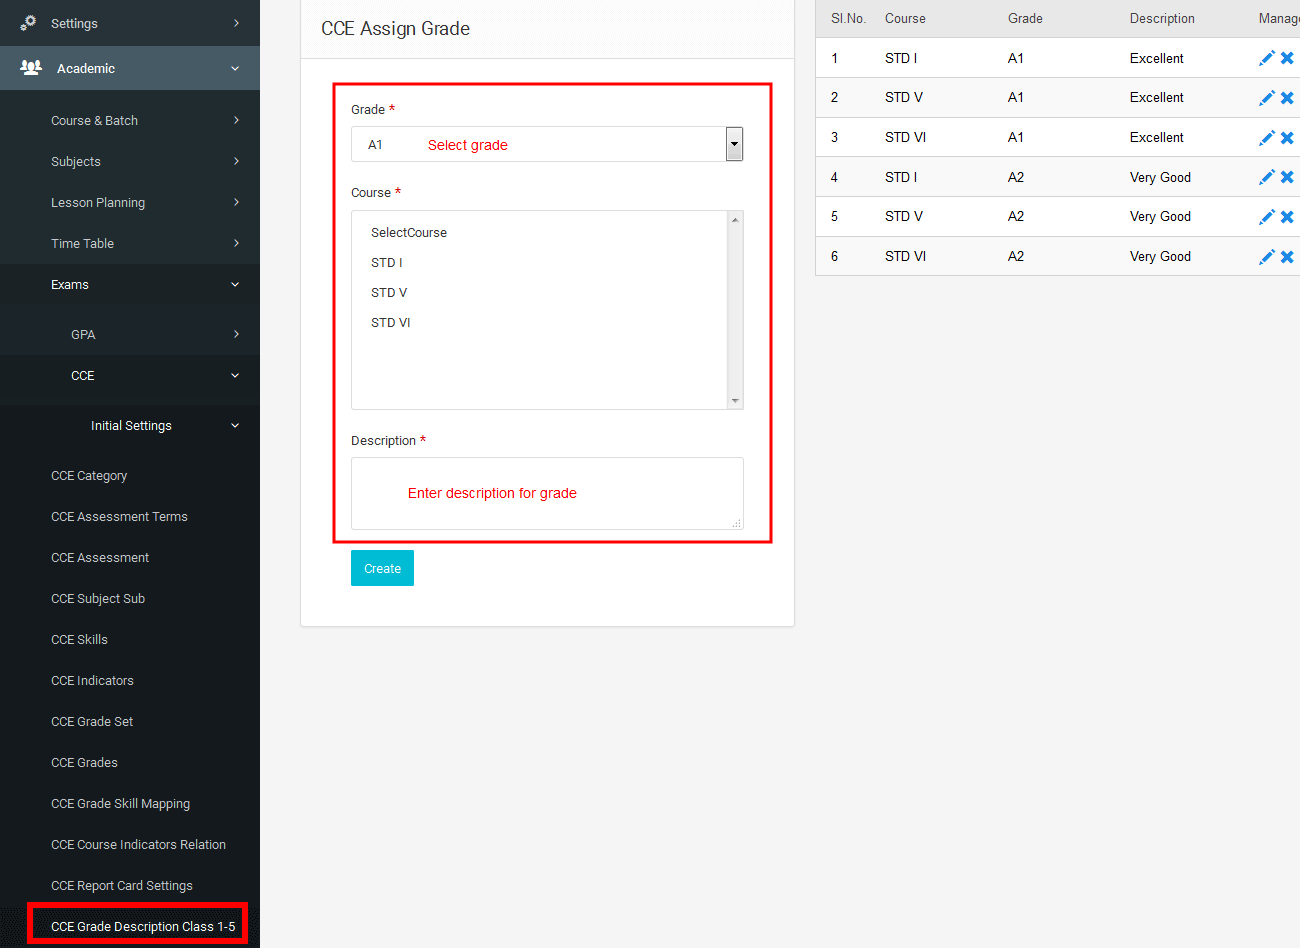
3.2.5.2.1.12 CCE Grade Description
Here we can add the grade description of the selected course.
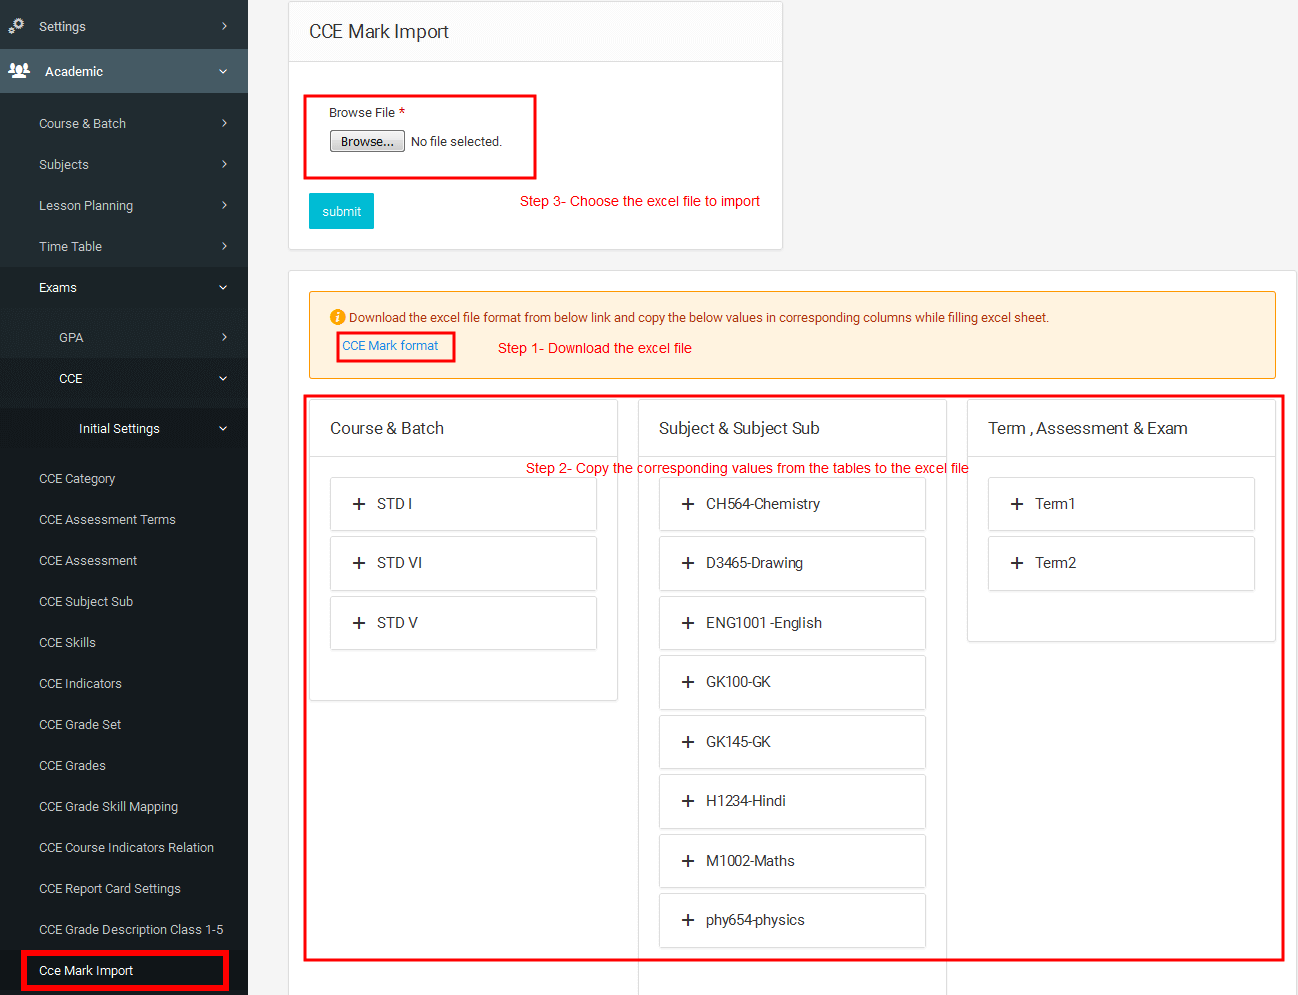
3.2.5.2.1.13 CCE Mark Import
To Import the CCE Mark, You can use the Excel Template. You can copy the mandatory fields like Course & Batch,Subject & Subject Sub...etc from the table given in the page.
Before importing the data into the system you have to create the basic data's like course , Batch etc...
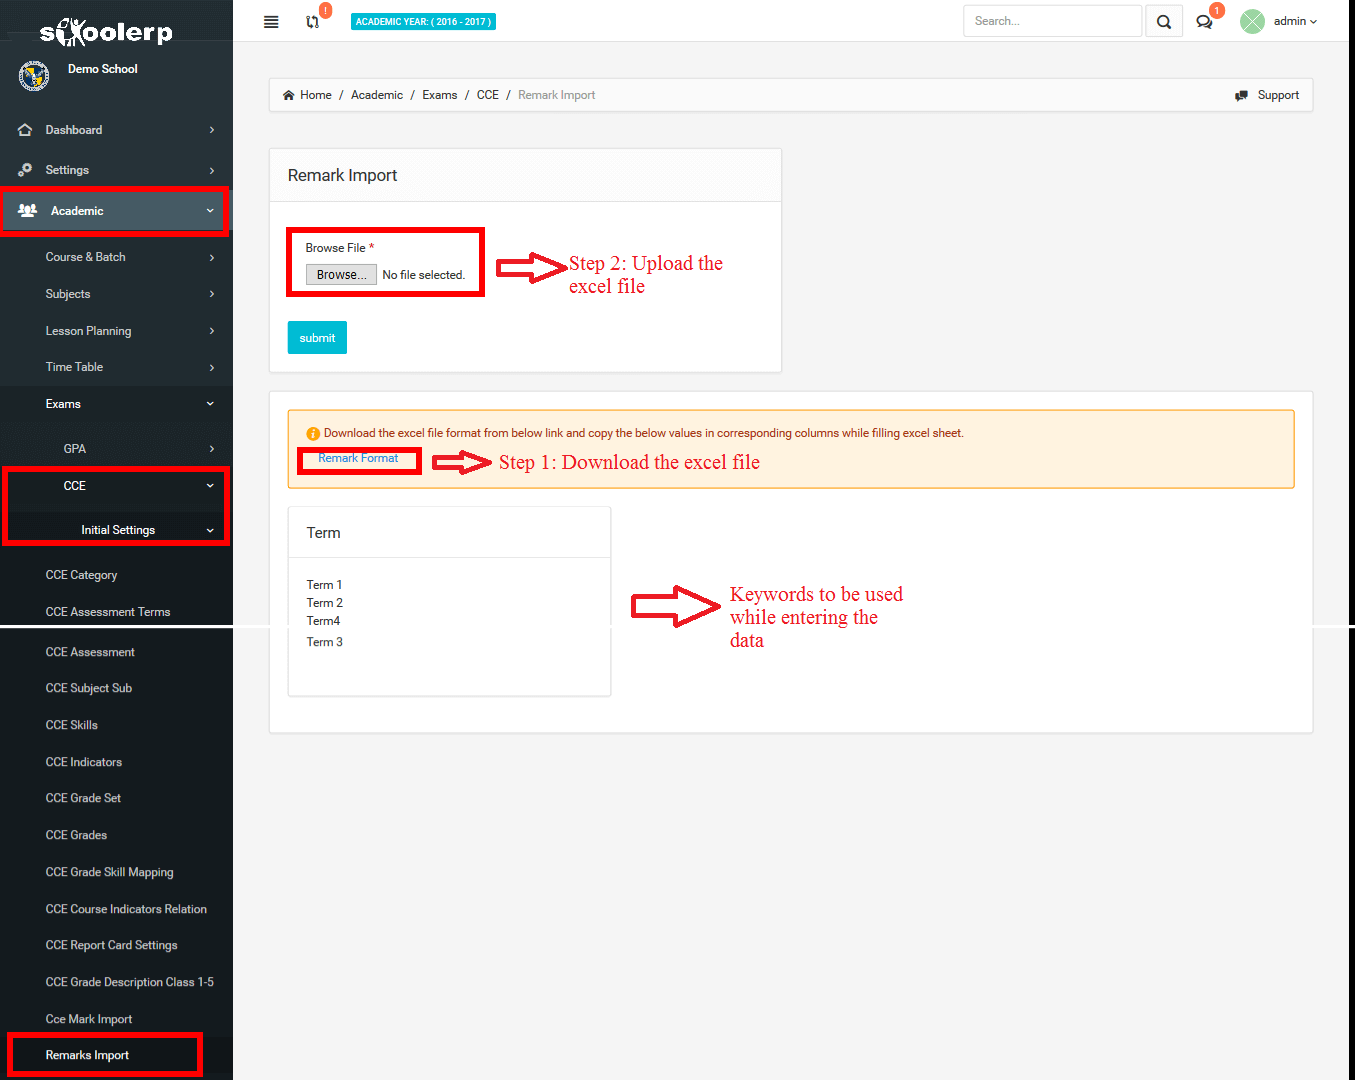
3.2.5.2.1.14CCE Remark Import
In CCE Remarks Import, one can add remarks details of a particular course & batch by downloading the excel file and adding the details according to the keywords provided in the bottom of the same page.
3.2.5.2.2 CCE Exam
CCE exam includes settings for conducting exams based on CCE syllabus and publishing marks for the exam
3.2.4.2.2.1 CCE Exam Scheme
CCE Exam Scheme set the exam name under each assessment.

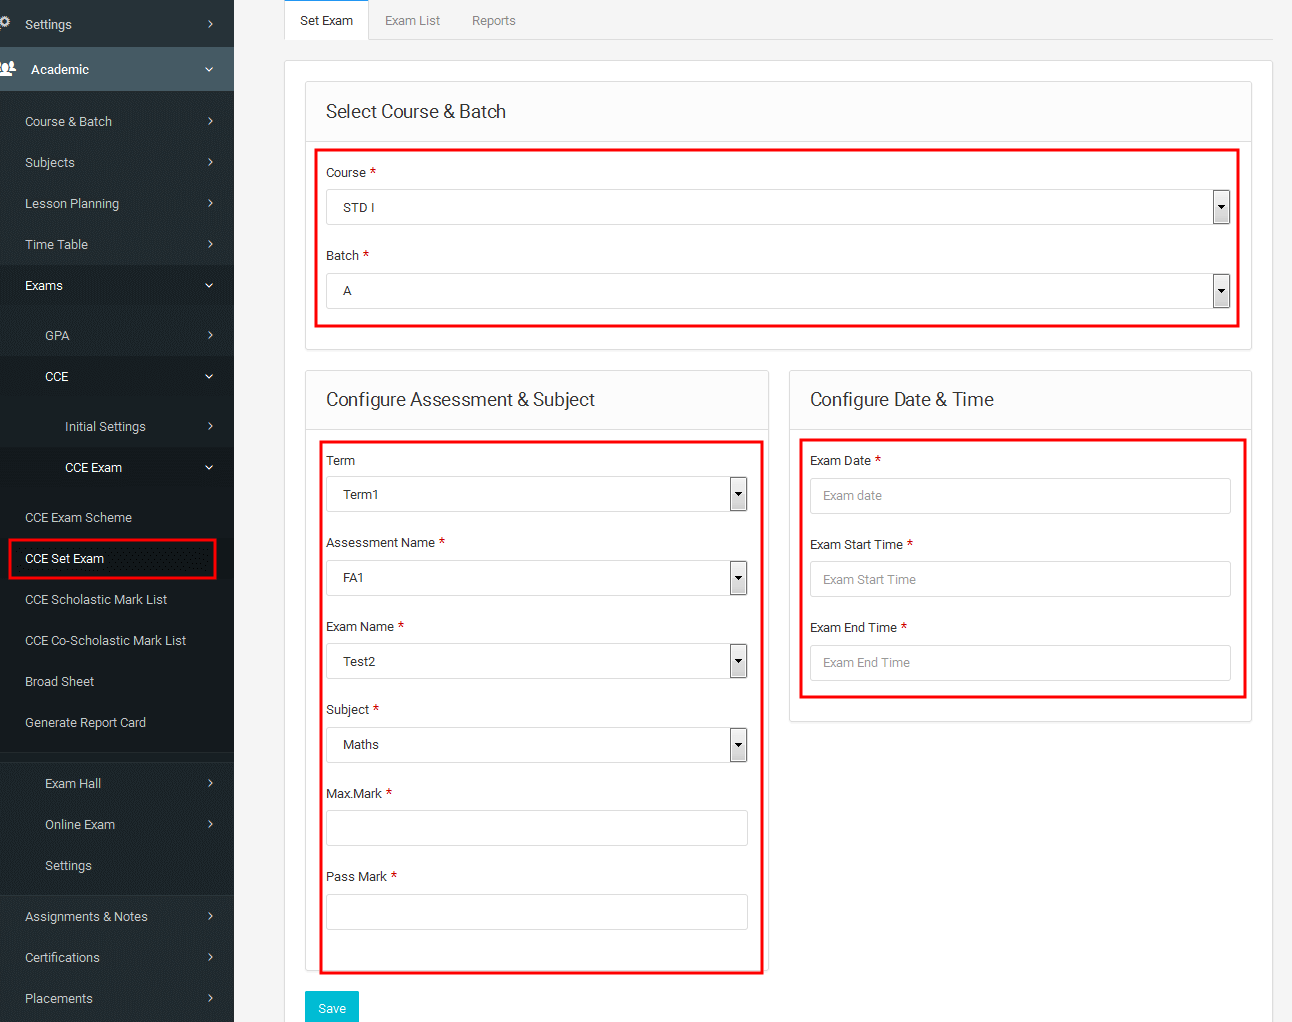
3.2.4.2.2.2 CCE Set Exam
CCE Set Exam saves the exam details like exam name, date, time.. Etc..
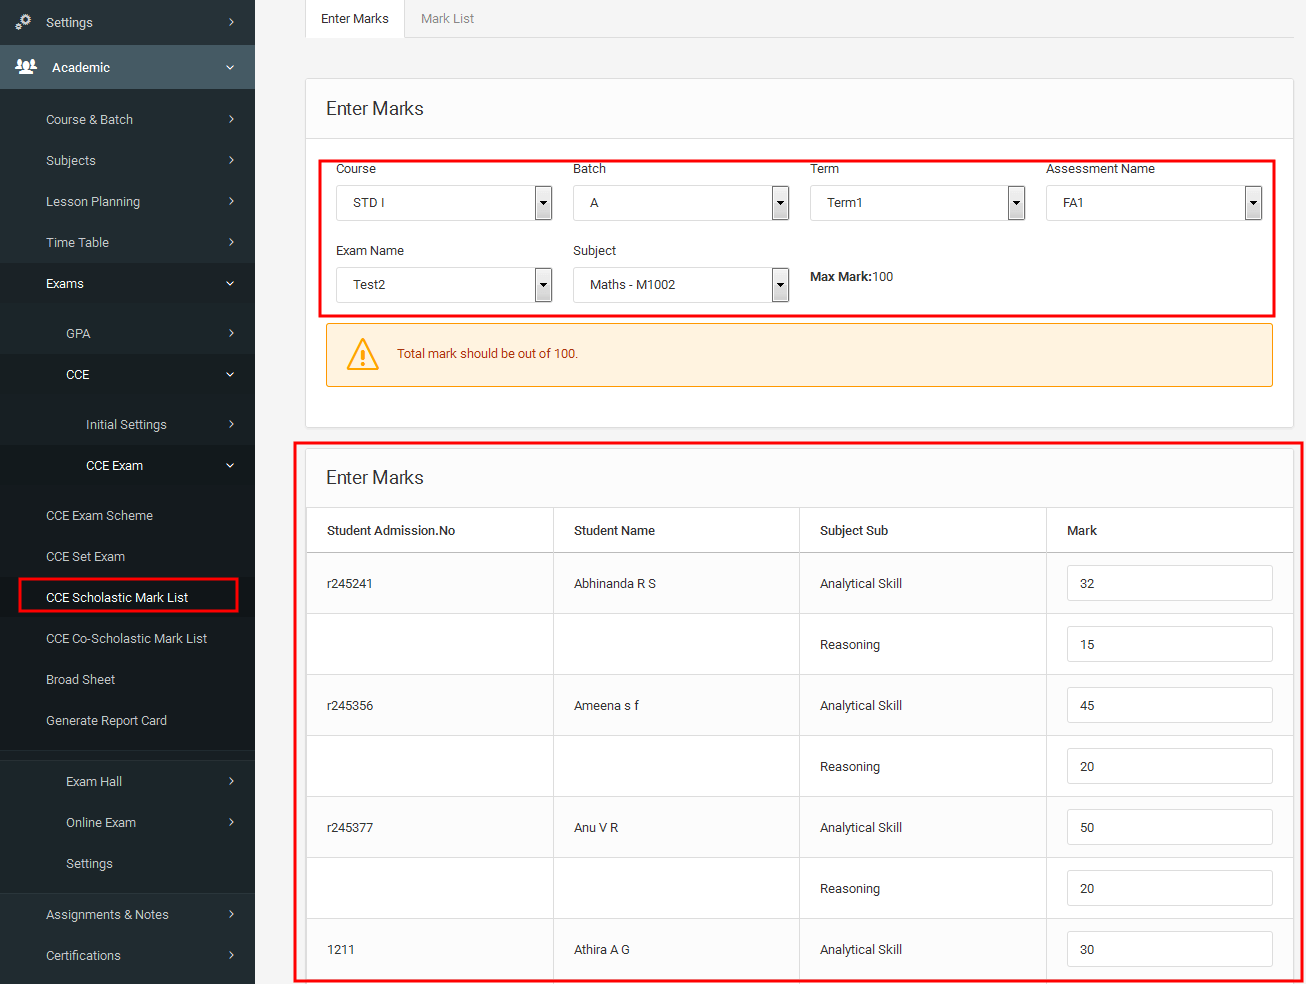
3.2.4.2.2.3 CCE Scholastic Mark list
CCE Scholastic Mark list saves the marks of the student obtained for scholastic subjects and also has the
provision to see mark lists. Here the marks are entered for subdivision of the subjects and marks
should be entered out of 100.
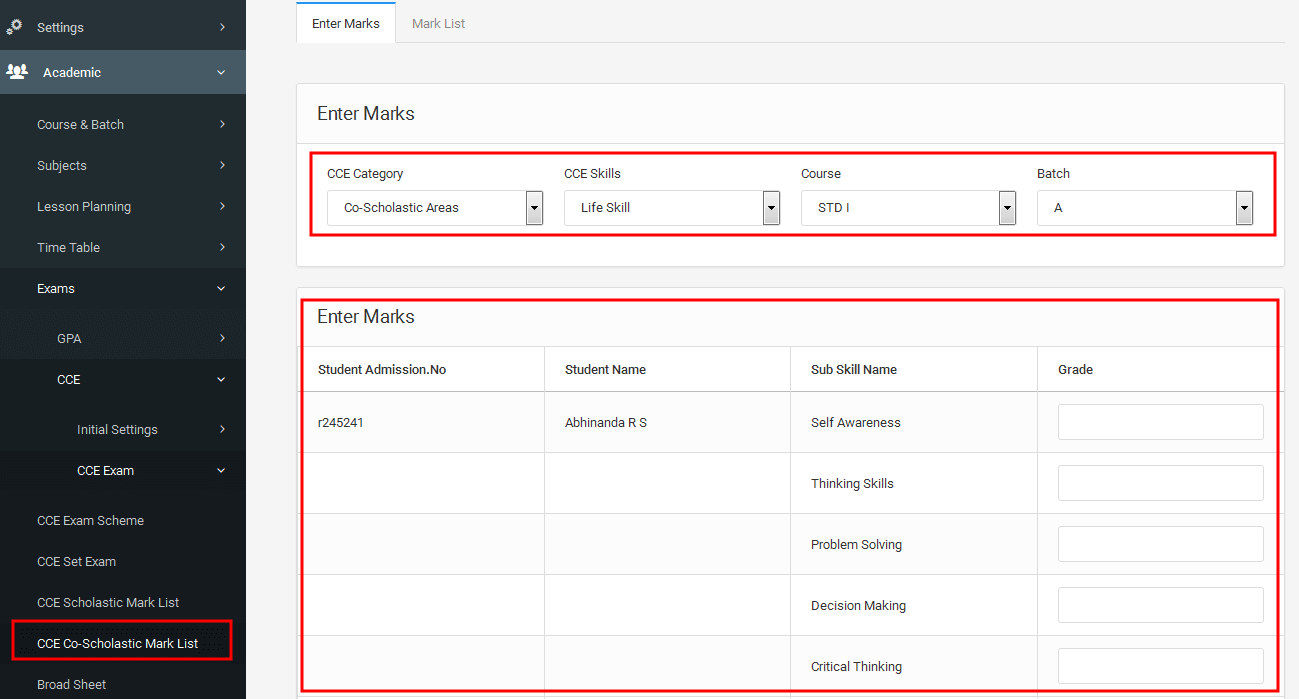
3.2.4.2.2.4 CCE Co-Scholastic Mark list
CCE Co -Scholastic mark list saves the marks of the student obtained from co- scholastic skills and also has
the provision to see mark lists. Here grades are entered instead of marks and has to
select the indicator for corresponding grade.
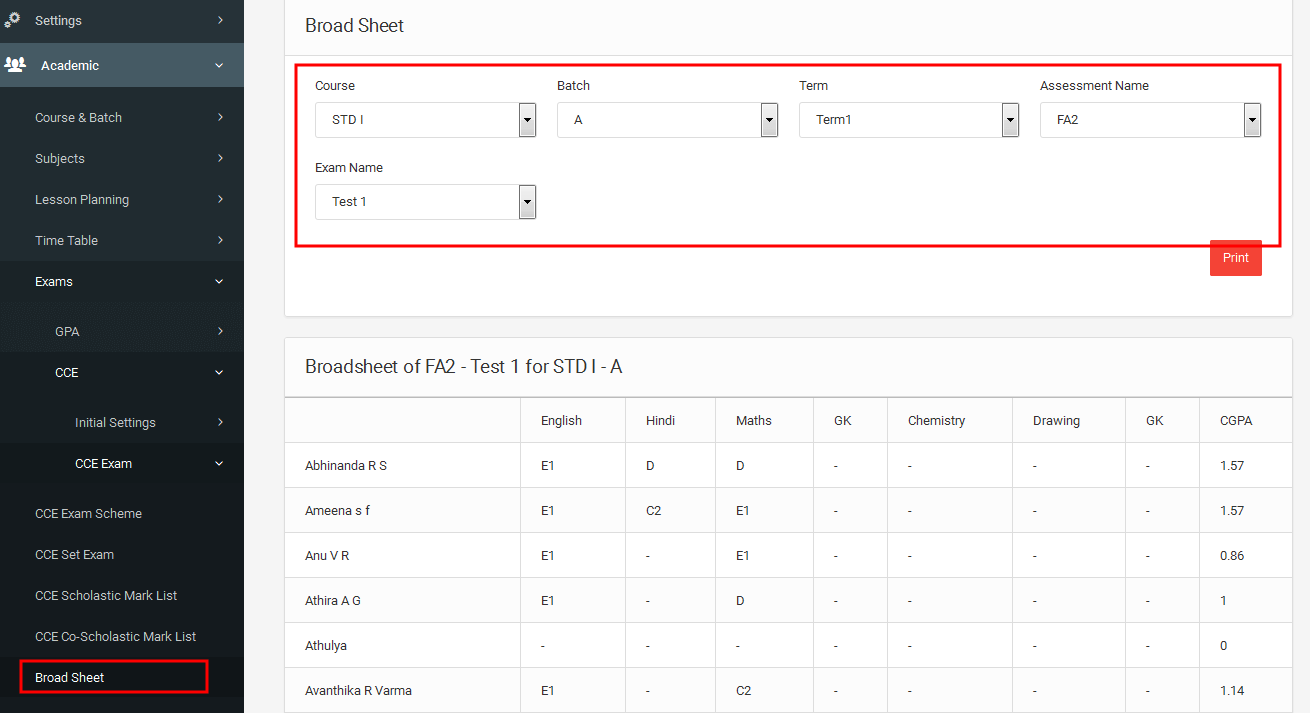
3.2.4.2.2.5 Board sheet
Broadsheet contains the mark list of the students in a batch. And we can take the print out of broadsheet.
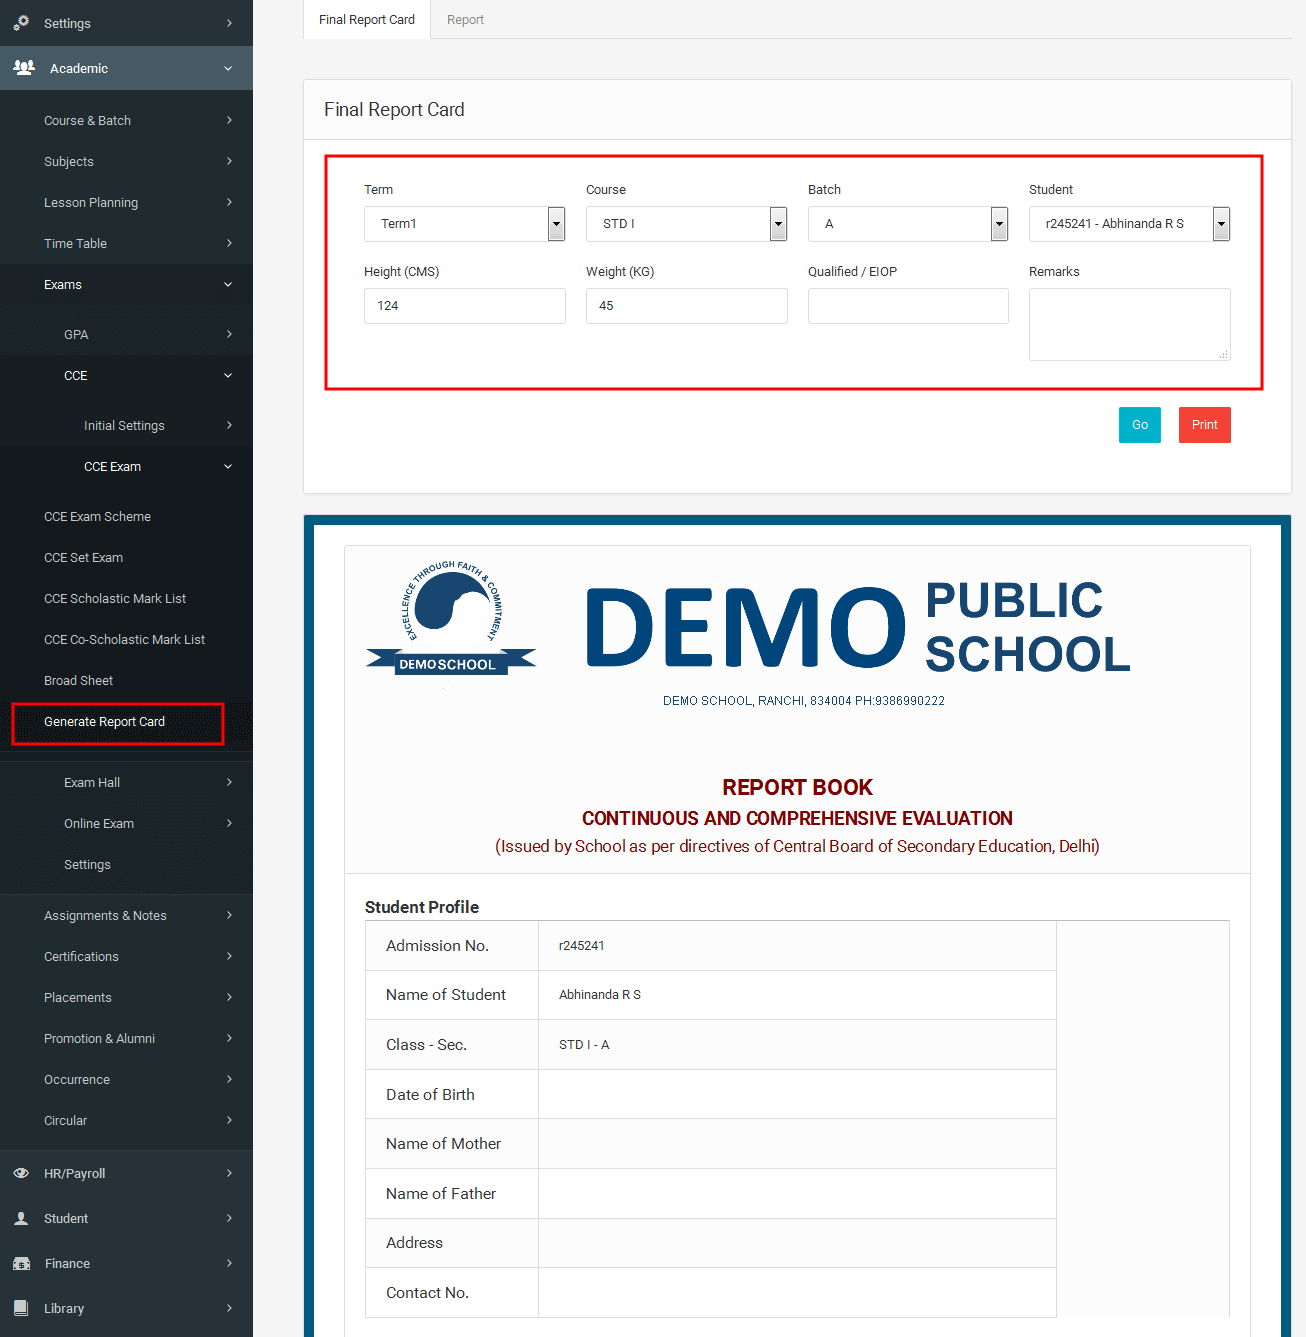
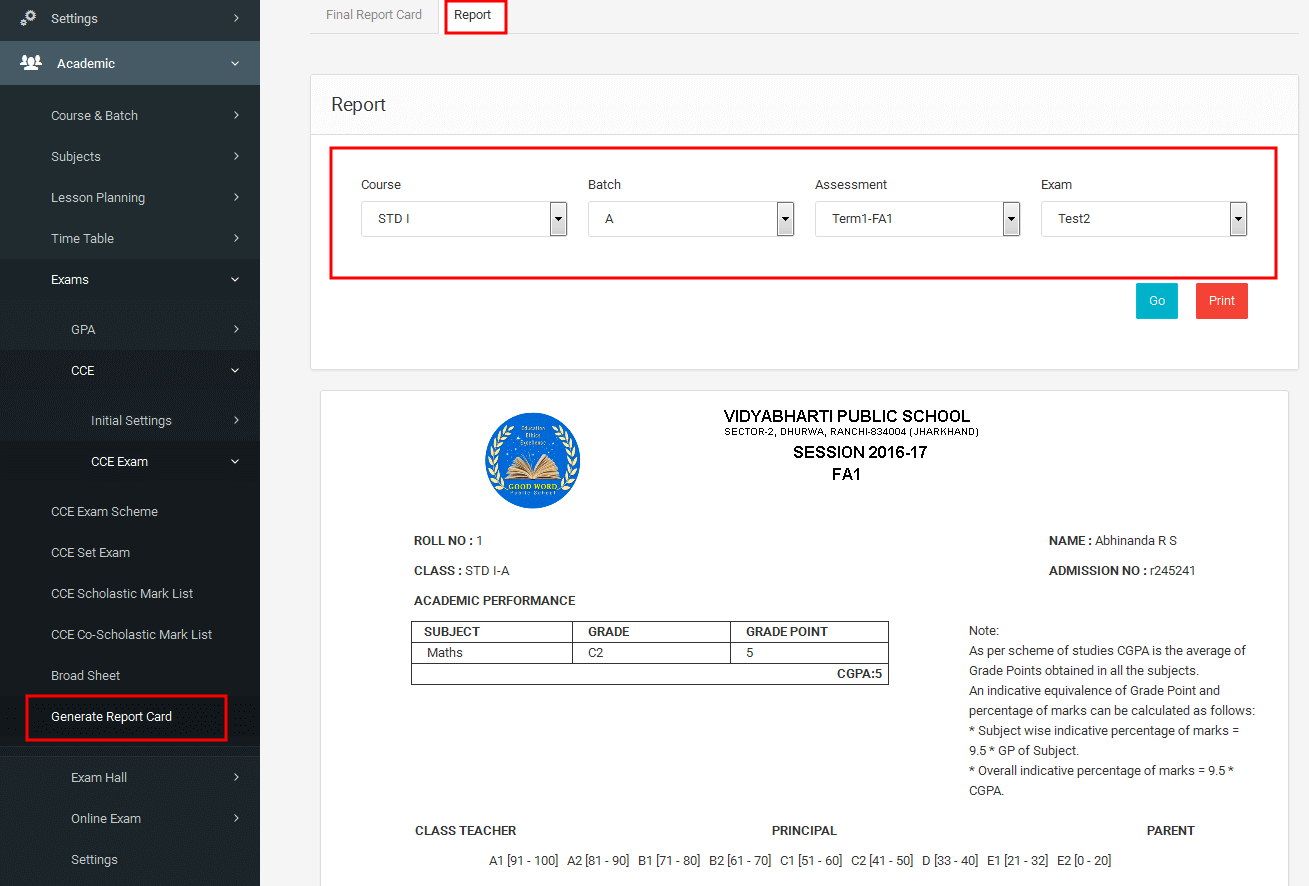
3.2.4.2.2.6 Generate Report Card
Report card is used to publish the total mark of each student after the completion of one academic year.
3.2.4.3 Exam Hall
Exam hall Management can be used for creating halls for conducting exams and allocating these halls to students and
assigning teachers for invigilator duties.From here each student can easily identify the halls allocated for him/her
and also teachers will get the details of his/her invigilator duties
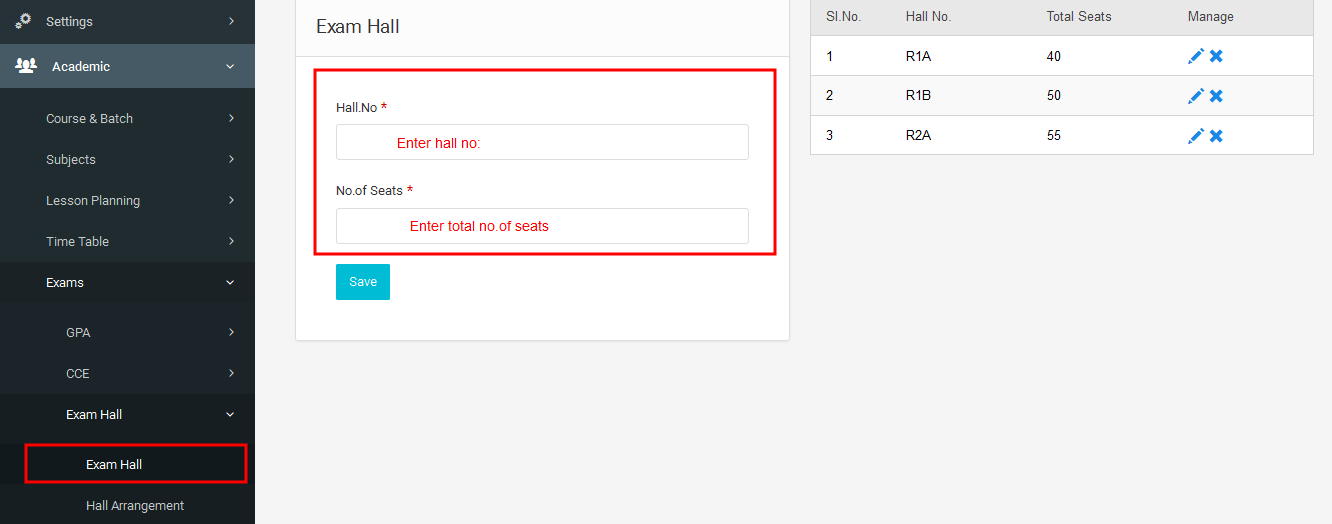
3.2.4.3.1 Exam Hall
In exam hall user can create halls with hall name and the total capacity of the halls, So that user can
easily allocate students to each hall according to its capacity.
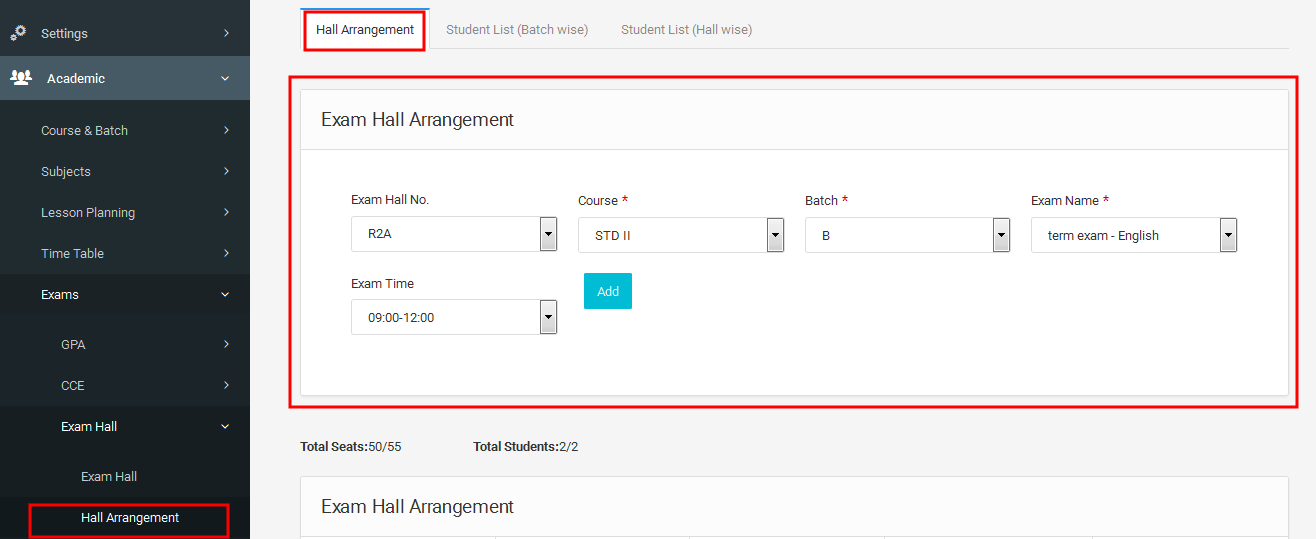
3.2.4.3.2 Exam Hall Arrangement
Hall arrangements mainly include three tabs. Hall arrangements, Student list (Batch wise), student list (Hall wise).
In hall arrangements each student is allocated to a hall for a particular exam.Here user can identify the total
number of seats available in each hall and remaining seats. Also can identify the total number of students in a
particular batch and remaining students who where unallocated.
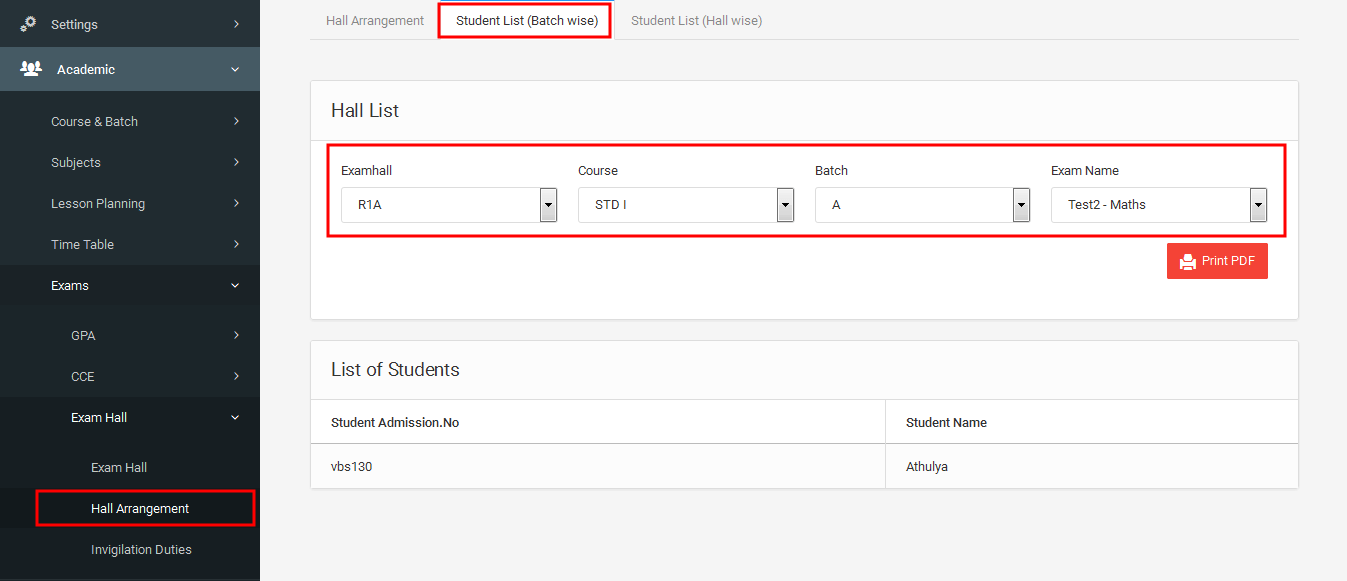
Student list (Batch wise), list of students allocated in each hall is listed for a particular batch and particular exam.
Student list (Hall wise), list of students allocated in each hall is listed for a date.

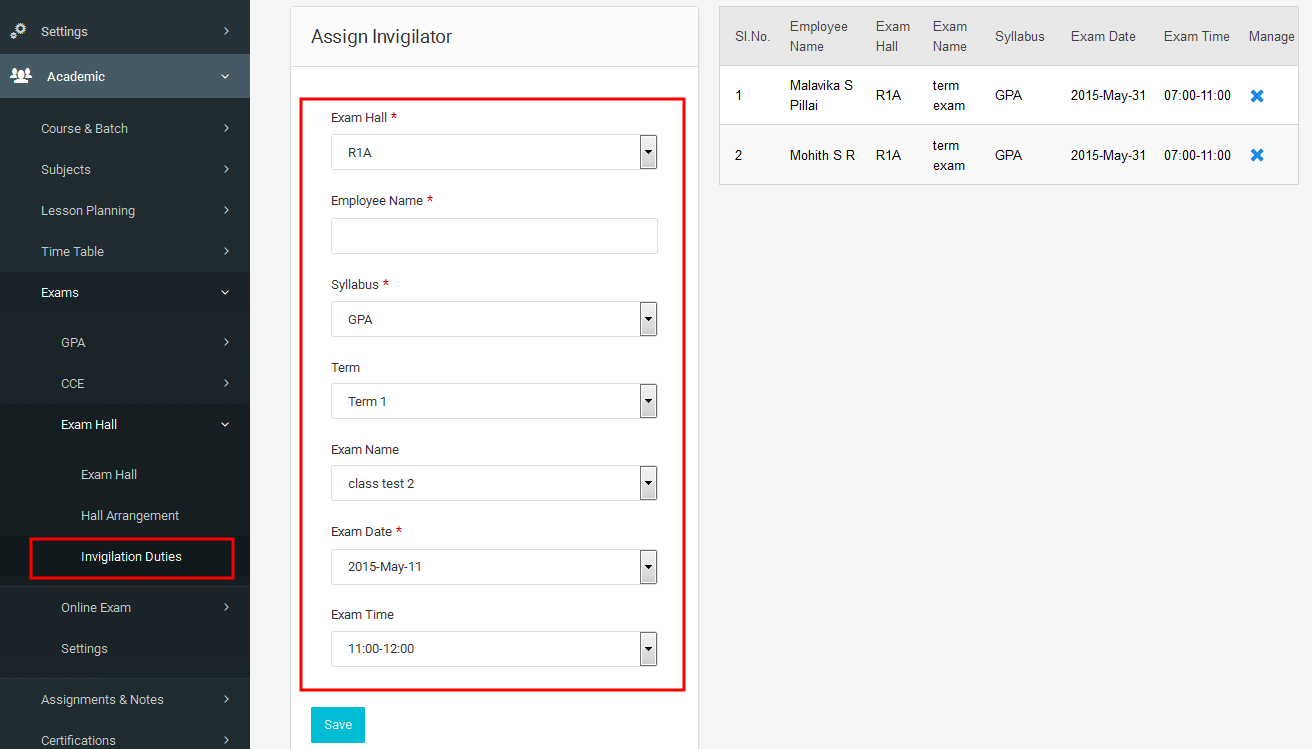
3.2.4.3.3 Invigilator duties
It is used to assigning invigilators for each hall
3.2.4.4 Online Exam
3.2.4.4.1 Online Exam
In online exam user can create online exam, view the exam details and can view the results
easily allocate students to each hall according to its capacity.
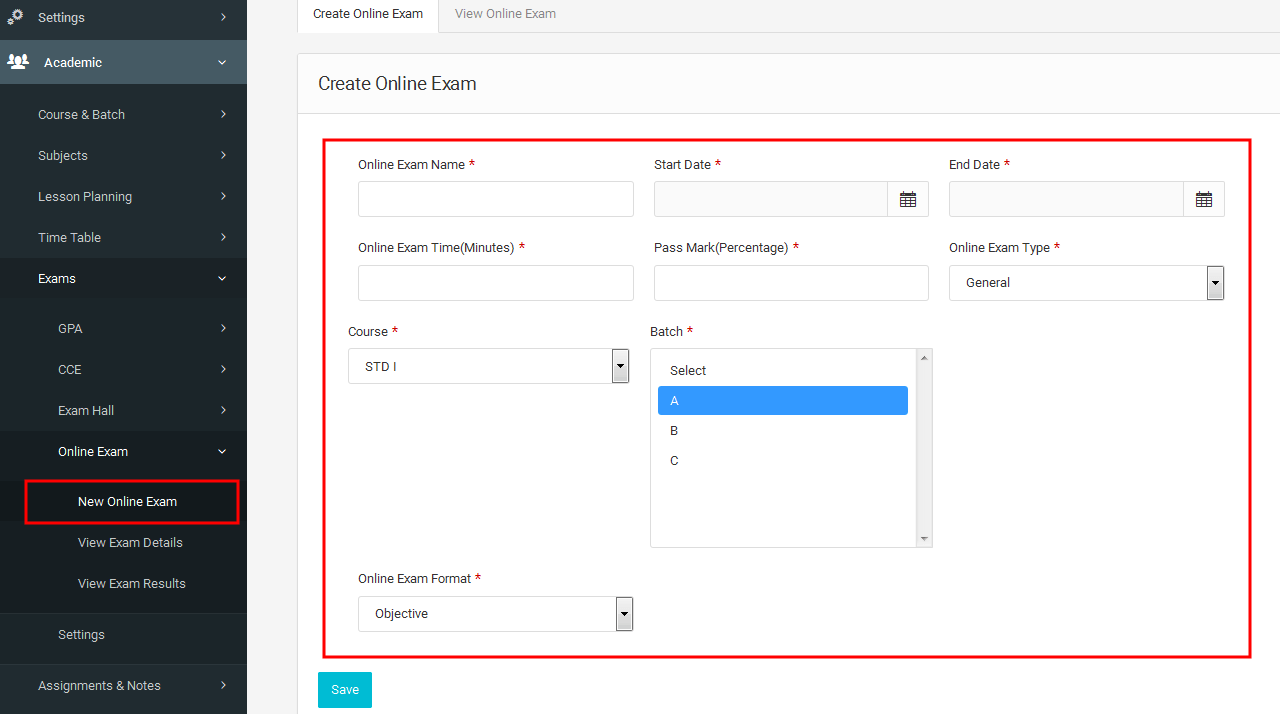
3.2.4.4.2 New Online Exam
By New Online Exam, we can schedule new exams and also we can view the details of created exams.
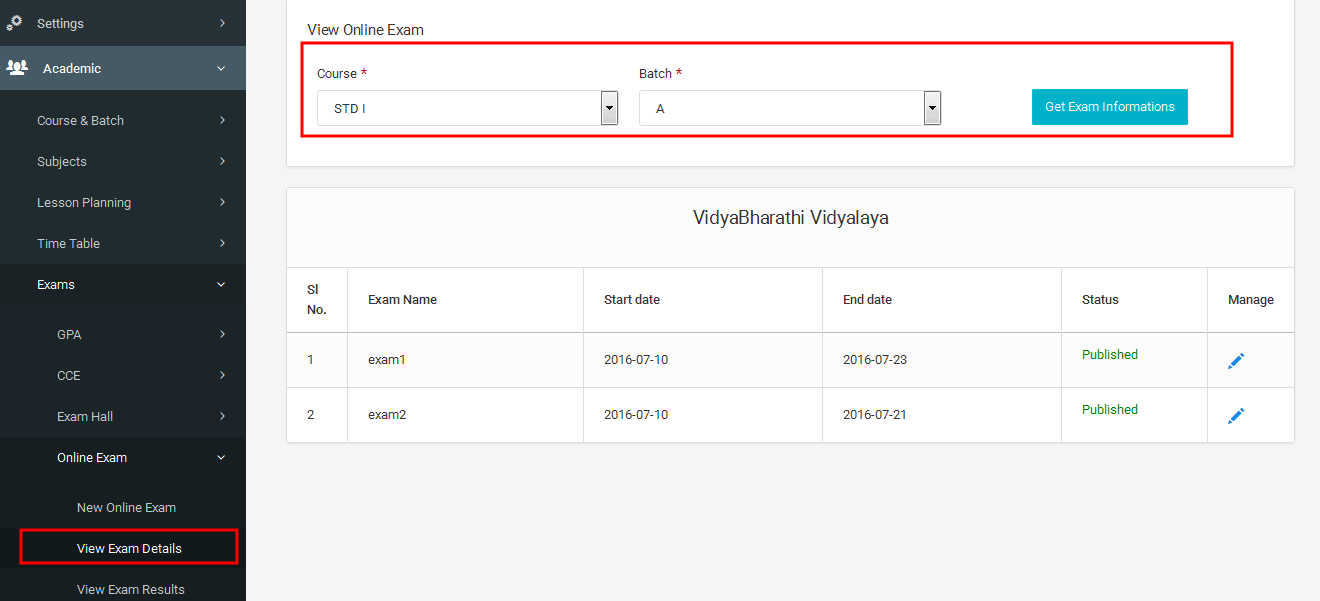
3.2.4.4.3 View Exam Details
In view Exam Details, we can view the details and status of exams for a selected batch.
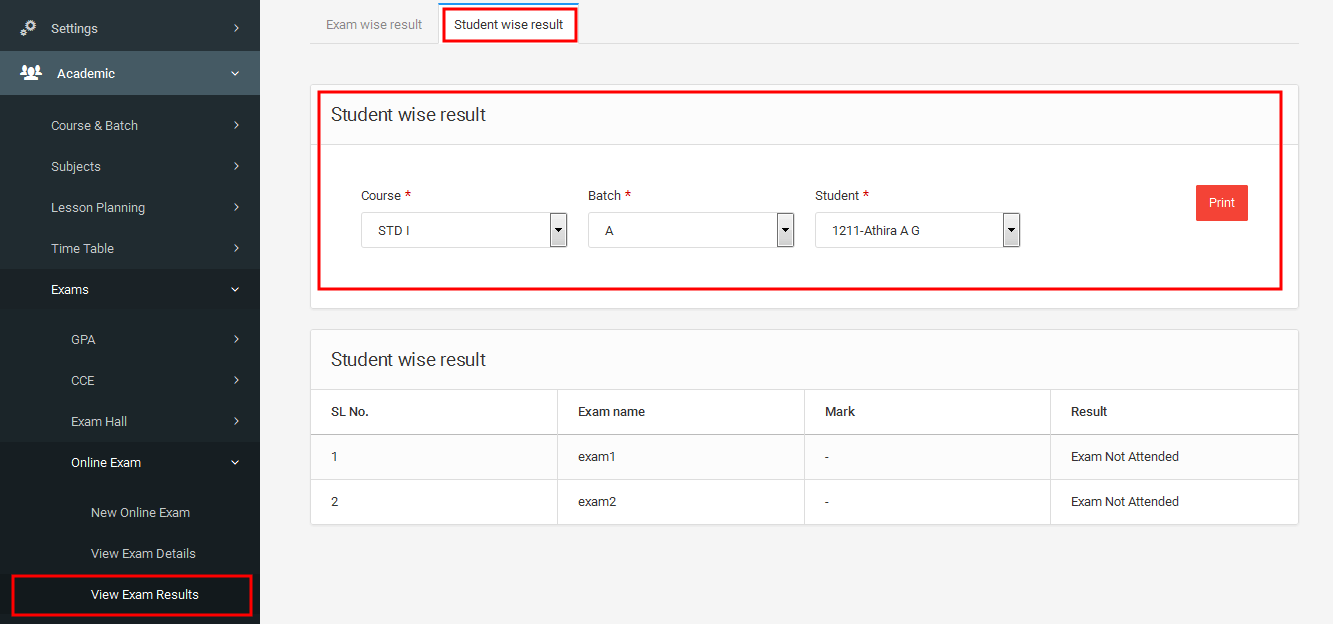
3.2.4.4.4 View Exam Results
View Exam Results shows the exam results.
Here we can view the exam wise exam result for the selected course .
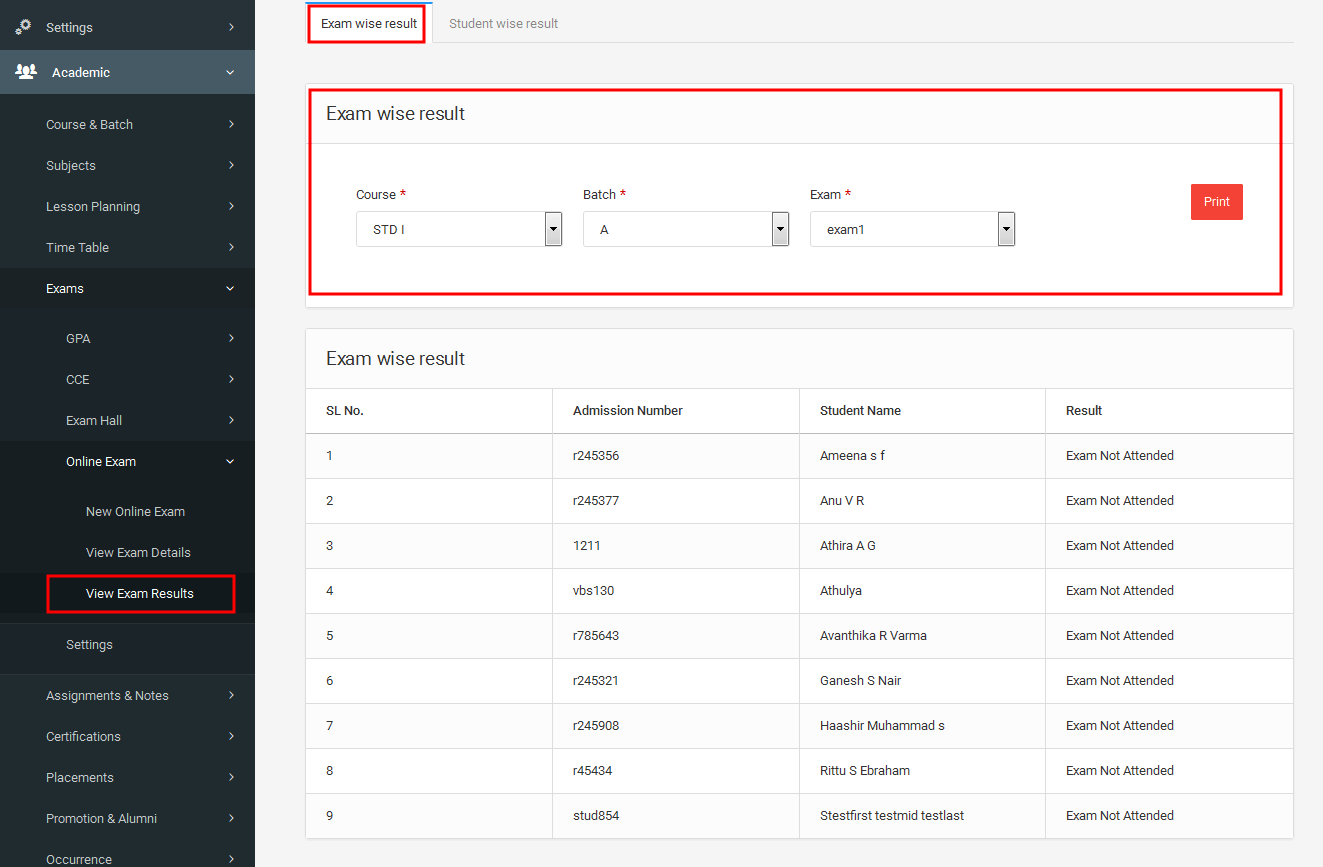
View Exam Results (Student wise), list the exam result student wise.
Here we can view the student wise exam result for the selected course .
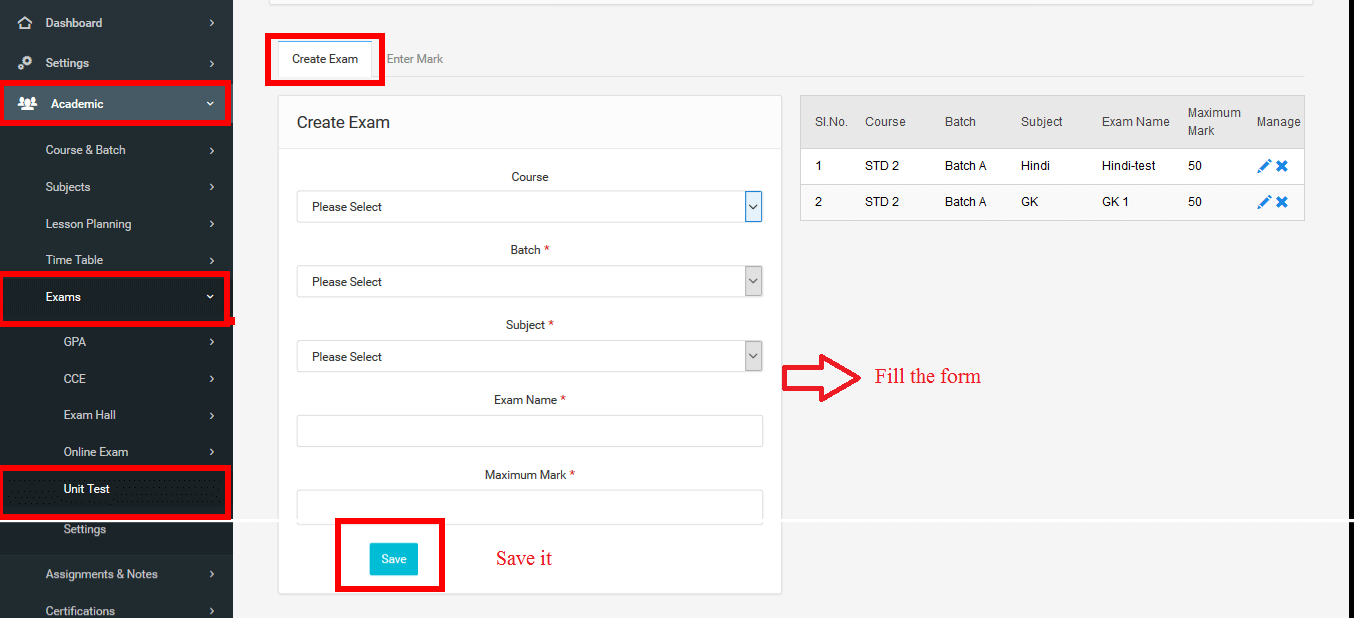
3.2.4.4.5 Unit test
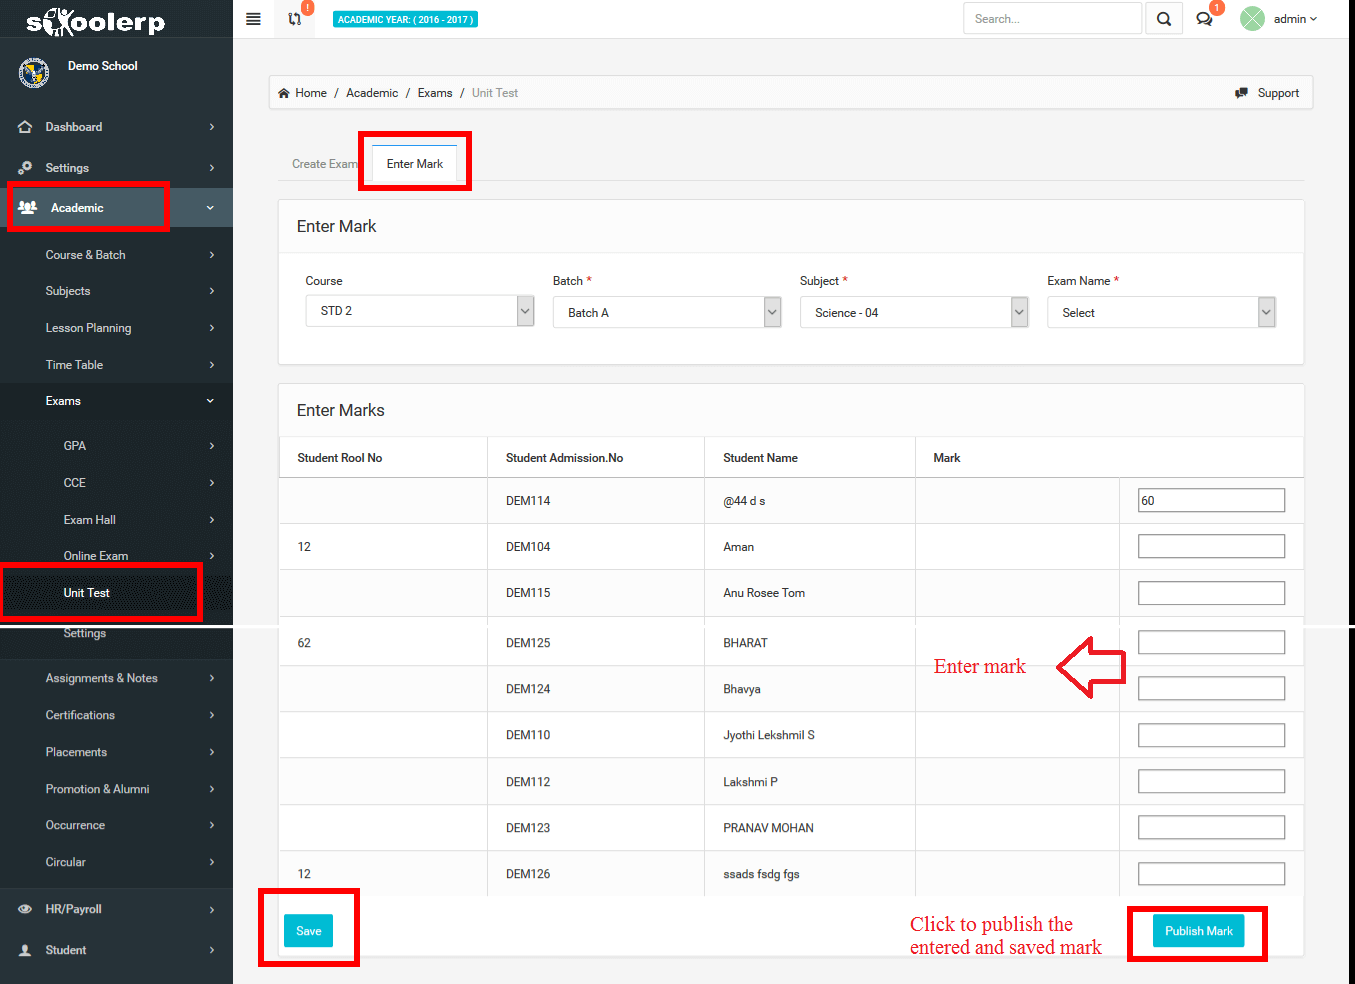
Unit test sub module is for keeping details of the unit tests conducted in the school. The marks can be entered and saved.
The marks of the Unit test can be entered as shown in the below figure
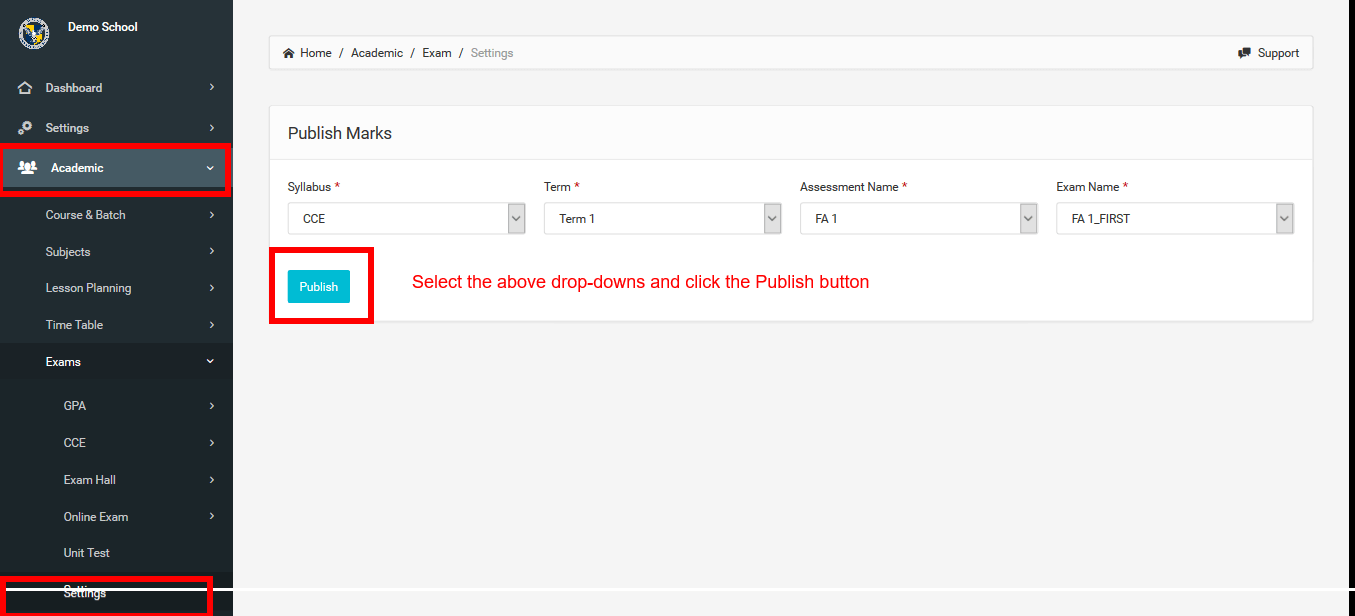
3.2.4.4.6Settings
In settings sub module, you can publish the marks of the selected Syllabus (CCE or GPA).
3.2.5 Assignments & Notes
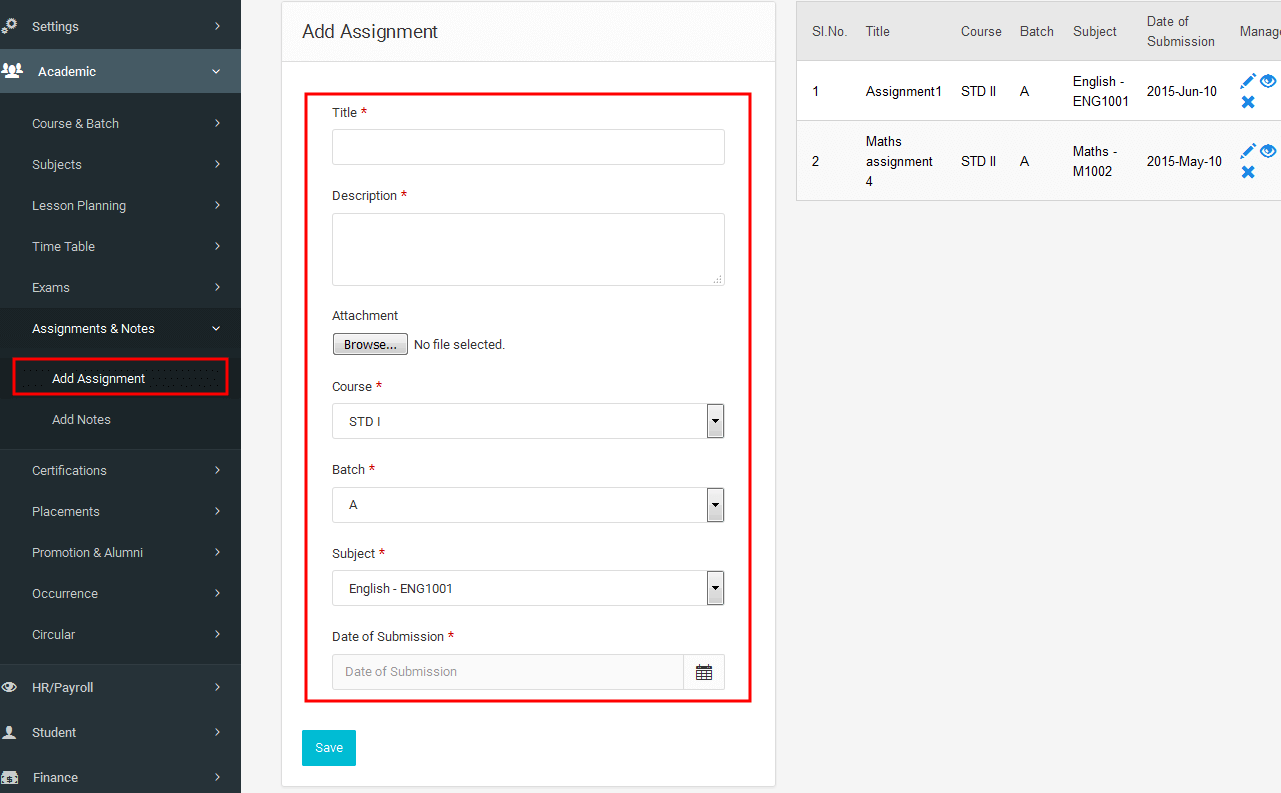
3.2.5.1 Add Assignments
From here you can submit assignments to a particular batch or group of batches
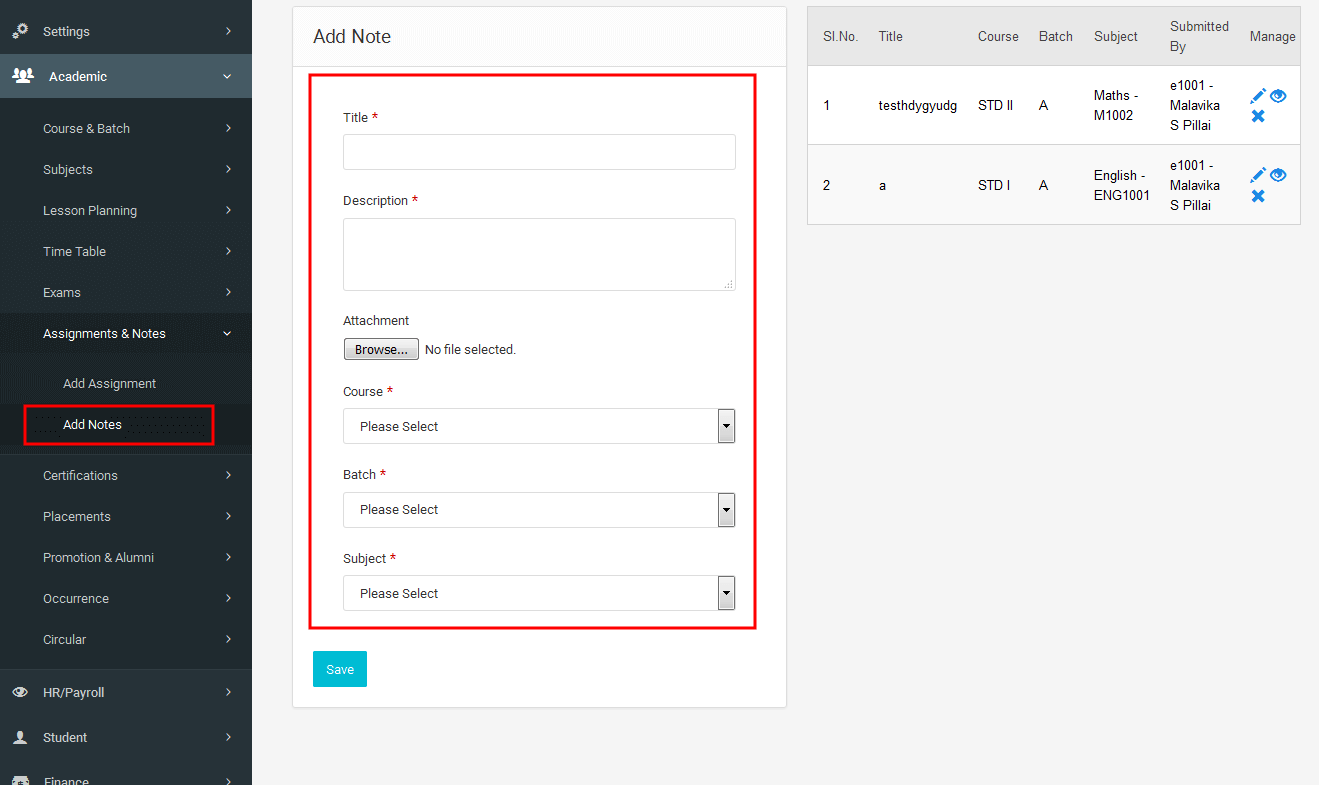
3.2.5.2 Add Notes
You can submit notes of a course for a selected batches from here.
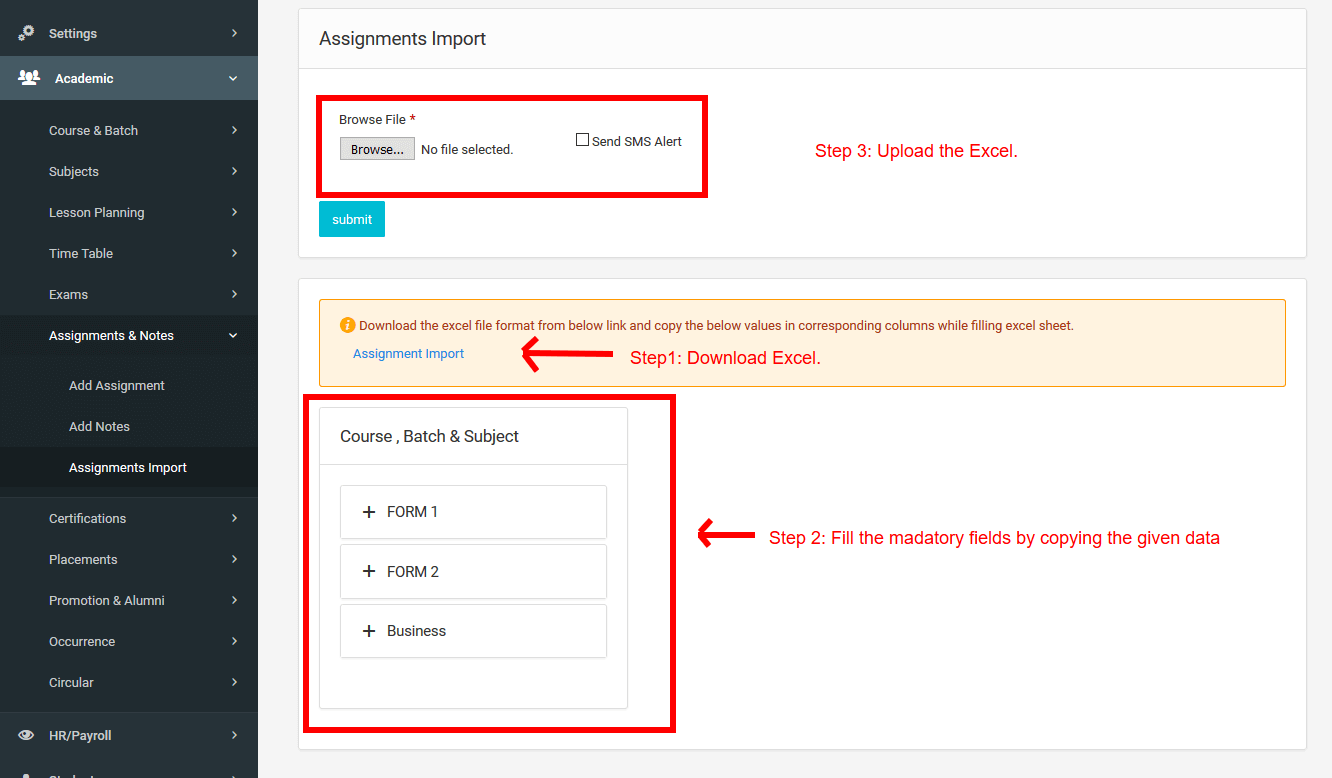
3.2.5.3 Assignments Import
Here we can upload a list of assignments or homeworks in excel format. Please follow the instructions given below.
3.2.6 Certification
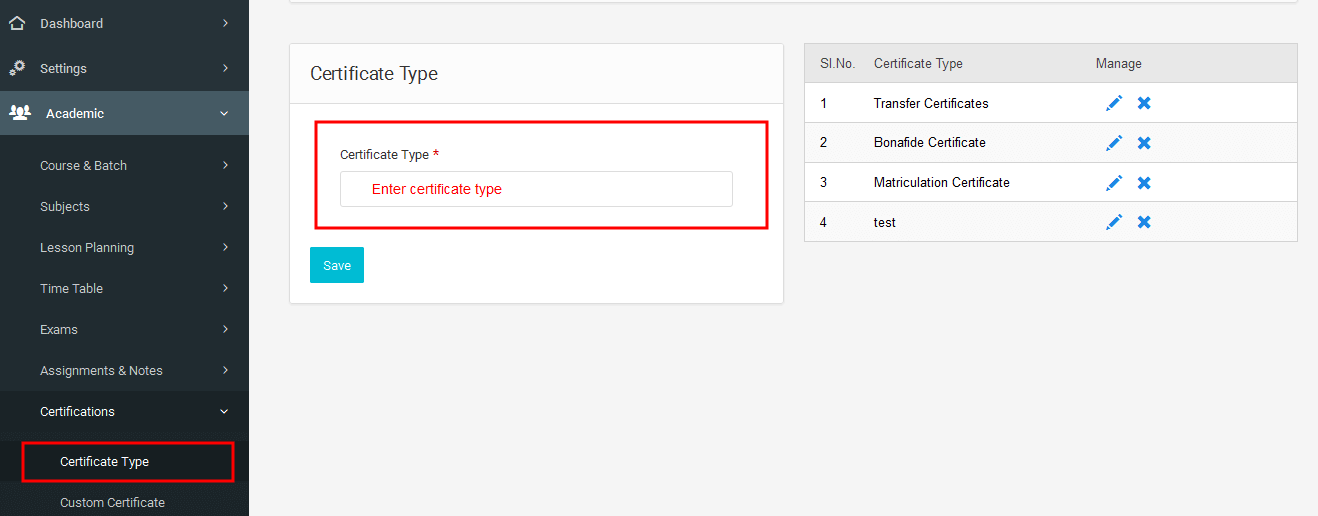
3.2.6.1 Certificate Type
You can create the certificate type like Transfer Certificate,Contact Certificates ..etc..
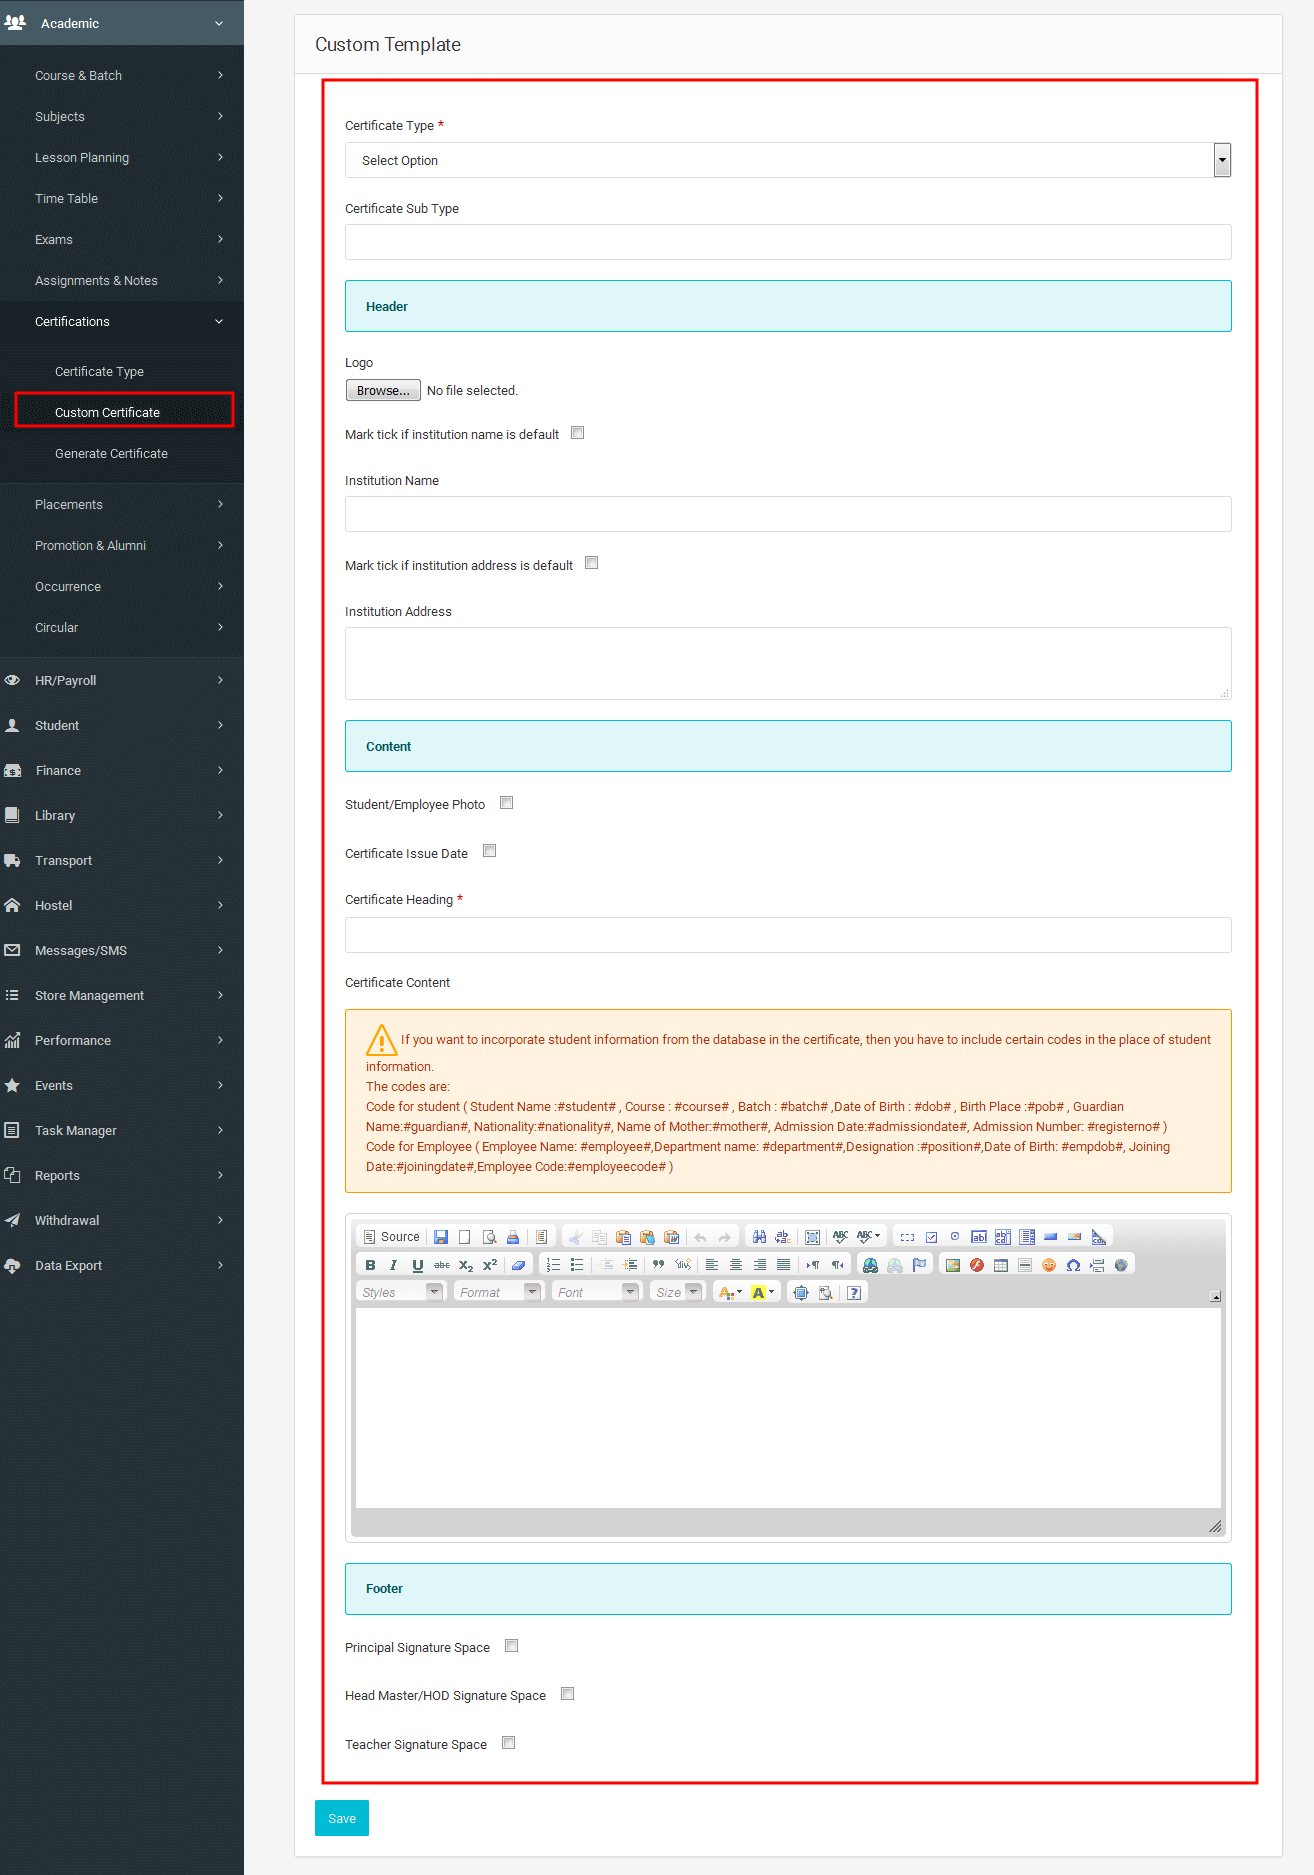
3.2.6.2 Custom Certificate
Here you can create custom certificate template for both Students and Employees.
You can select the header and footer of your choice and content you want in the certificate.
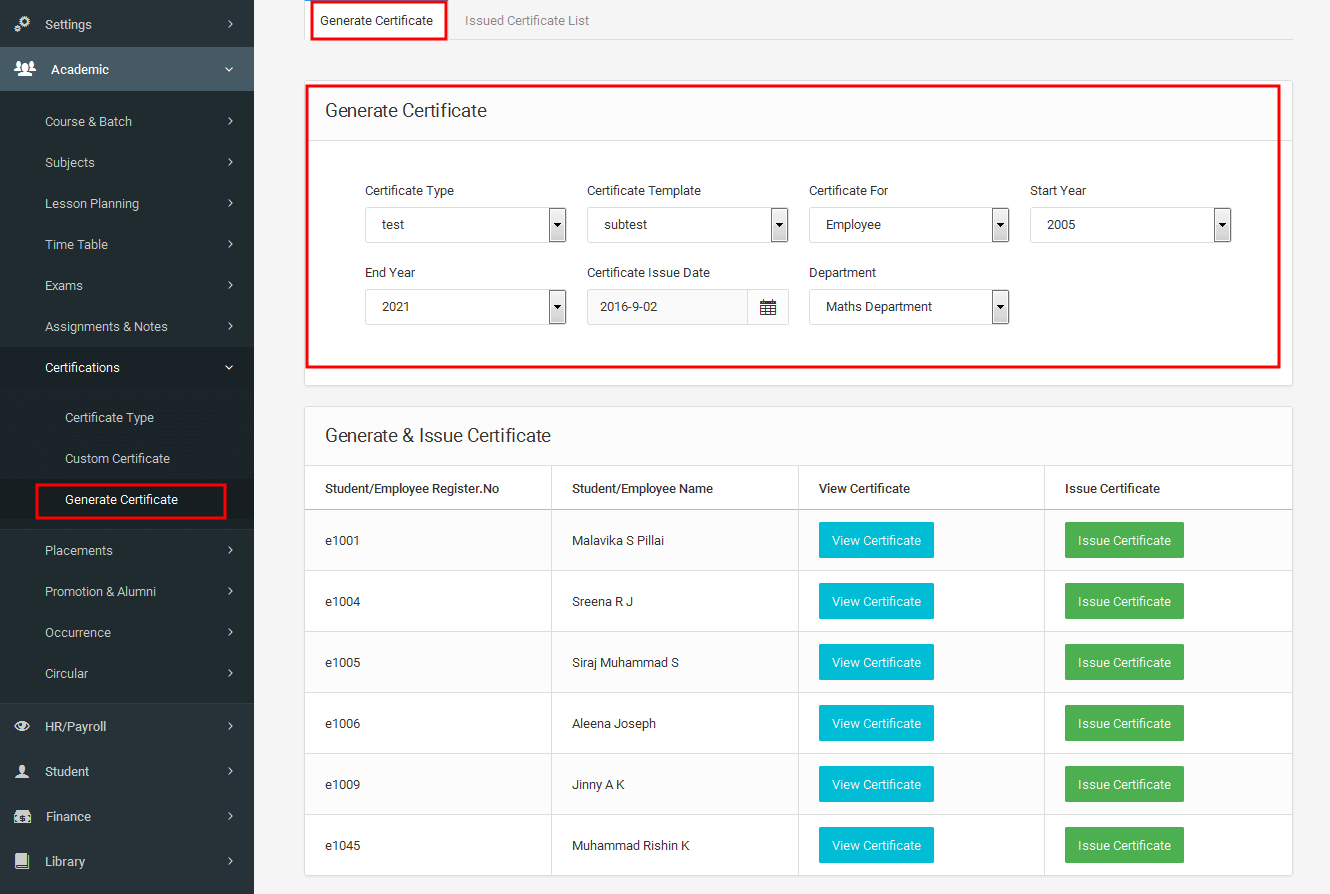
3.2.6.3 Generate Certificate
You can generate and issue certificates for both employees and Students.
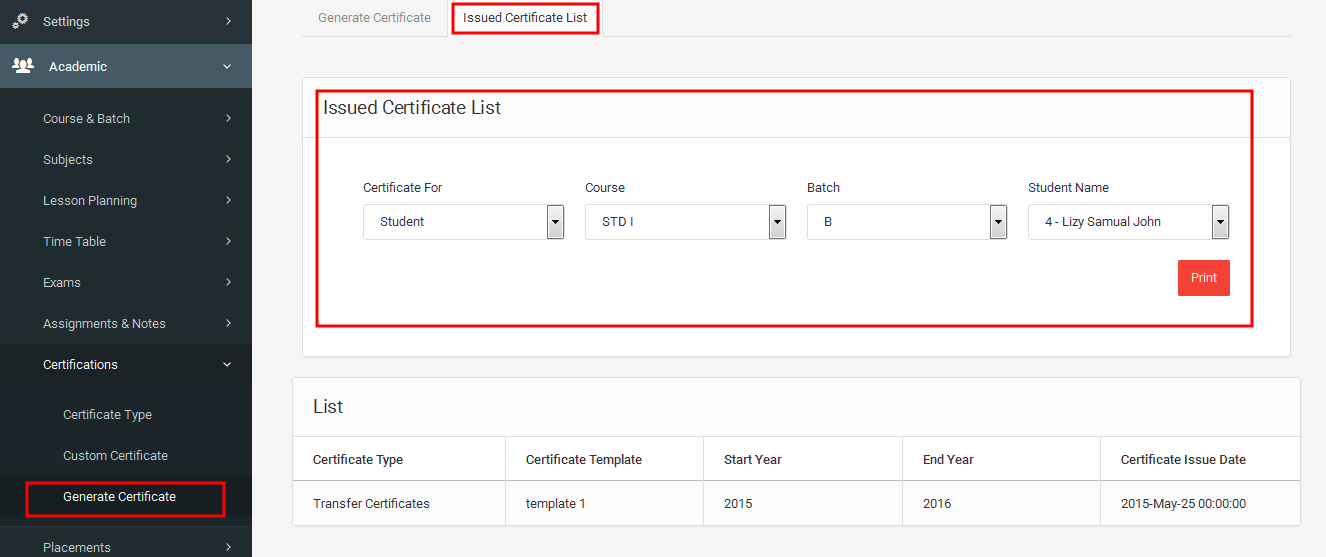
Here you can see the details of issued certificates for the selected student or employee.
3.2.7 Placements
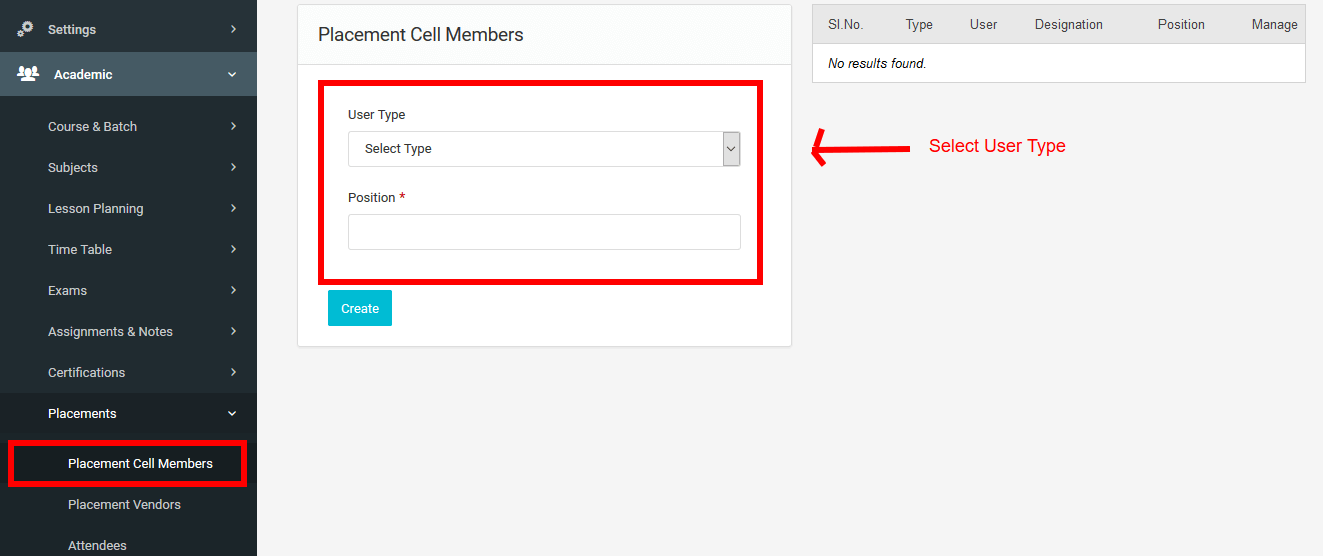
3.2.7.1 Placement cell Members
Placement cell members is used to define the position of employees and students in placement cell.
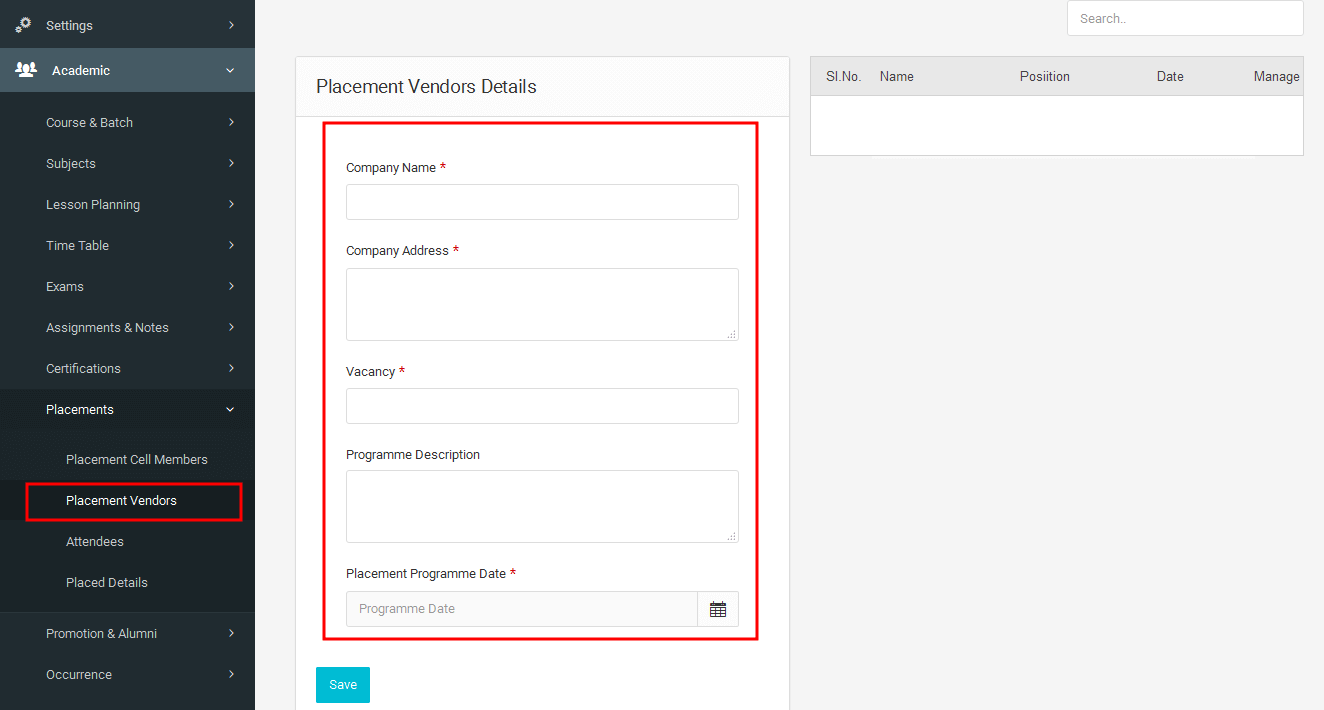
3.2.7.2 Placement Vendors
Placement vendors is used to store the the vendor details.It also stores the placement programme date and vacancies.
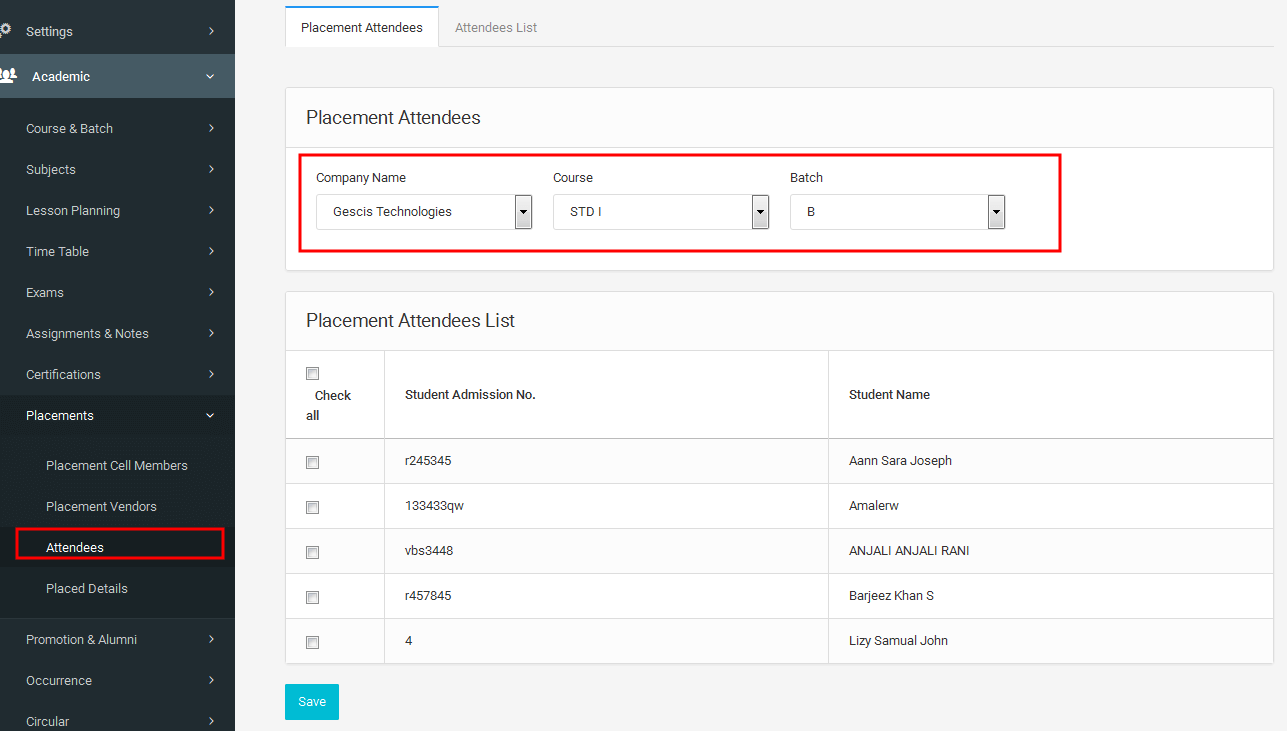
3.2.7.3 Attendees
Attendees contains two tabs.
First one is placement attendees which allows the user to enter the attendance of students who attend the placement programme.
Second one is Placemnet list, which allows user to take the print out of attendees list.
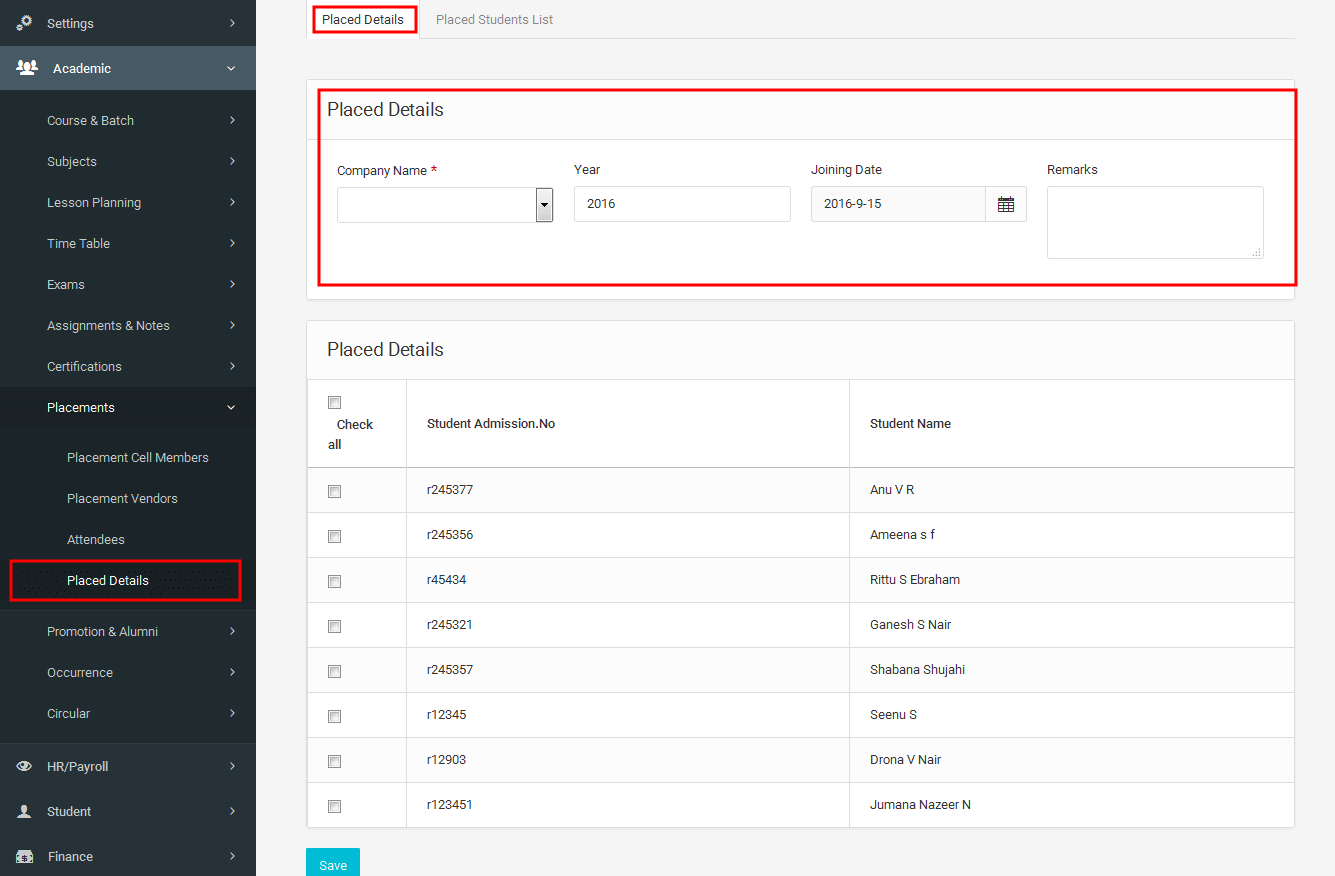
3.2.7.4Placed Details
Placed details contain two tabs.
First tab is, Placed details which allows user to enter the details of placeed students.
Second tab is,Placed students list lists the students who get placed.
3.2.8 Promotion & Alumni
3.2.8.1Promotion & Alumni
Promotion and alumni allows user to promote students to next class or make the student as an alumni memeber.

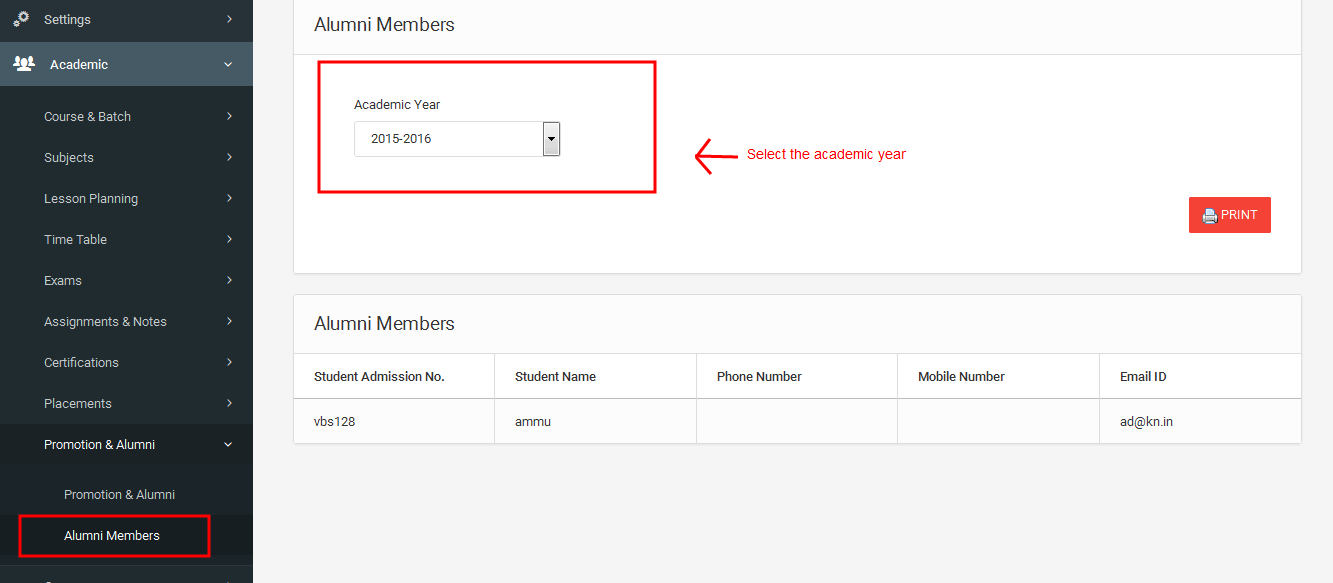
3.2.8.2Alumni Members
It list all the alumni members for the selected academic year .
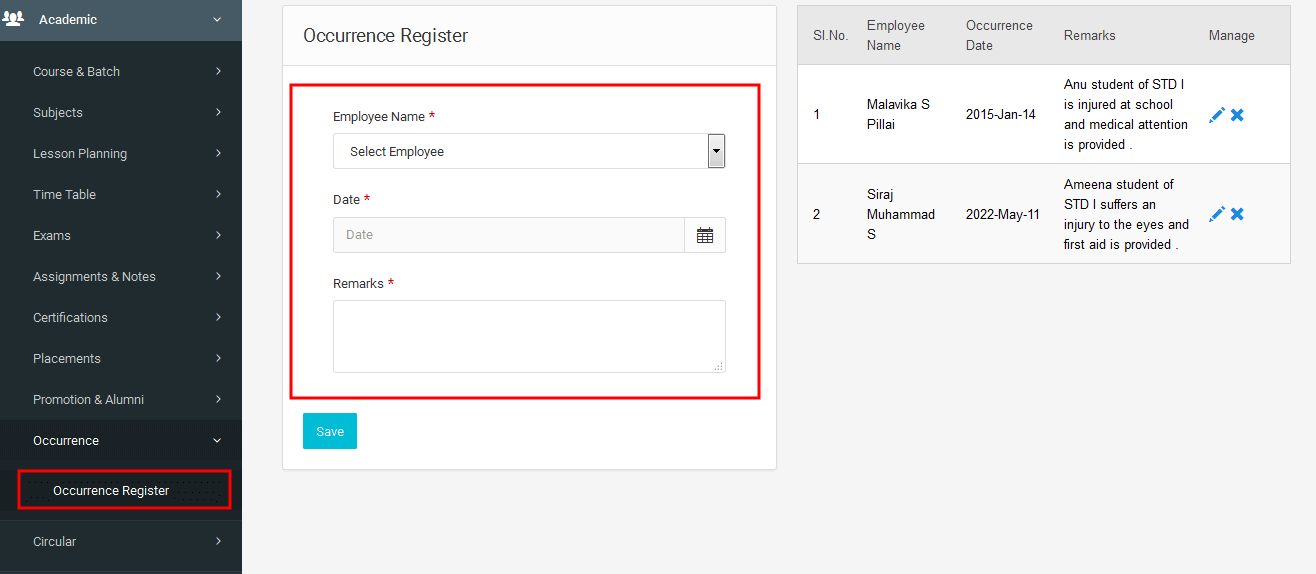
3.2.9 Occurrence
3.2.9.1Occurrence Register
A significant student accident/incident and action taken must be reported to the Institutions.
This can be done by using the Occurrence register.
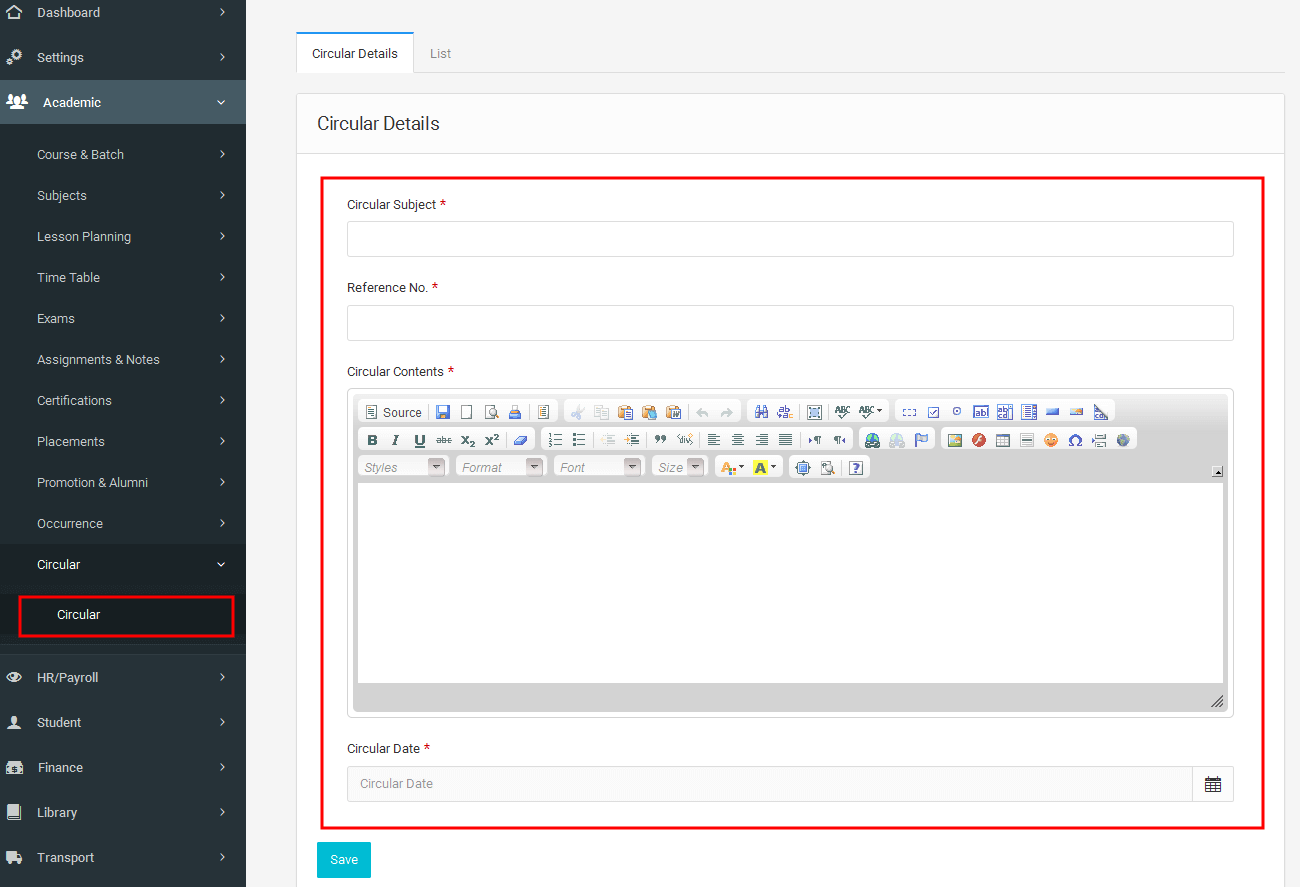
3.2.10 Circular
3.2.10.1Circular
Institutions may issue several circulars that must be relevant to parents,employees and students. This can be done by using Circulars.
3.3 HR / Payroll
3.3.1Employee Management
It manages the employee details.
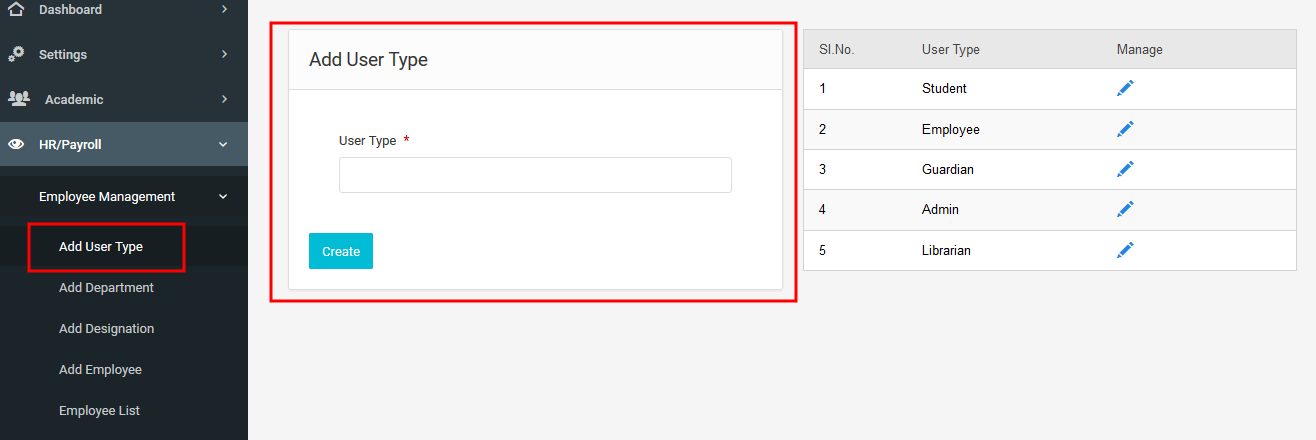
3.3.1.1Add User Type
Employee user type is used to create users. By default there are 4 user types ,
namely Admin,student,employee and guardian.User can create other user types and it’s
possible to assign privileges
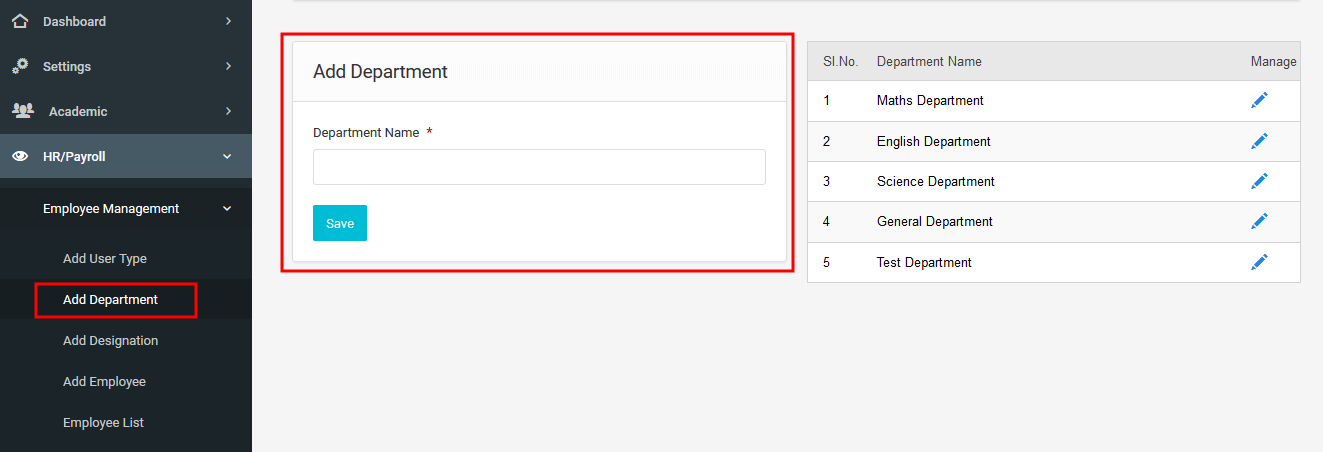
3.3.1.2Add Department
While filling employee details user need to select the department of that employee.
For this we need to add departments.
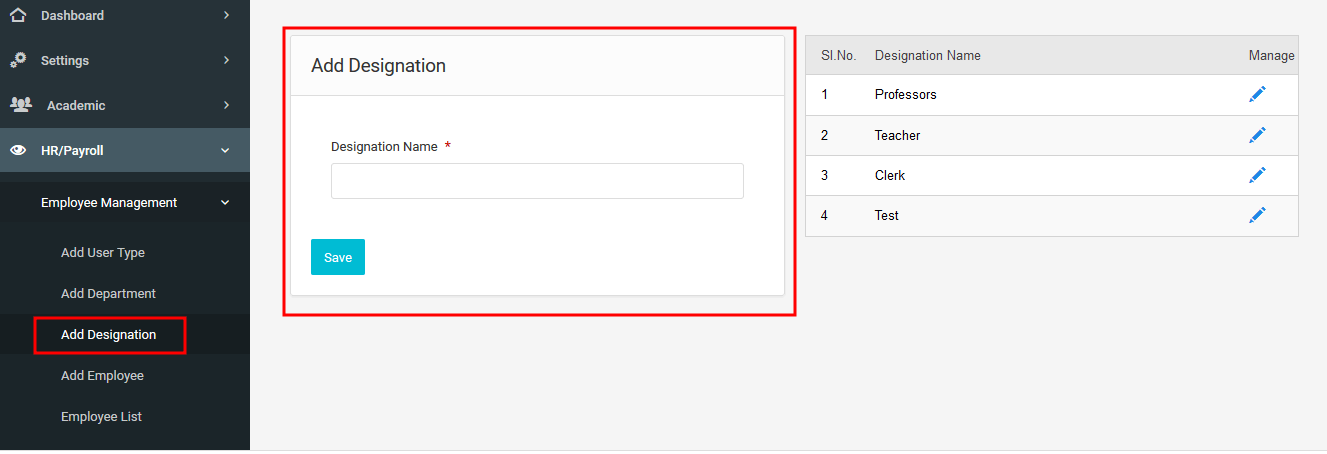
3.3.1.3Add Designation
Designations are used to define the employee grades for the institution. This must be
important because it is used while filling the employee details.
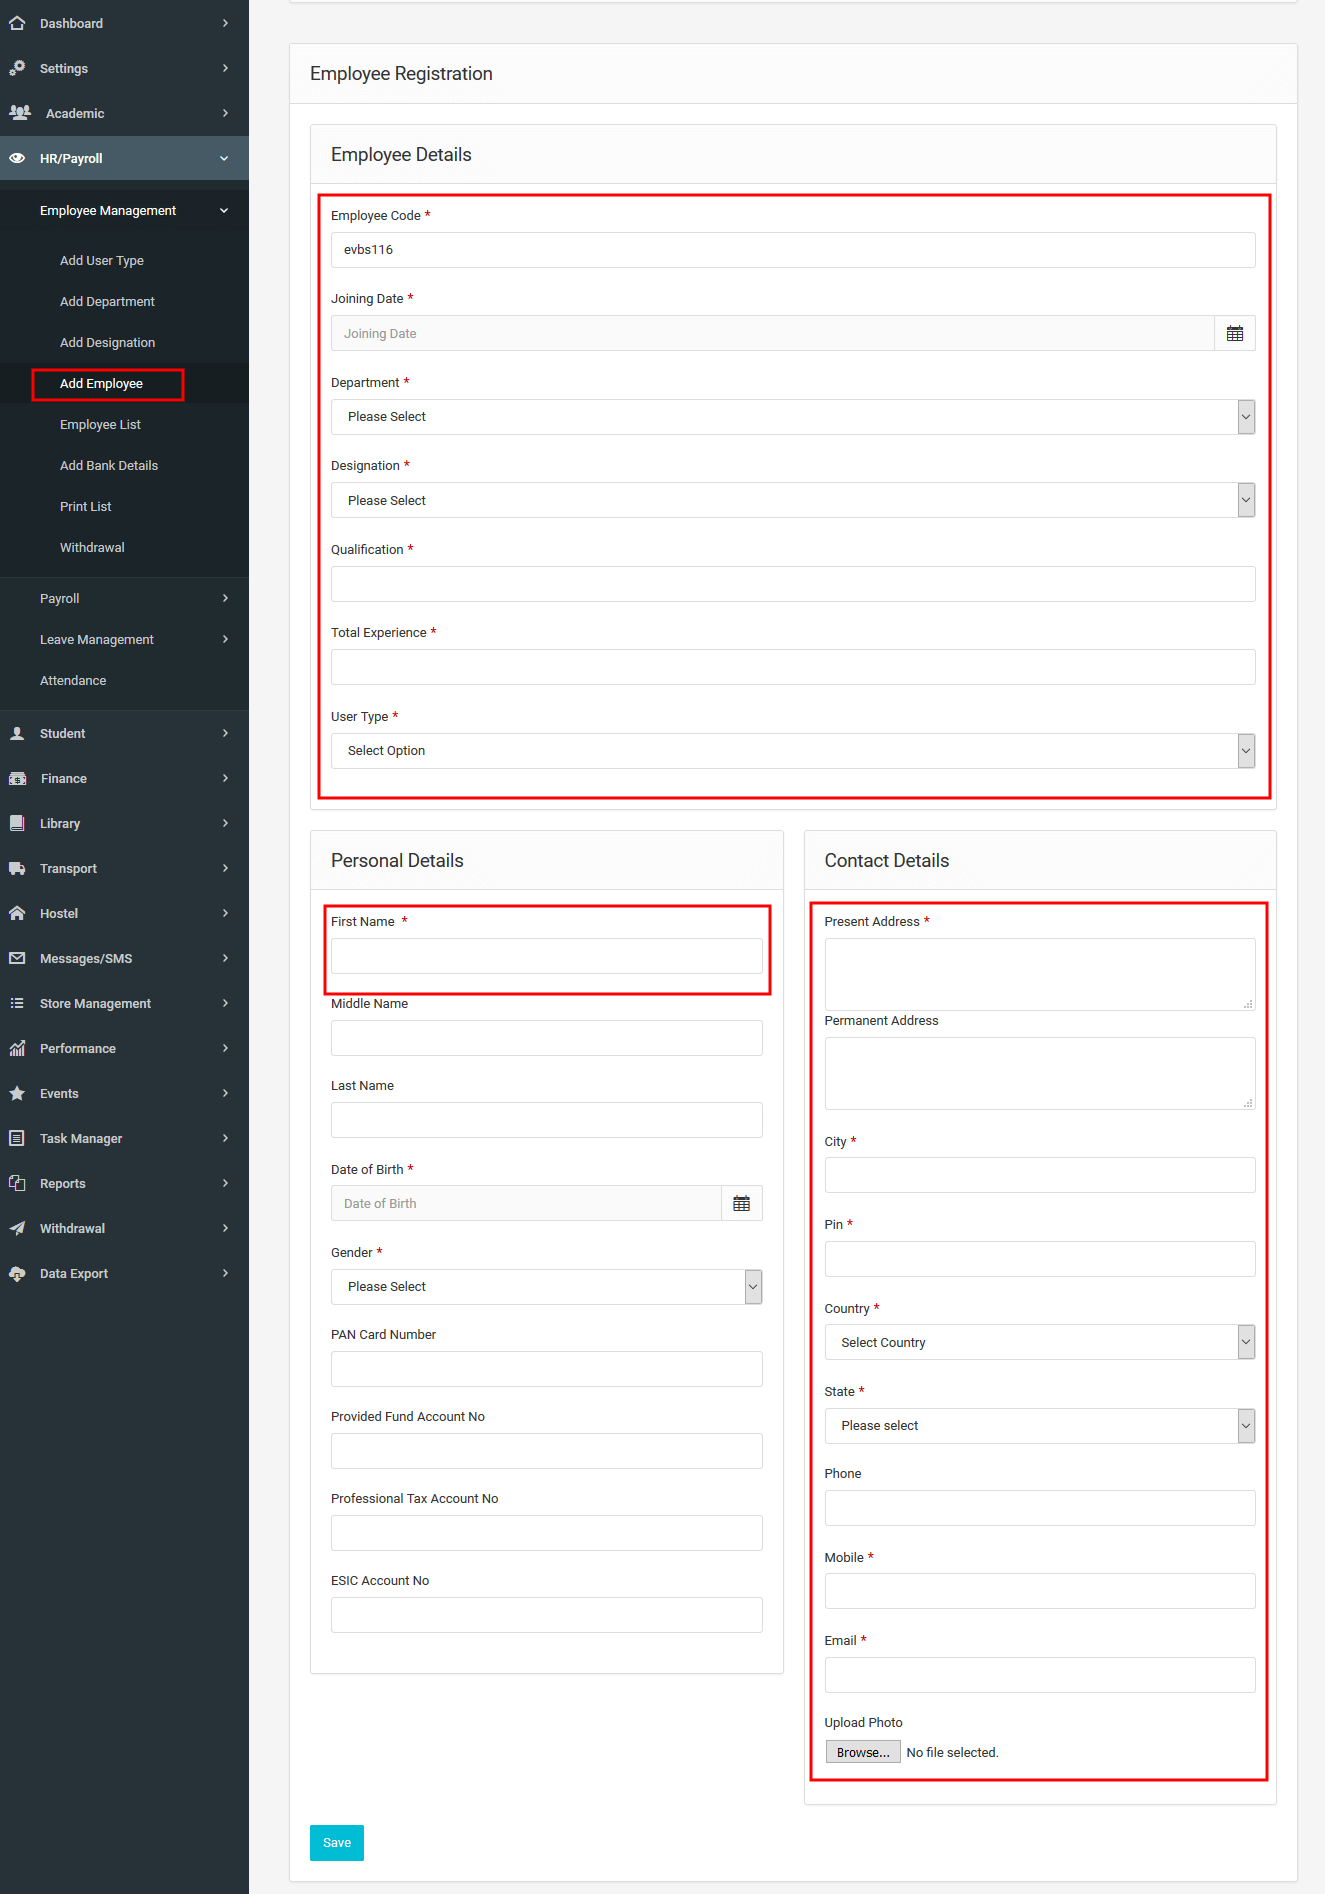
3.3.1.4Add Employee
Add employee is used to add employee details.Here the user has to enter the
details regarding their position and educational qualification and also have to enter
some basic personal info.Employee code should be unique.The Login credentials for the
employee is created while the enrollment of the employee.
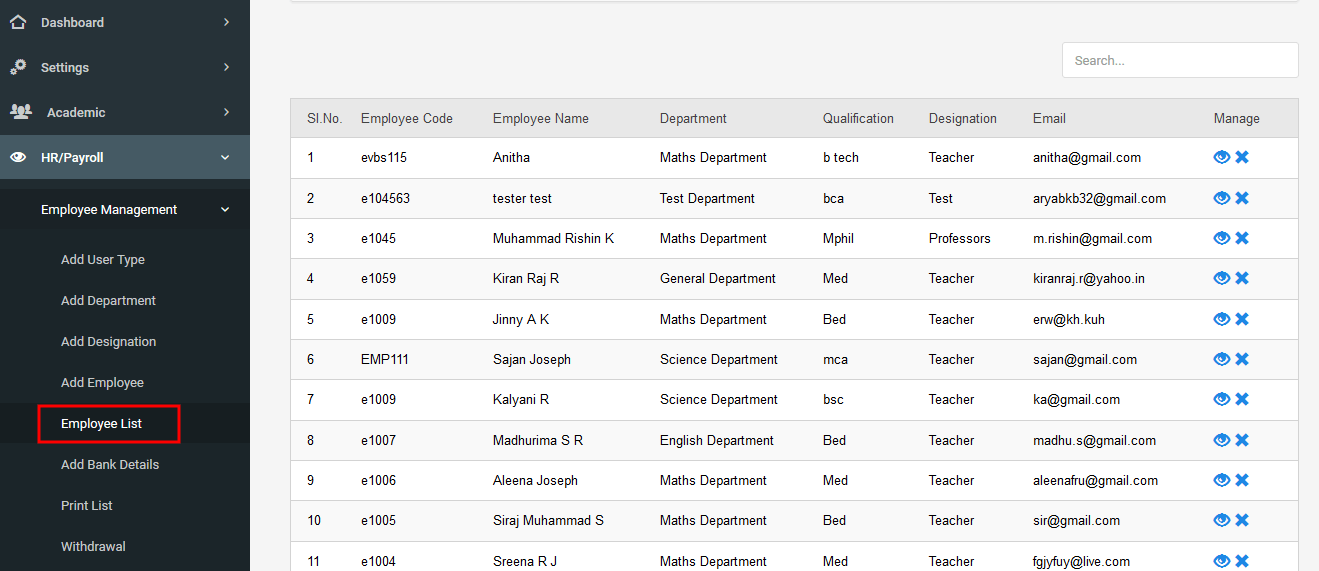
3.3.1.5Employee List
Employee list is used to list all the employees in that institution. And a search bar is in
the top of the page to search employees based on employee code, employee name
,qualification and email.
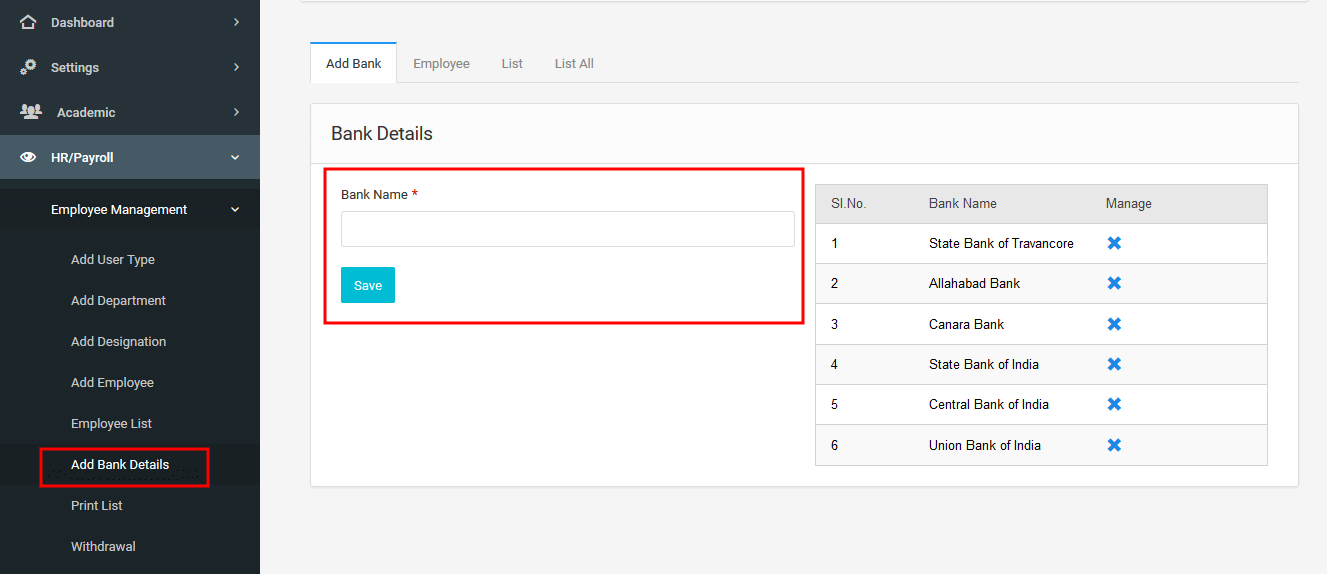
3.3.1.6Add Bank Details
Add bank details mainly consist of three tabs.
First tab (Bank Details)is used to enter the bank details which consist of various
information like bank name, branch name ,IFSC code for each employee.
Second tab(list) is used to view the bank details of each employee.
Third tab(List all) is used to list the bank details of employees in each department.
User can also take print out of this.
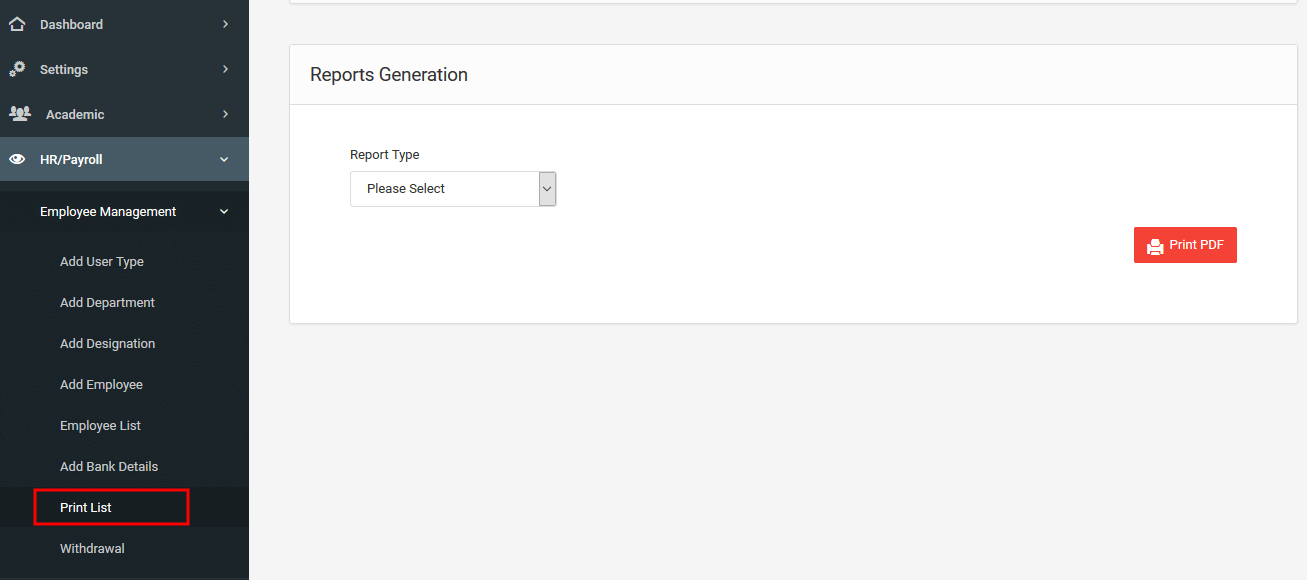
3.3.1.7Print List
Here we can generate the details of the employees of the selected department.
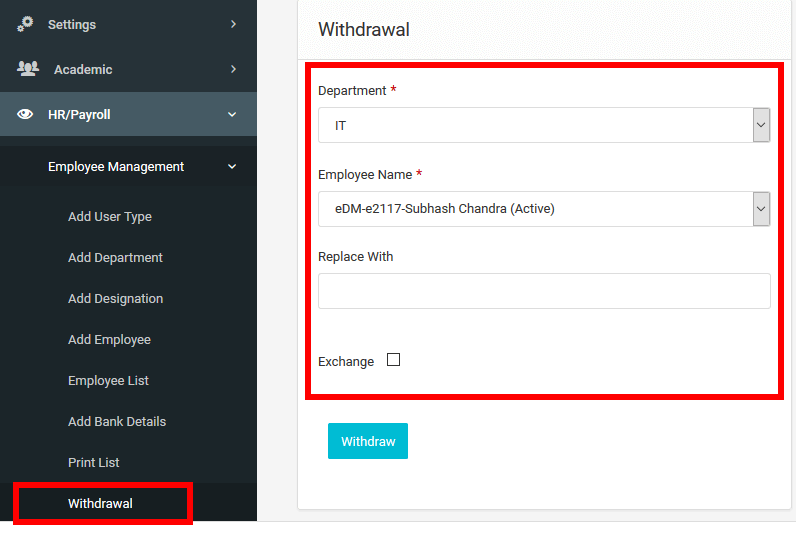
3.3.1.8Withdrawal
Here we manage the withdrawal of employee.By checking the exchange option, we can exchange the selected employee with the given employee. Otherwise the employee withdrawal is takes place(Resignation).
3.3.2Payroll
In a school, payroll is the sum of all financial records of salaries for an employee, wages,
bonuses and deductions. Our payroll section meets this requirement .
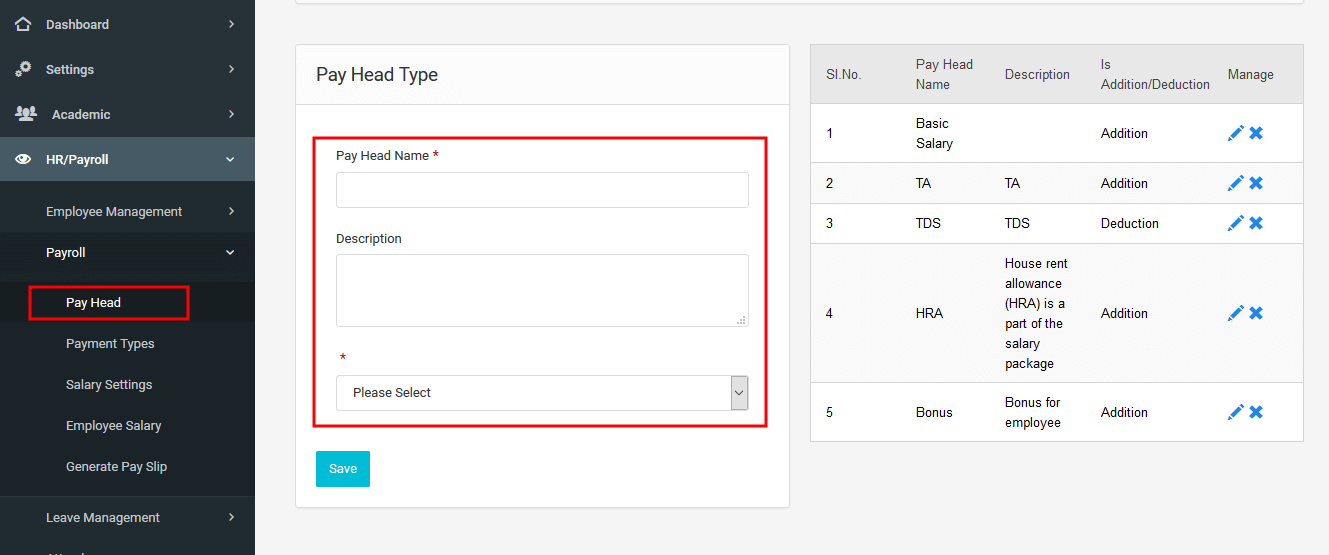
3.3.2.1Pay Head
The salary components constituting Pay Structures are called Pay Heads. A Pay Head may be an
earning,which is paid to an employee, or a deduction, which is recovered from his/her salary such as TA,HRA ..etc.
The value of these Pay Heads could be either fixed or variable, for each Payroll period.
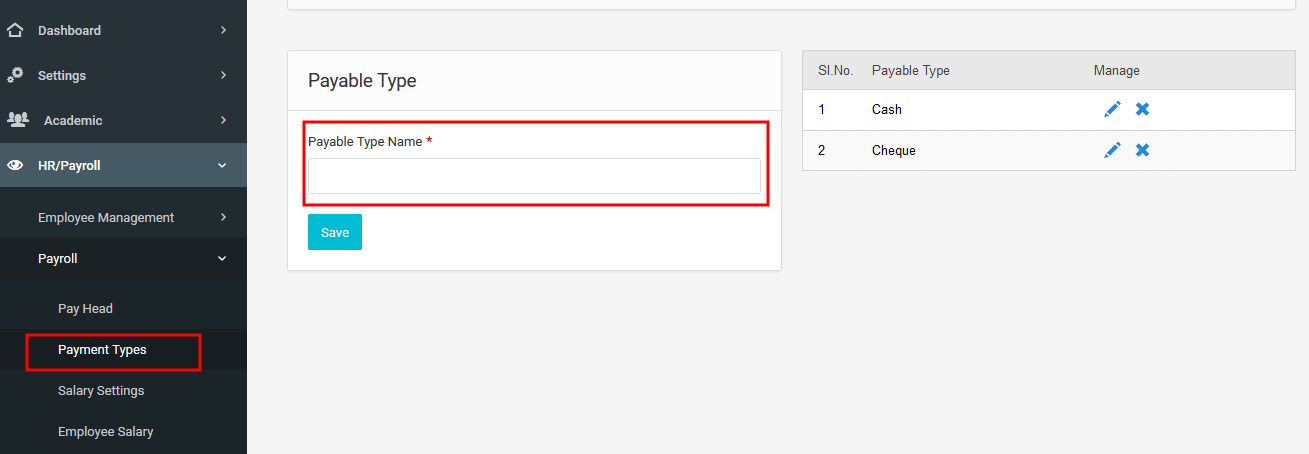
3.3.2.2Payment Types
The payment can be made in many different ways like by giving Cash,Cheque, Bank Draft, etc.
Payment types defines this.
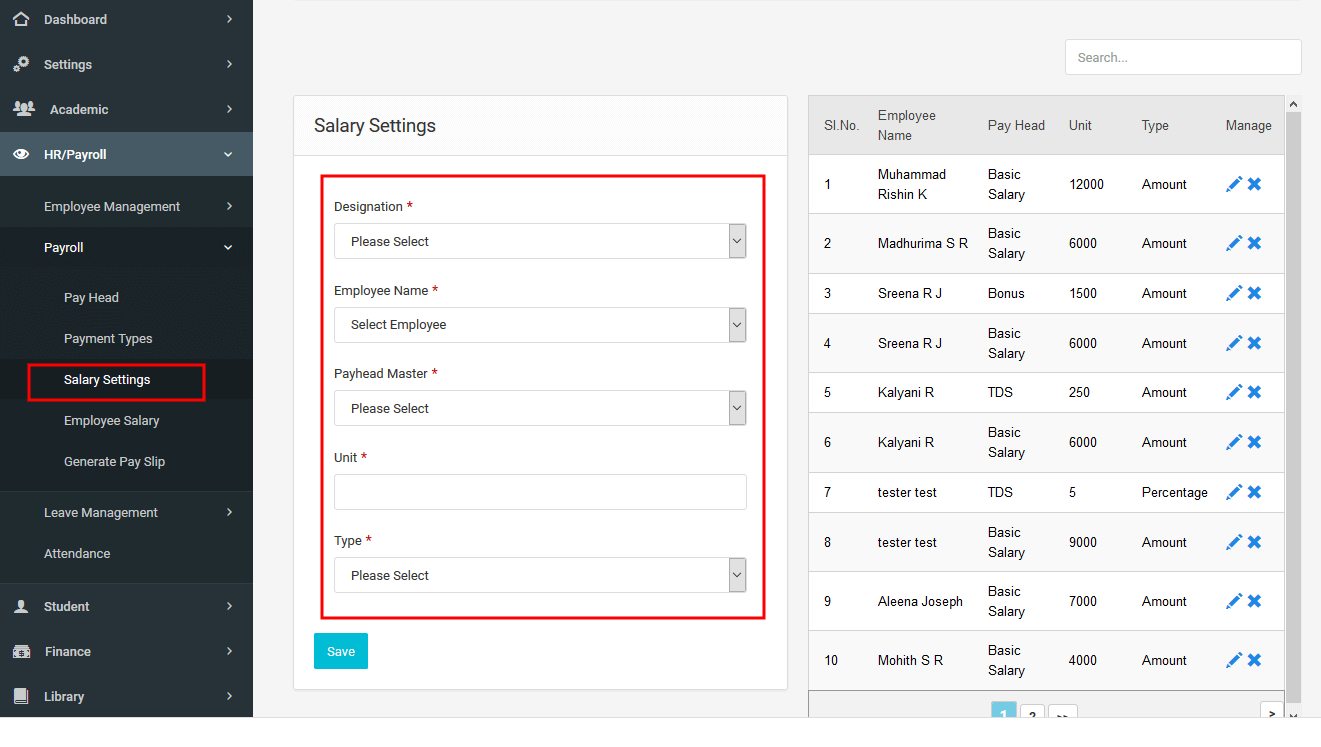
3.3.2.3Salary Settings
Salary settings are used to assign salary structure to each employee type. BY using this we can assign
each payment heads to employee type with units and we get a complete salary structure. Unit can be
either in percentage of basic salary o0r can be in cash .
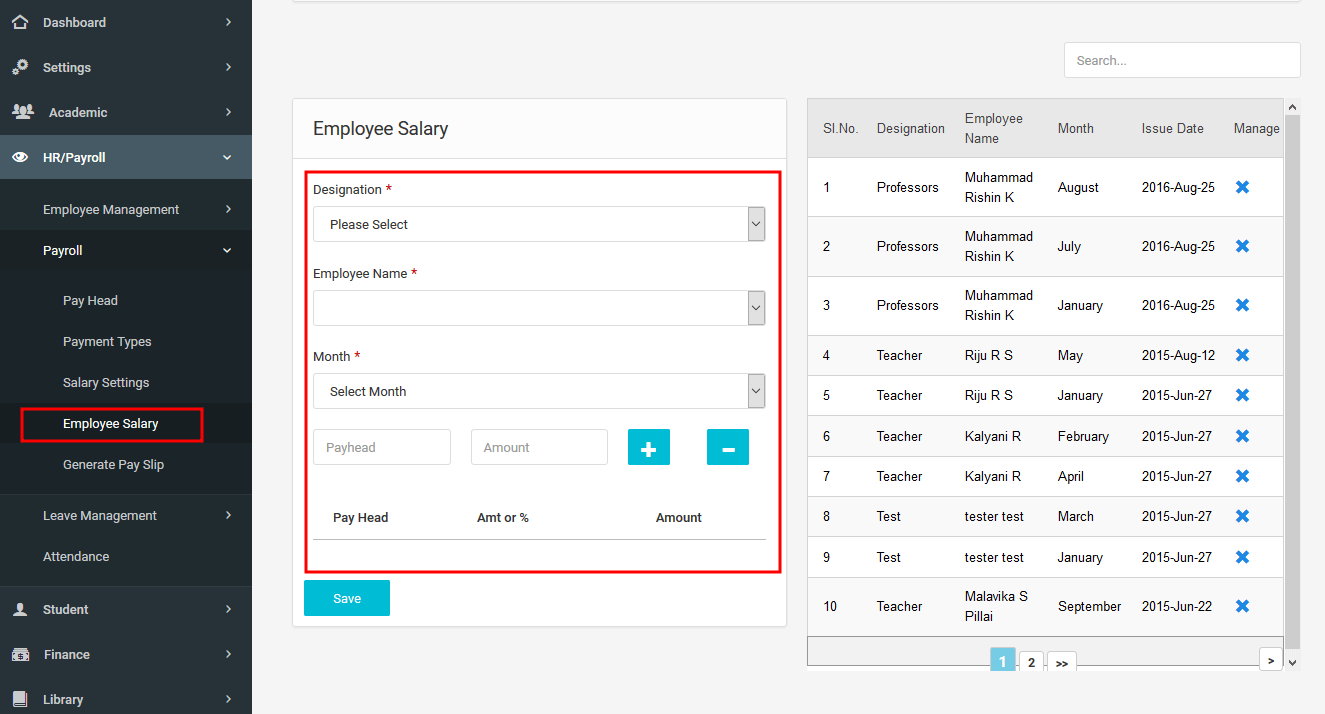
3.3.2.4Employee Salary
In employee salary , salary is assigned to each employee. And here we have provision to add any extra
bonus or benefits to each employee or deduct salary of a employee based on their performance in
each month.
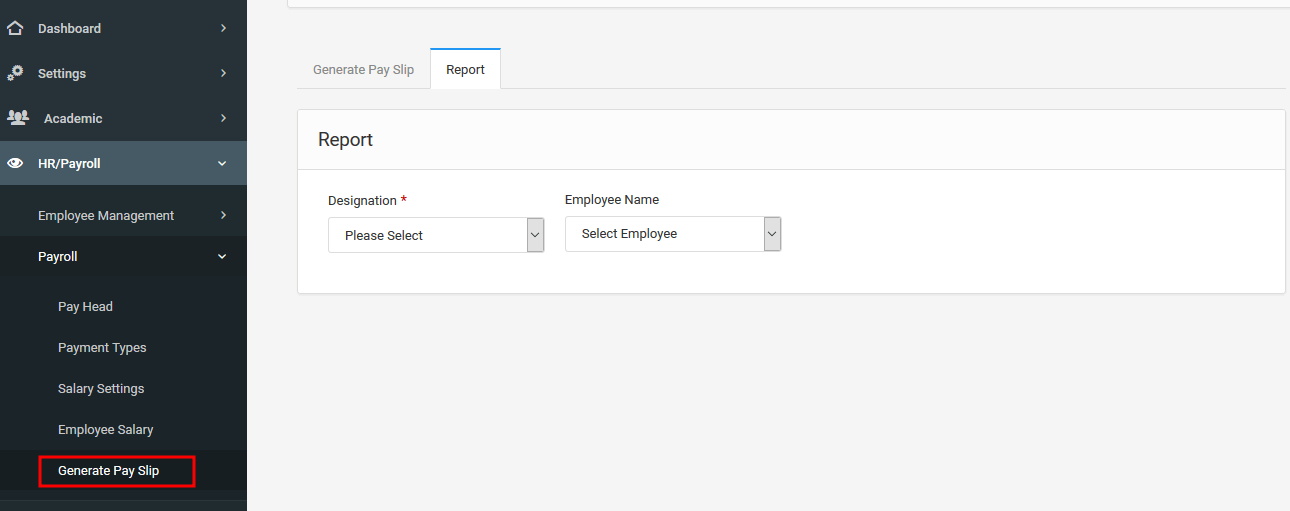
3.3.2.5Generate Pay Slip
Generate pay slip is used to issue payslip for an employee.
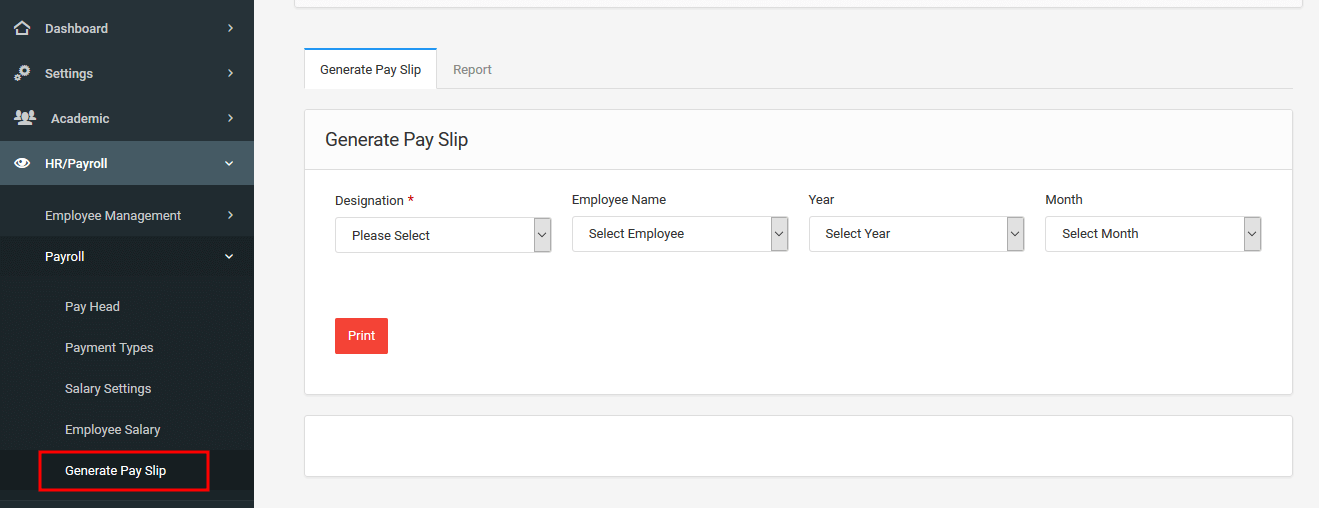
This shows the report of salary details of employee in the selected department.
3.3.3 Leave Management
Leave Management is used to managing the leave related details.
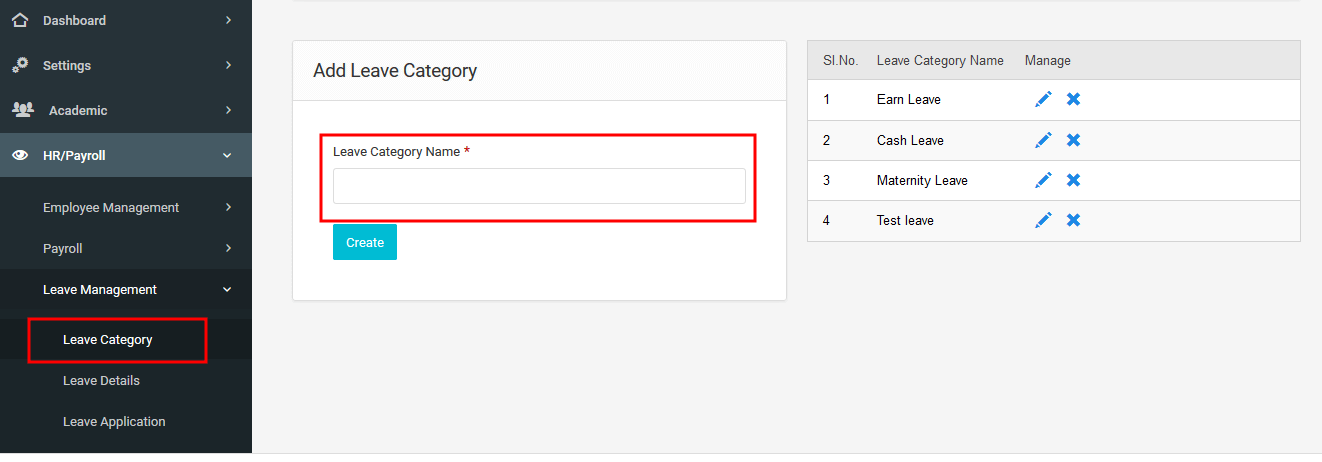
3.3.3.1Leave Category
The Leave category is to categorize Leave into different groups. The Leave category name can be given in the name field
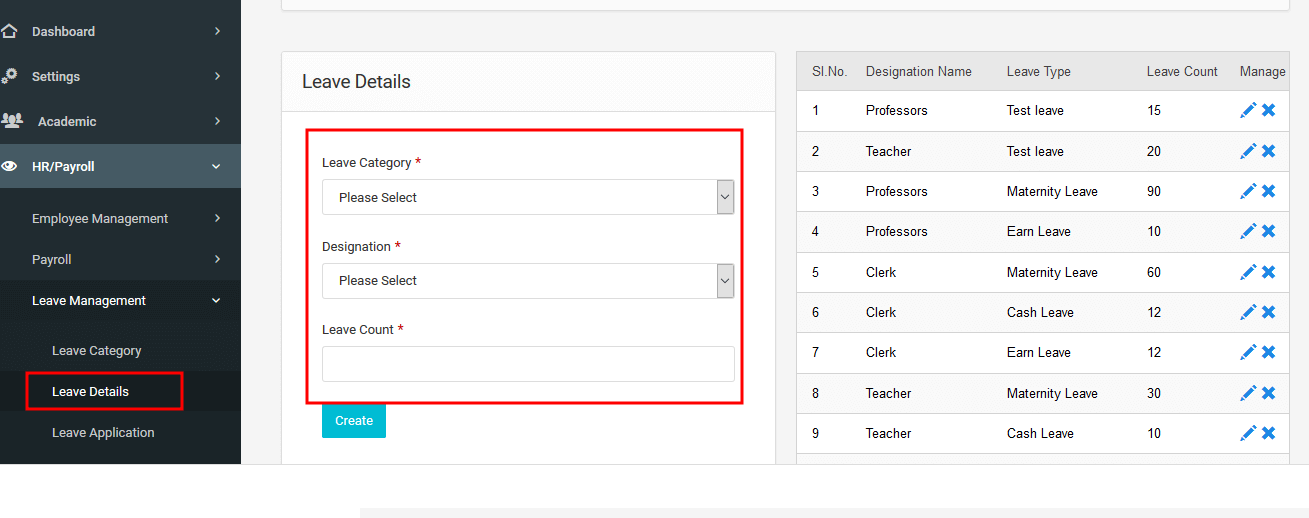
3.3.3.2Leave Details
Leave details is to assign leave count of each leave category against the designation.
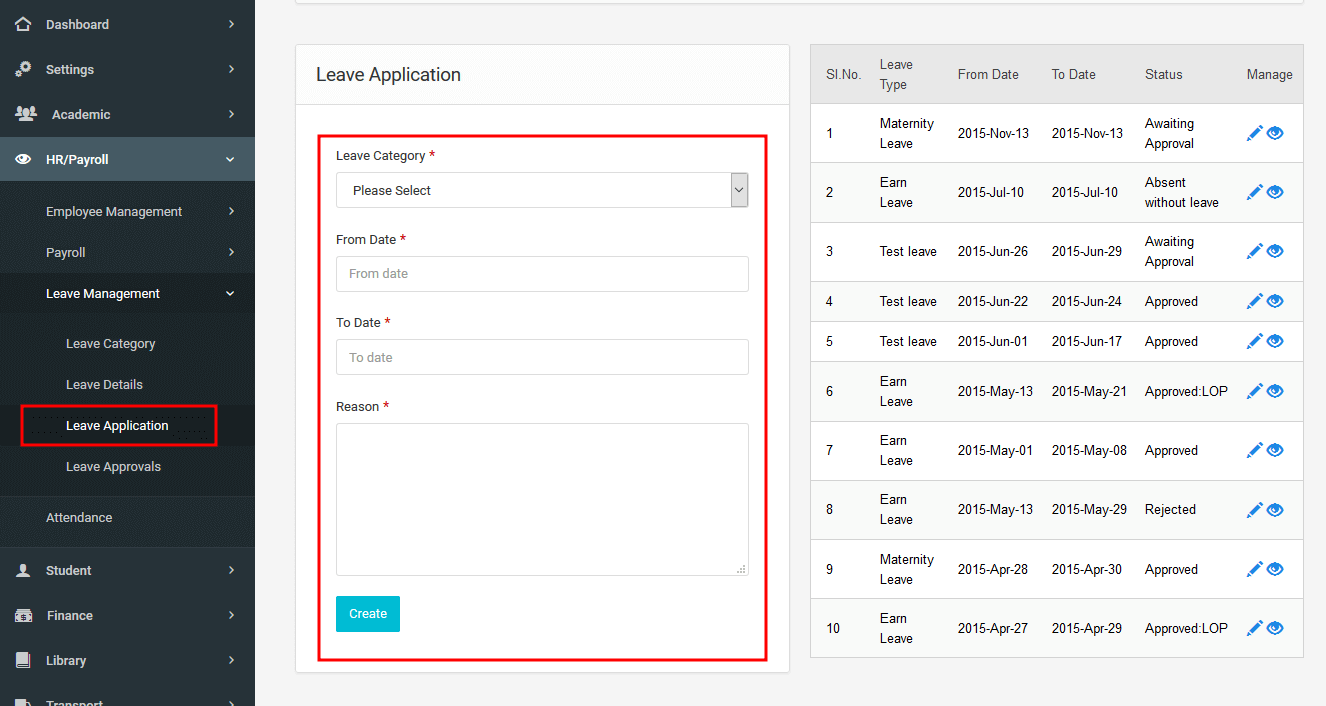
3.3.3.3Leave Application
Here user can apply leave by filling the details like leave category, from date ,to date and reason for leave.
And also user can view the leave status.
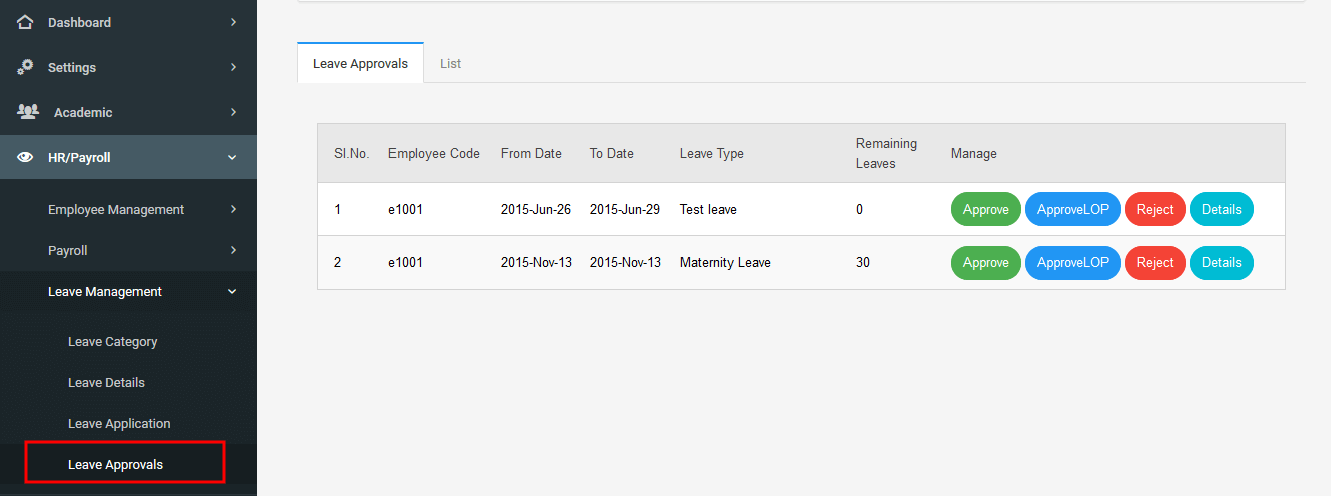
3.3.3.4Leave Approvals
Leave approvals are used to take action on applied leaves.
User can take three actions approve, approve lop and rejection.
Upon taking the action the request will be removed from Leave Approvals.
3.3.4 Attendance
Attendance is used to enter the attendance details of employees. It contains two tabs , one is for entering attendance details and other is for view attendance details

3.4 Student
In this module, we describe all the details related to the students in the institution.
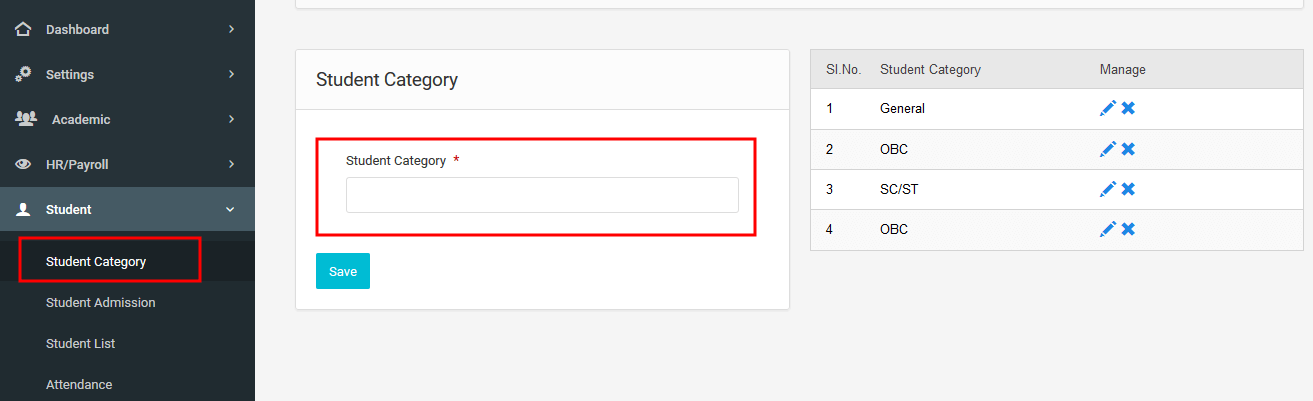
3.4.1Student Category
In student admission form, the user will be asked to select under which category the student
belongs to.It is important because in some educational institutions there may be concession based on
category. For this, the user has to enter the student category details here.
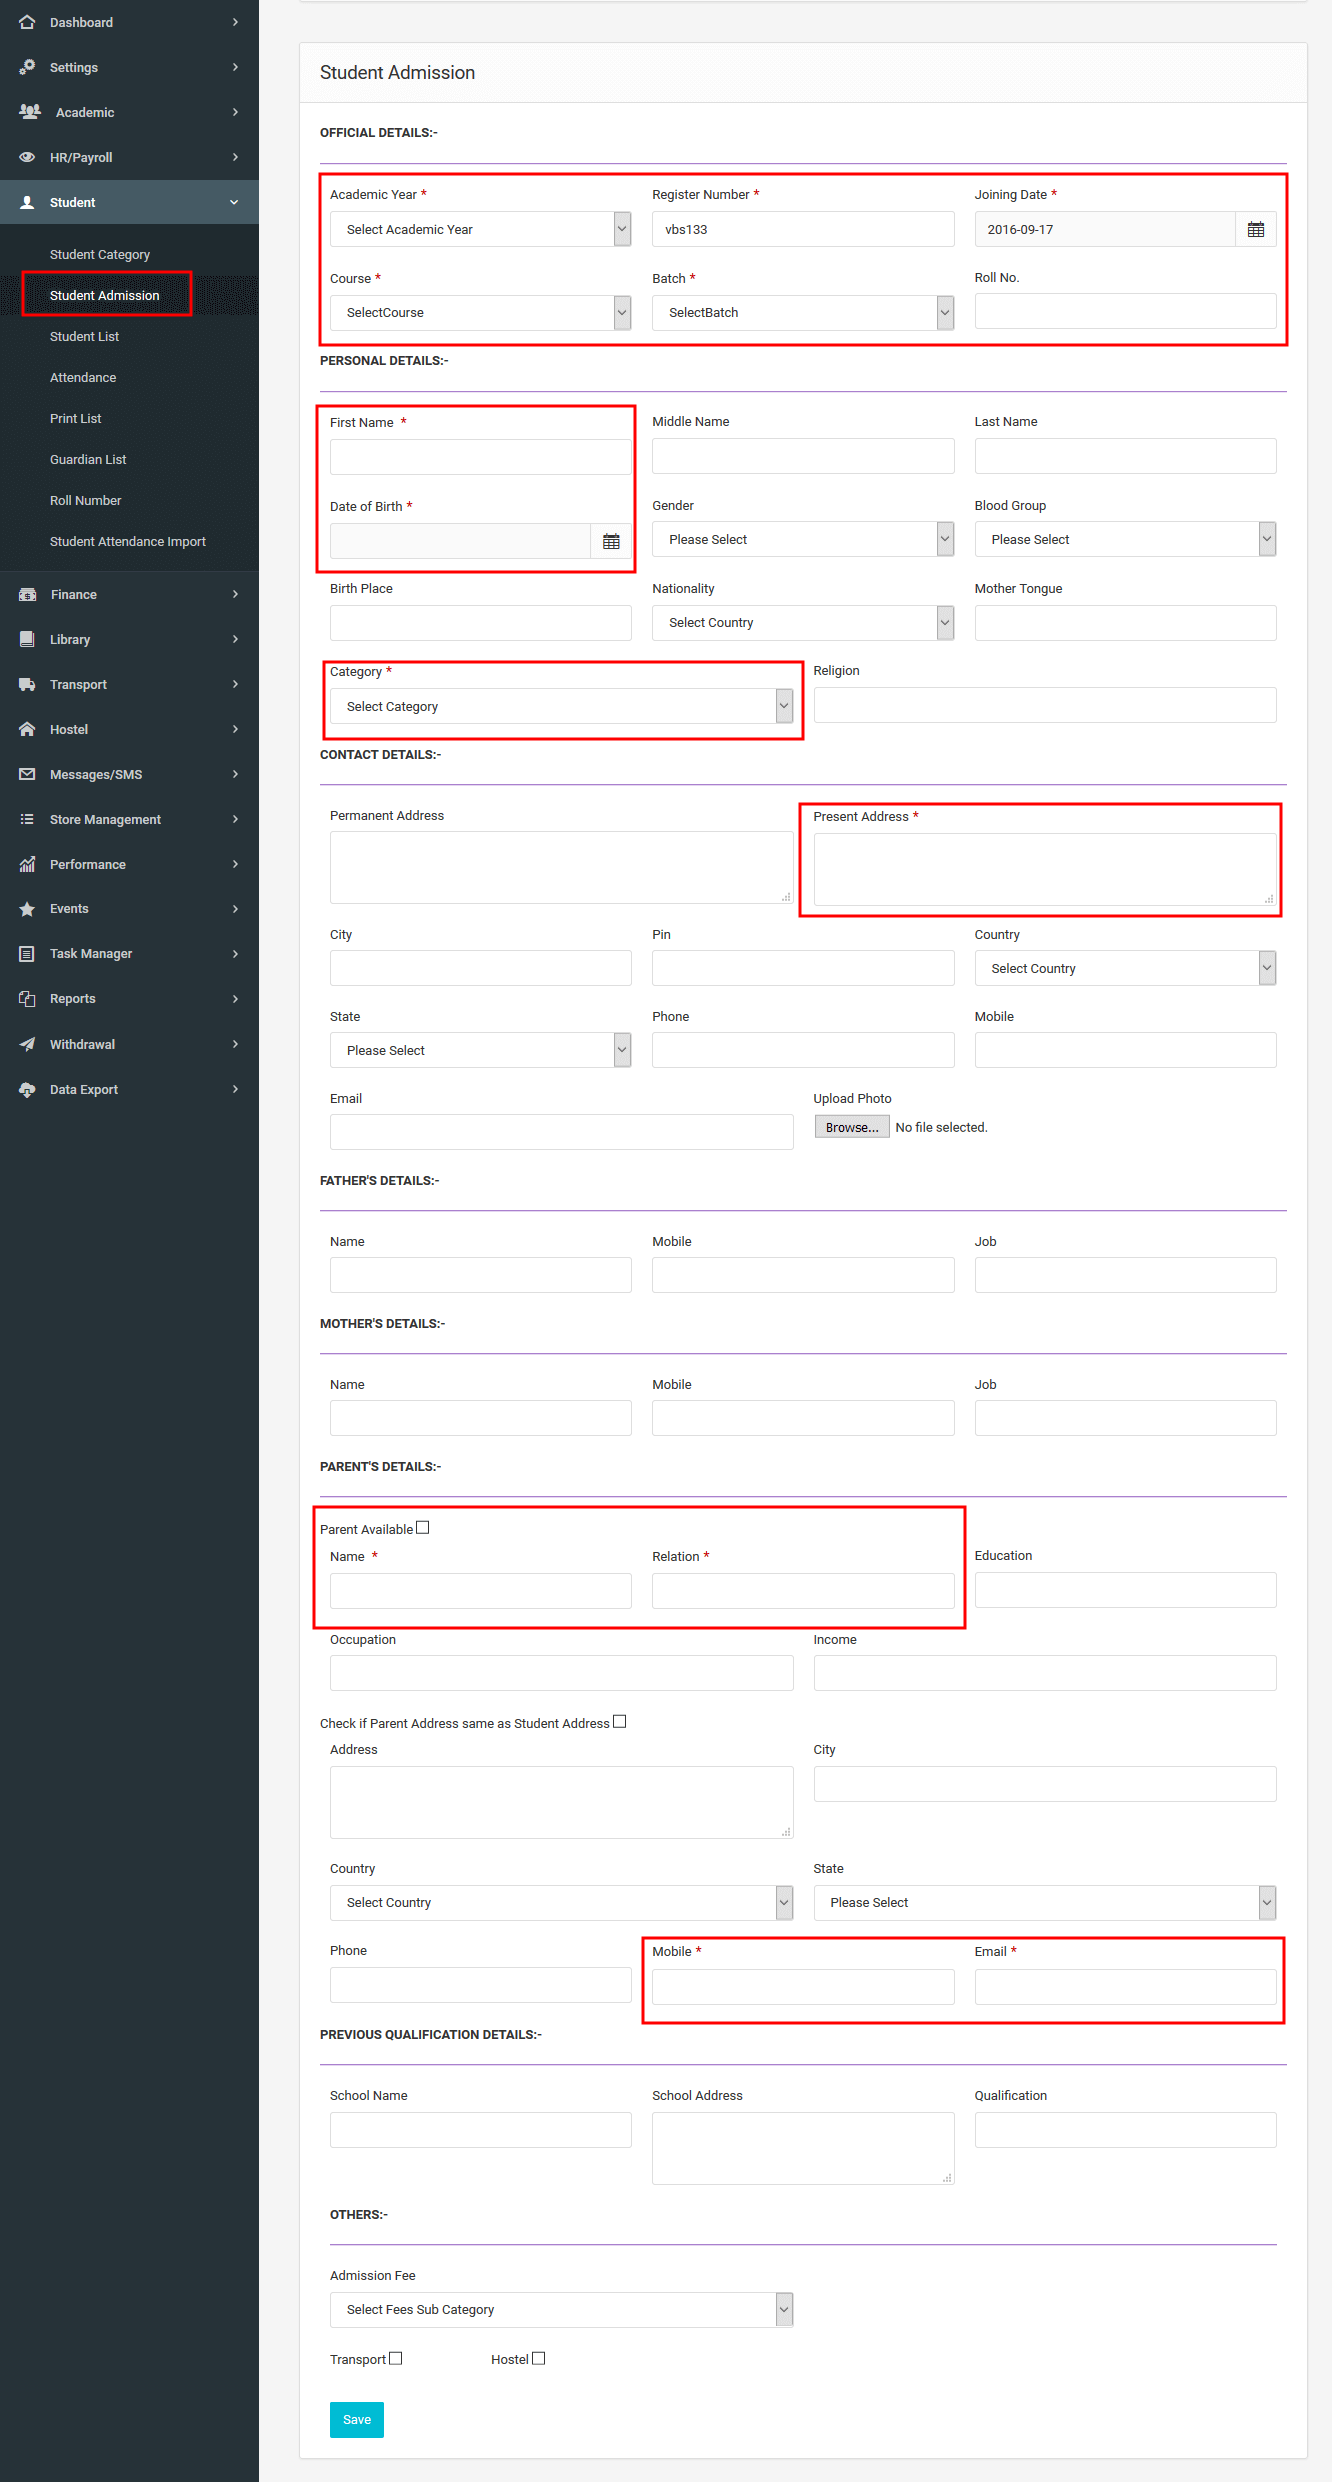
3.4.2Student Admission
In this process ,the user can only go to the next step only after the
successful entry of all mandatory fields.Student. In case of admission number, if we have selected auto
generation option while creating the institution details ,admission number will be auto generated.The Login credentials for the
students and guardian are created while the enrollment of the student.
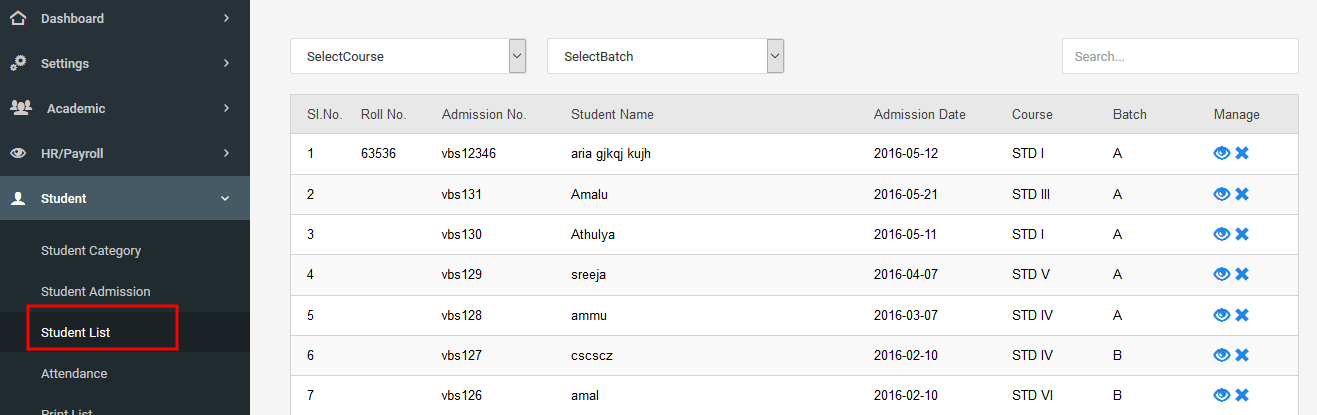
3.4.3Student List
Student list contains list of all students in that institution in LIFO order.The search bar
on top of the page is used to search a student using on admission number or name.
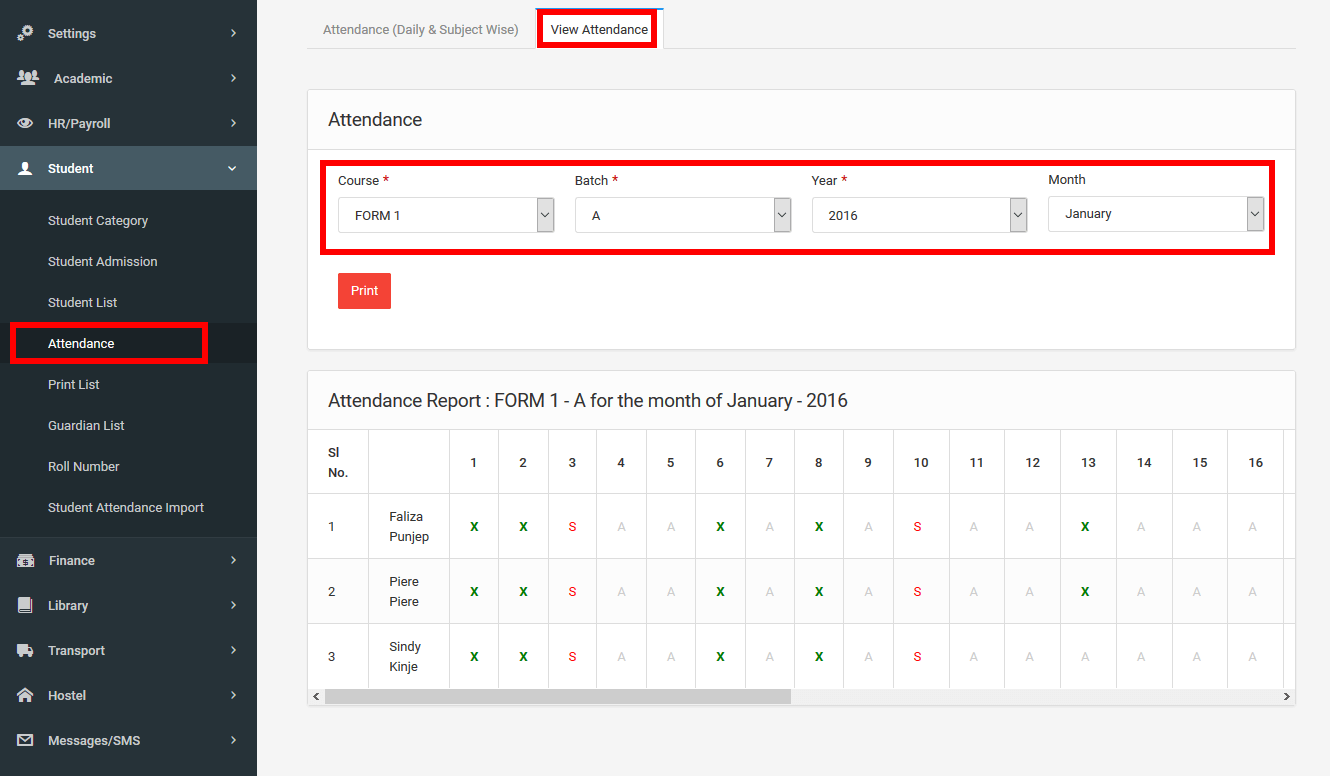
3.4.4Attendance
Attendance contains two tabs , one is for entering attendance details and other is for view
attendance details.
Attendance is used to enter the attendance details of students for the selected date. Attendance can be of two type:
Daily wise and subject wise. These types are defined in the course creation page. If type is daily wise ,then the subject selection
field is not displayed.
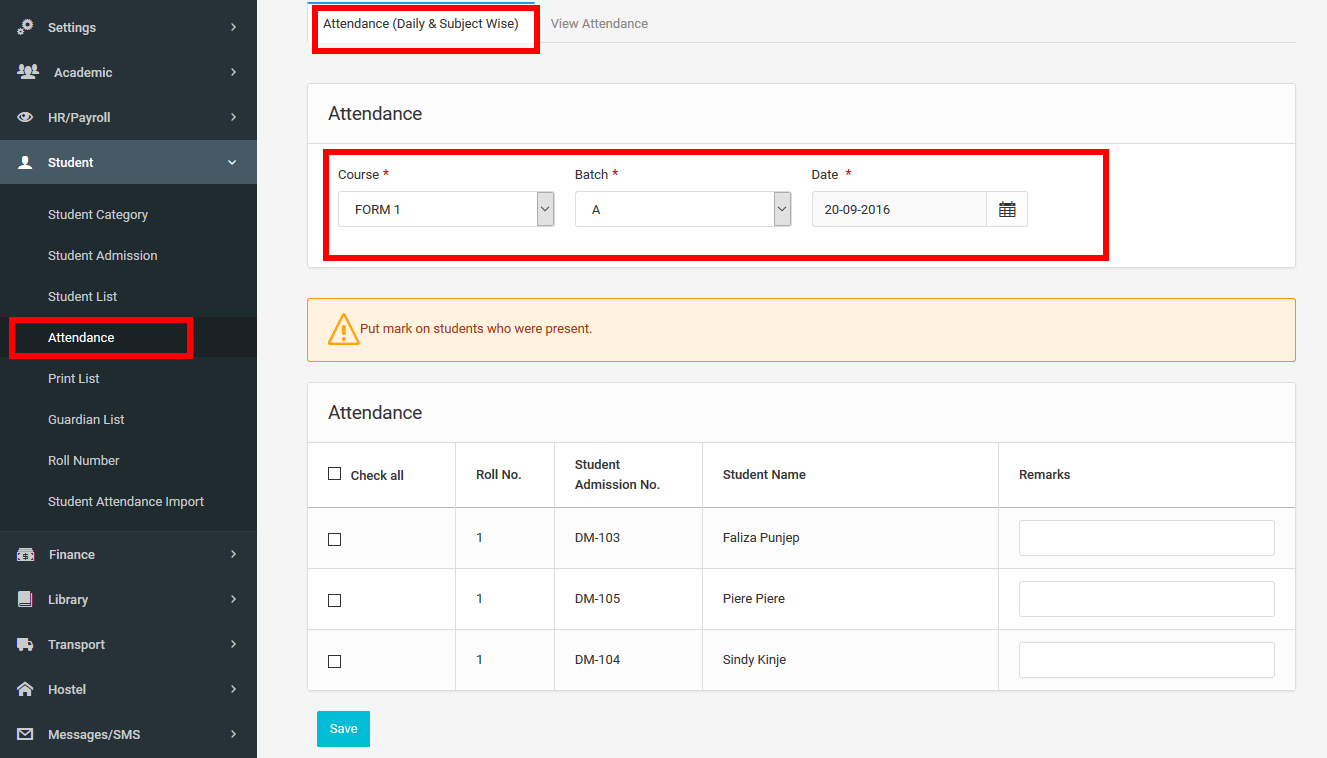
Here we can view the attendance details
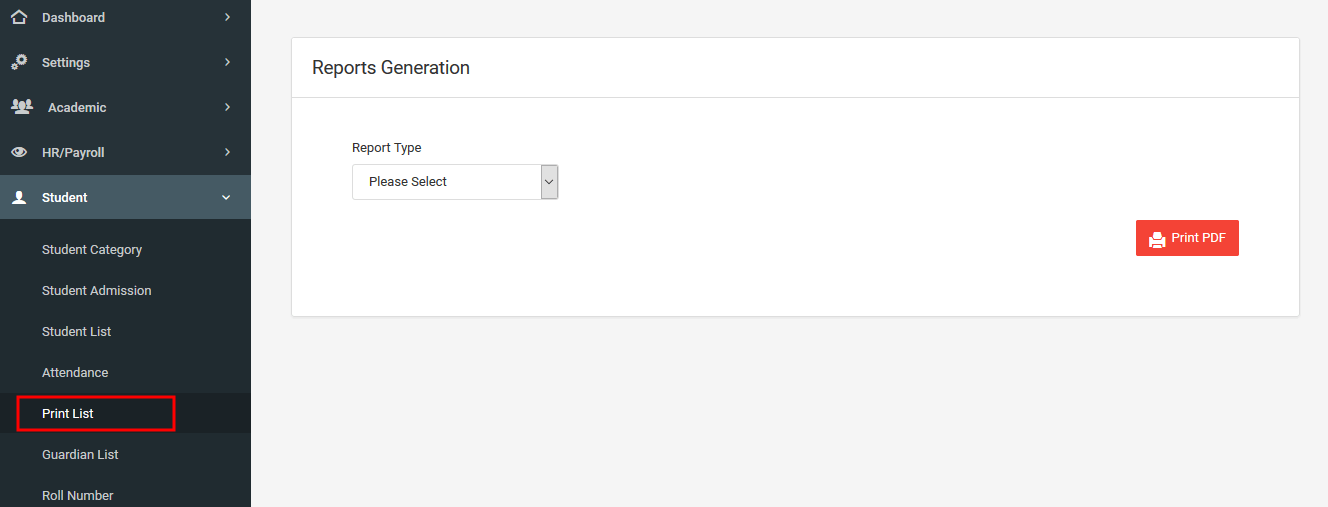
3.4.5Print List
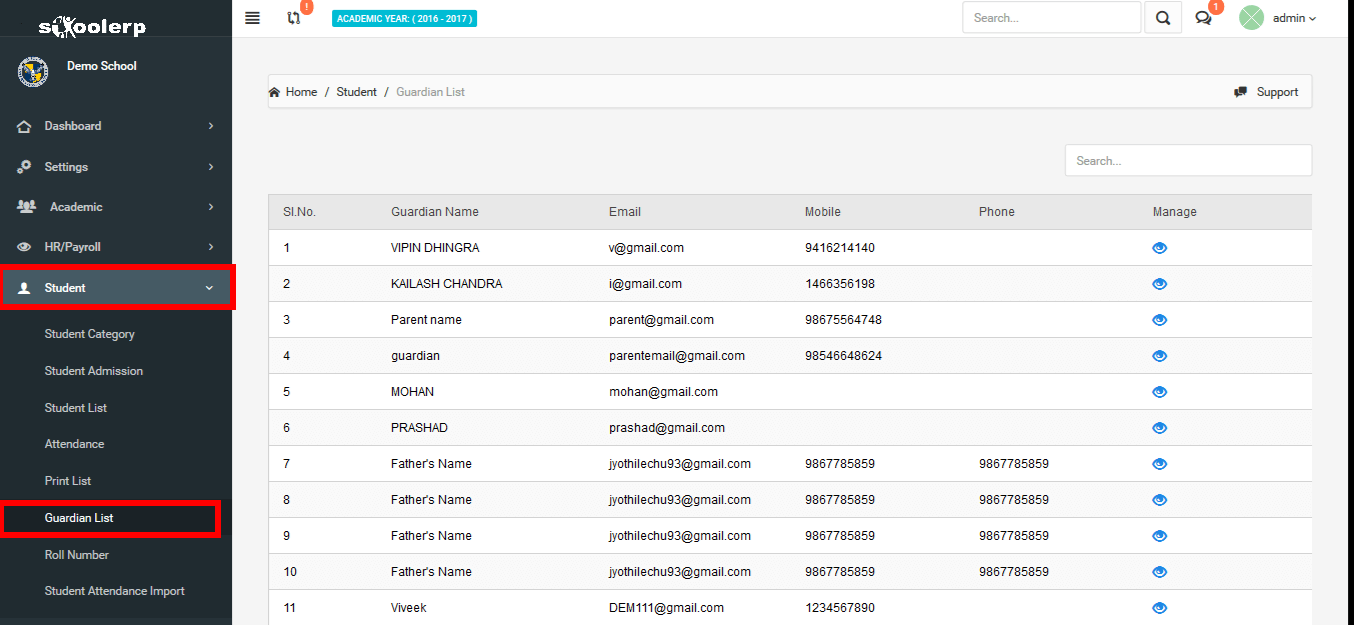
As the name indicates, it is the list of guardians.
3.4.6Guardian List
Print list is used to take the print out of the students details.There exist 3 types of the
student list (Class wise, Batch wise and Student wise).
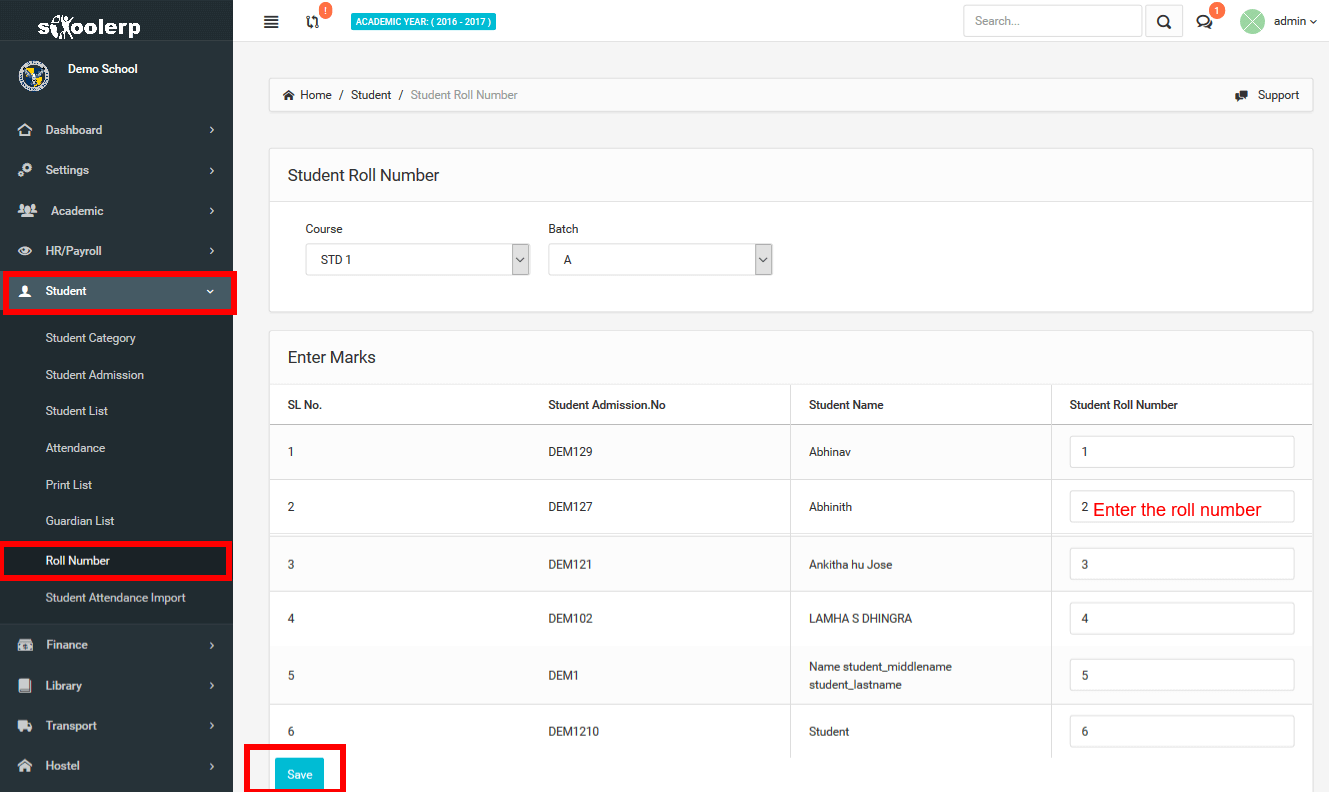
3.4.7Roll Number
Here you can assign roll number for students by selecting the course and batch. And then entering the roll number against the students name& admission number.
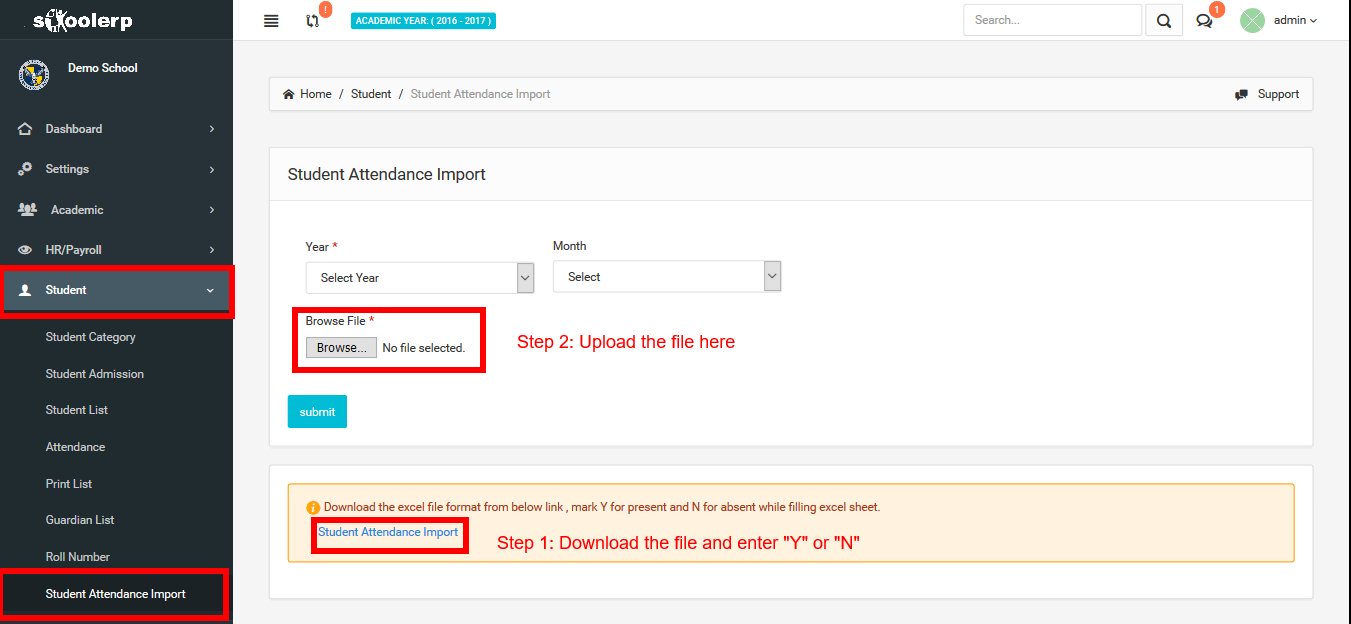
3.4.8Student Attendance Import
Here you can upload the details of the student attendance for this, first you need to download the Student attendance excel format from the provided link and fill the excel sheet by copying the below values in corresponding columns. After filling the excel sheet, you can upload it.
3.5 Finance
This module manages all the financial details of the institution.
3.5.1 Fees
Fee module manages the fee details of student and generate receipts of the payment ,and also provide the fee due list.
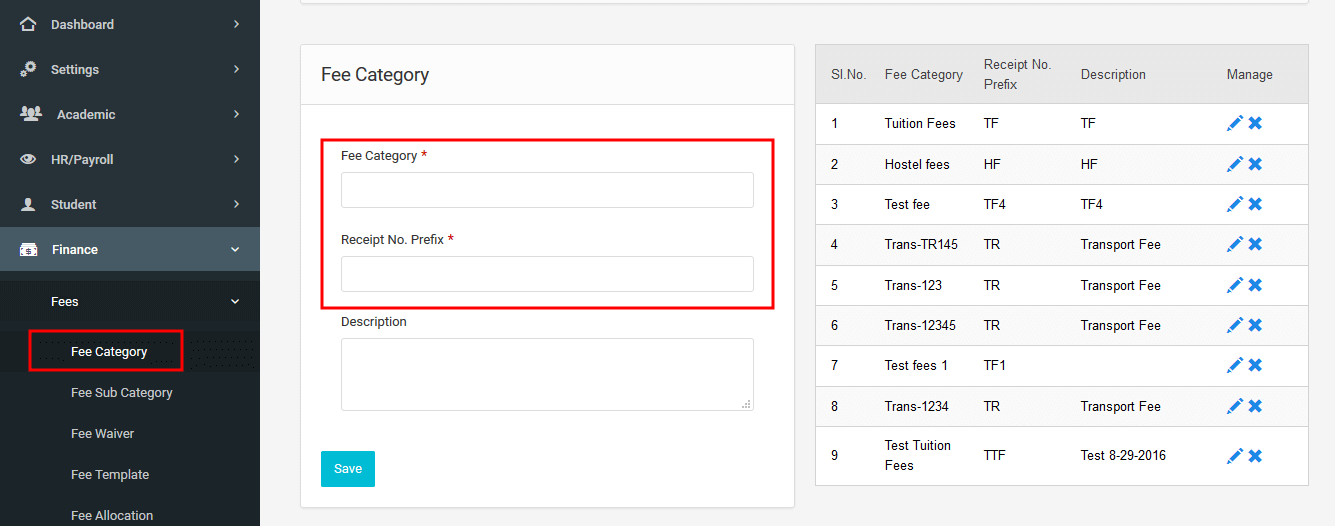
3.5.1.1Fee Category
Fee Category is used to create different categories with different receipt number prefix
and description.
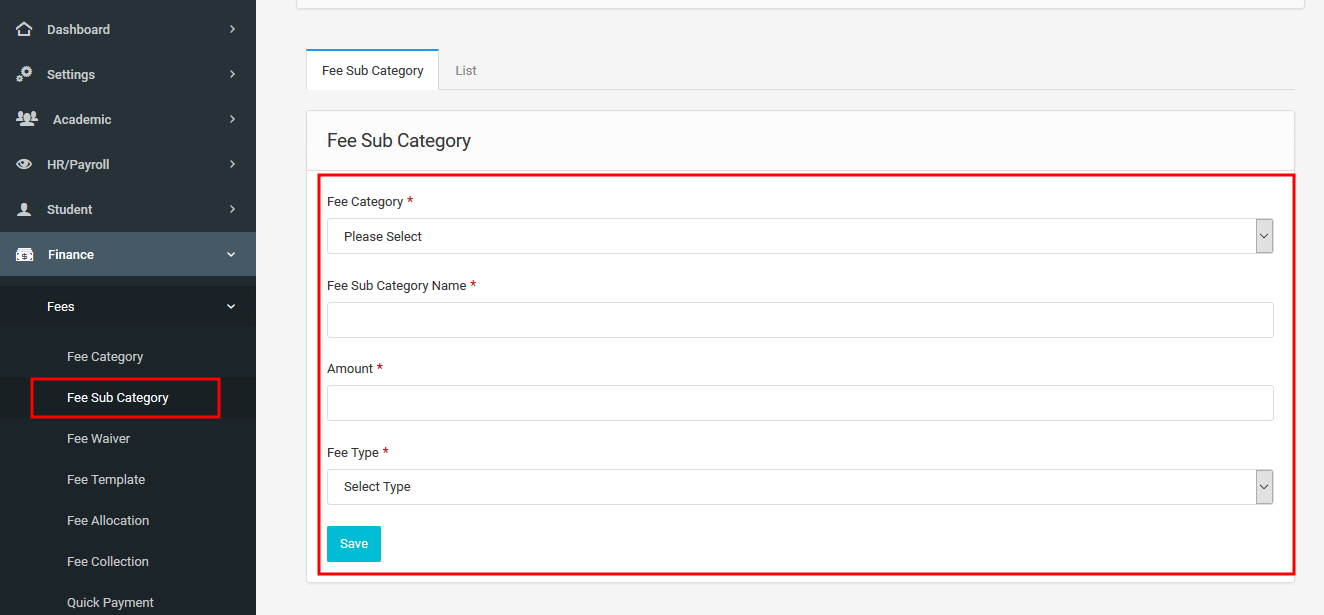
3.5.1.2Fee Sub Category
Fee Sub Category is used to create a subdivision for each created category and the payment
details are also assigned for each category.Payment details include amount,whether it is an
exemption or deduction and frequency.
3.5.1.2Fee Waiver
Here we can make deduction and excemption in fee.The deduction and excemption can be done in two ways: Gender wise,Category wise.
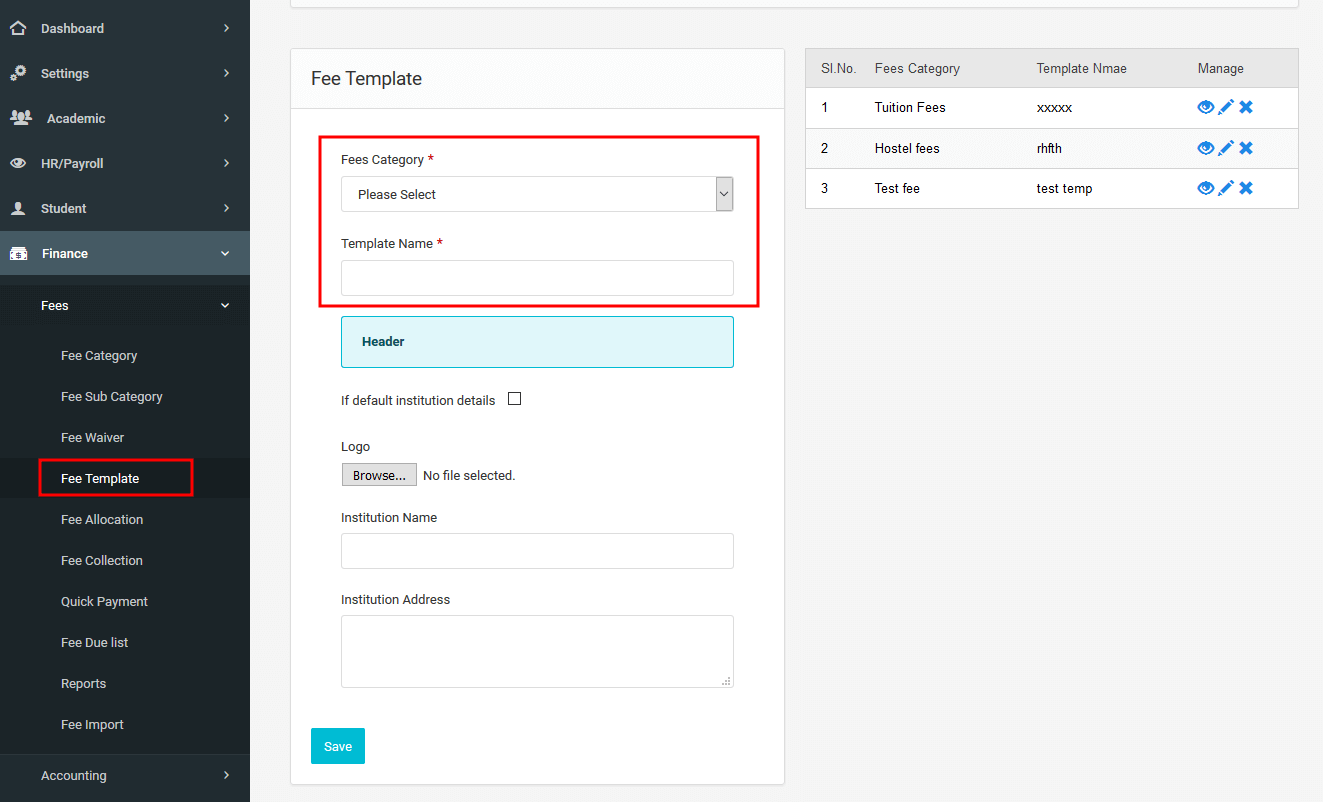
3.5.1.3Fee Template
Fee template is used to personalize the format of fee receipt. In this we can either create
template by using the institution logo itself or we can create by using another institution name
and logo. But only one template is allowed for each category
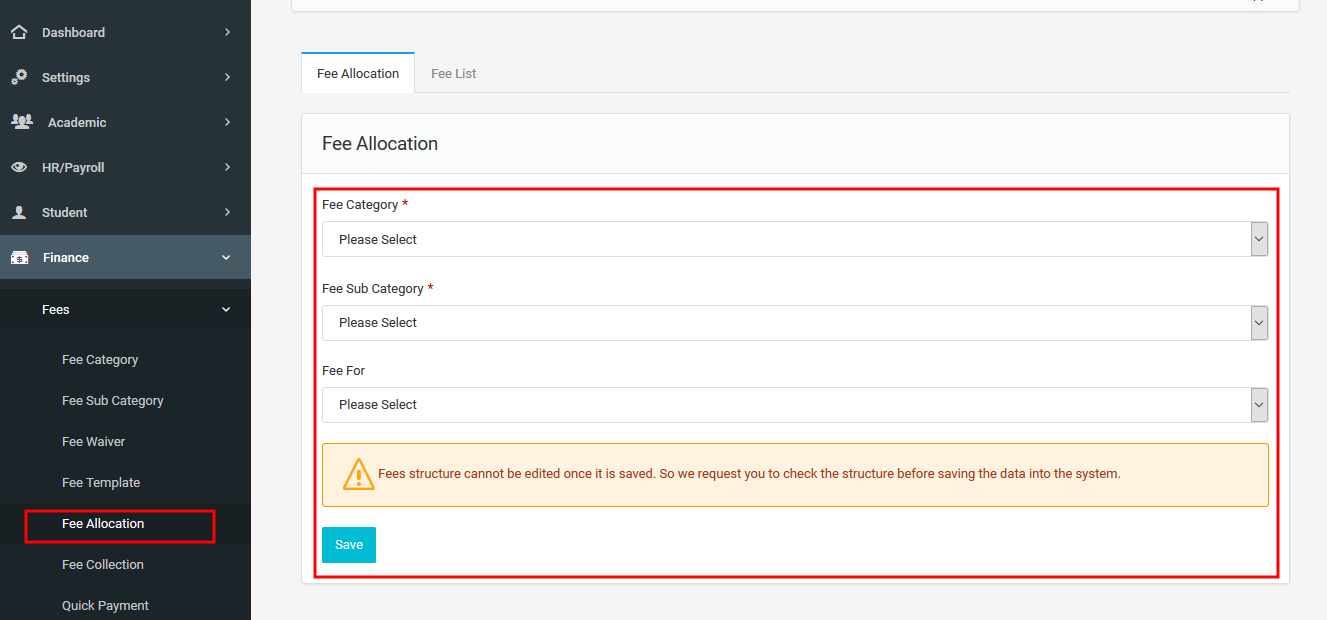
3.5.1.4Fee Allocation
Here we can allocate fee for each fee category. We can allocate fee either to
all batches or to selected batch or student in a batch
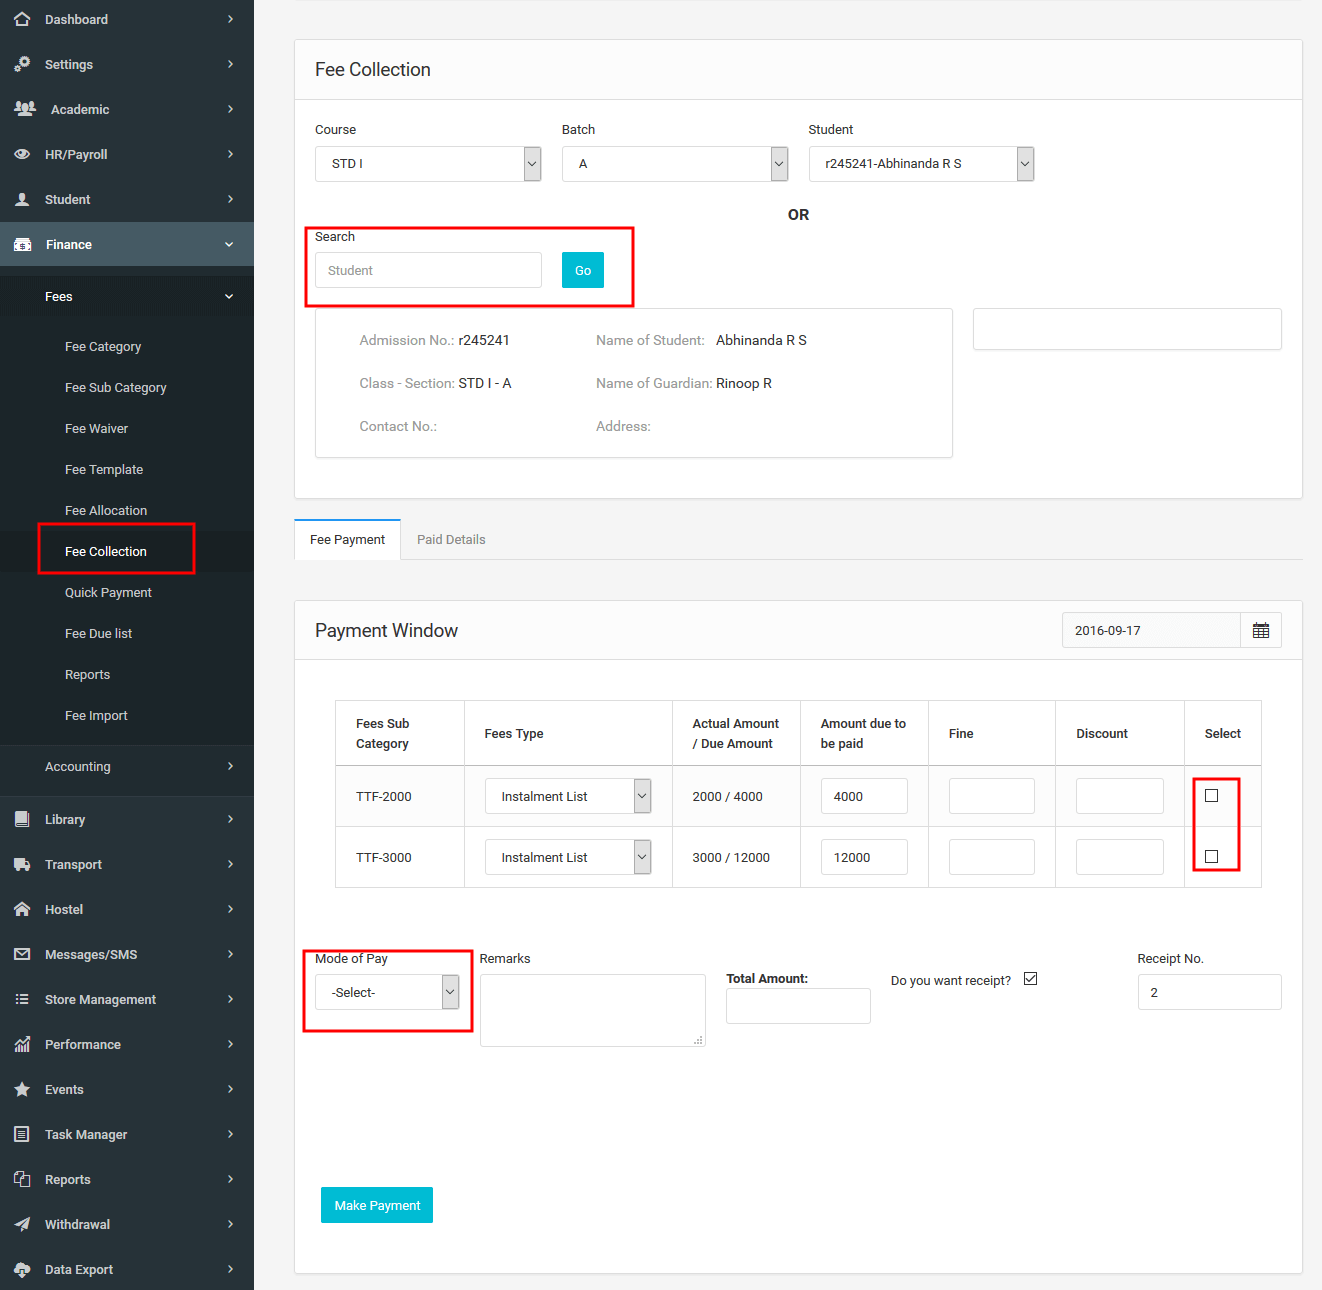
3.5.1.5Fee Collection
Here we can enter the fee collection details of the selected students. It generate slip for each payment And
payment method. If there is any fine , we can add that to fee at the time of payment
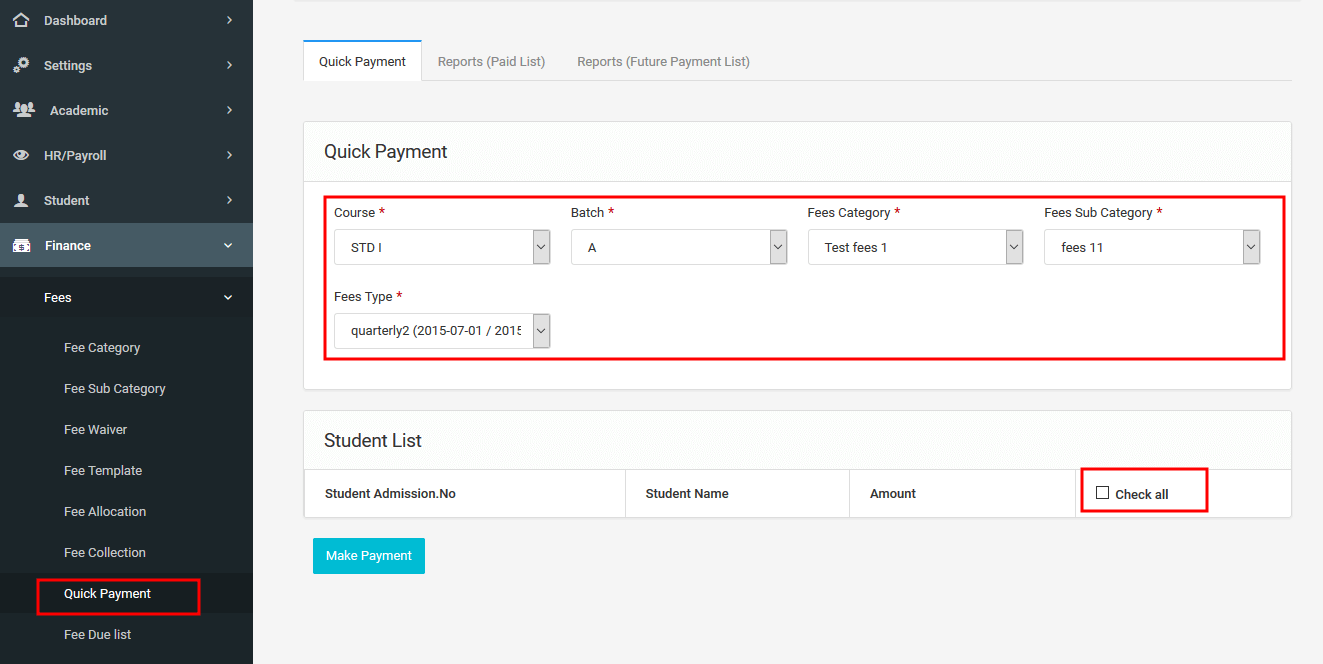
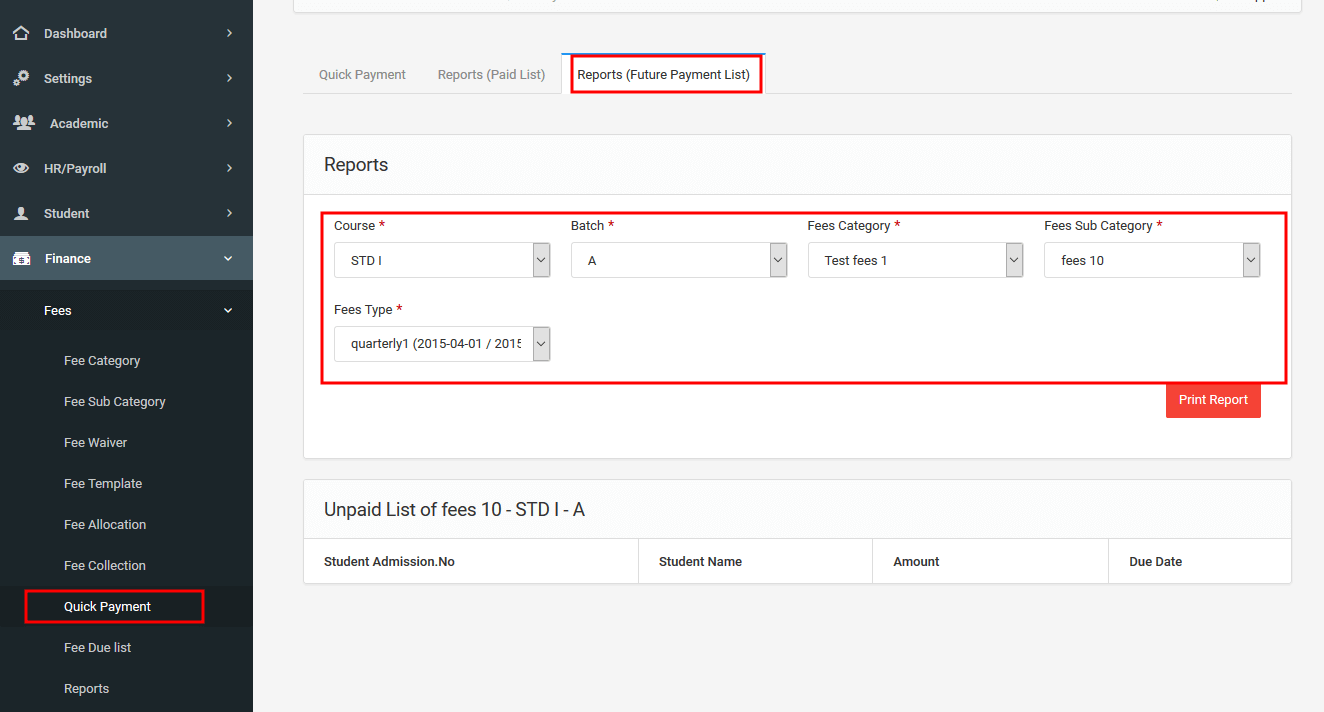
3.5.1.6Quick Payment
Quick payment option is used for bulk payment of fee. Which means,the teacher can collect fee
from class and enter the details at once.
Here we can see the paid list
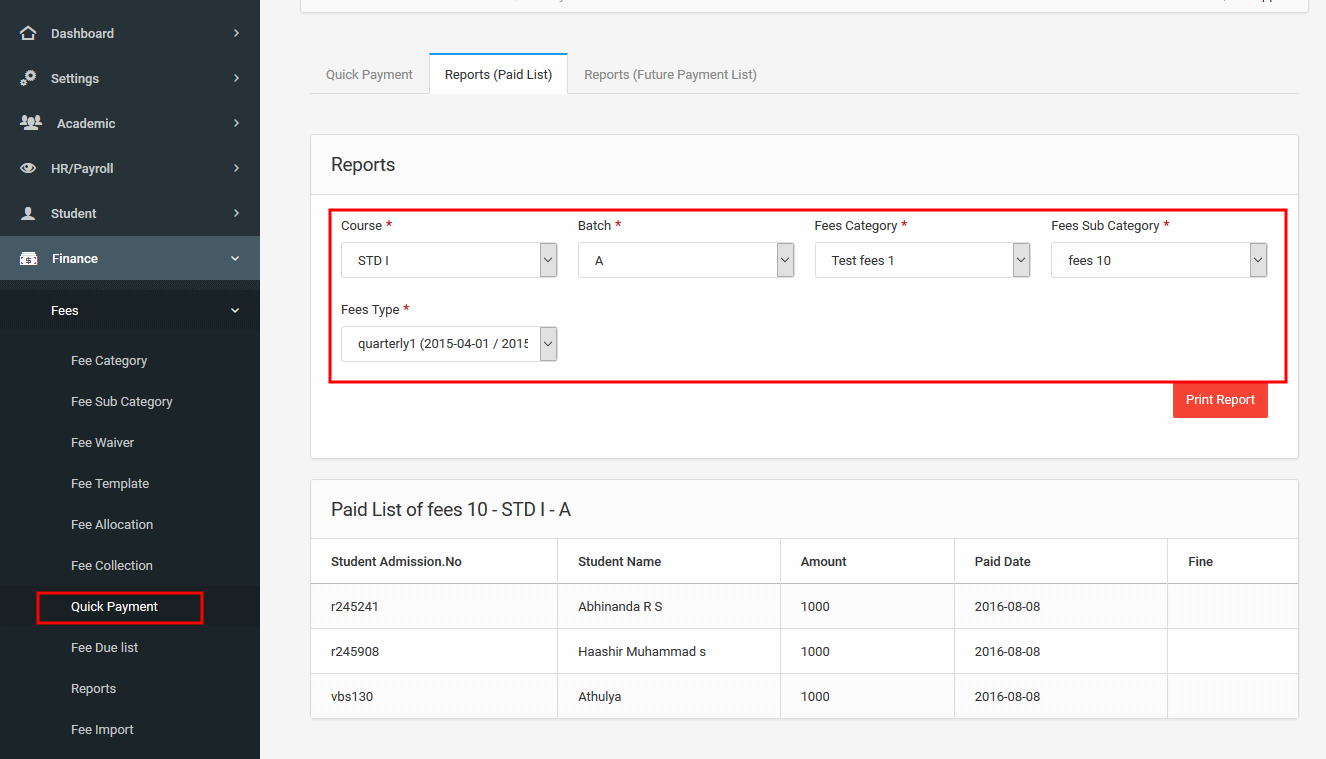
Here we can see the details of the future payment of fee generated.
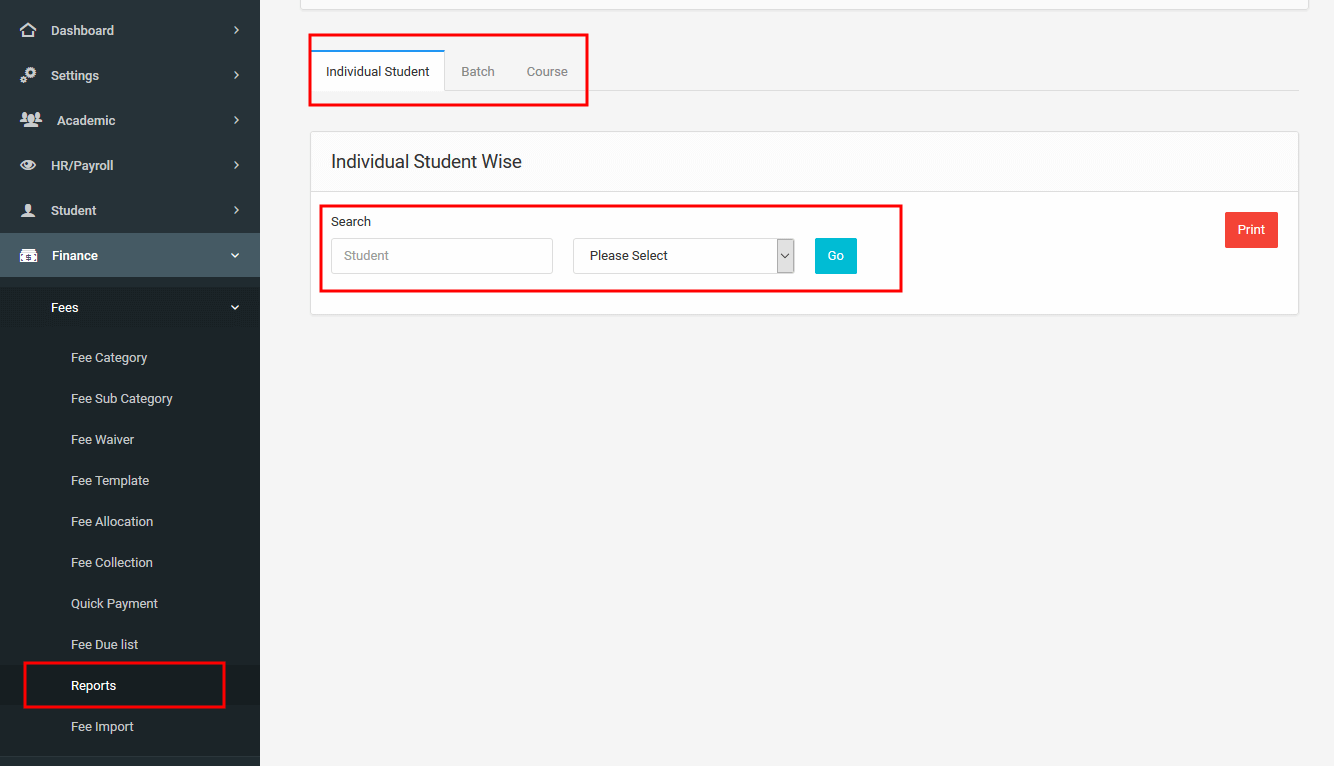
3.5.1.7Reports
Here we get the report of fee paid and fee due.We can generate the report batchwise,course wise,student wise or school wise.
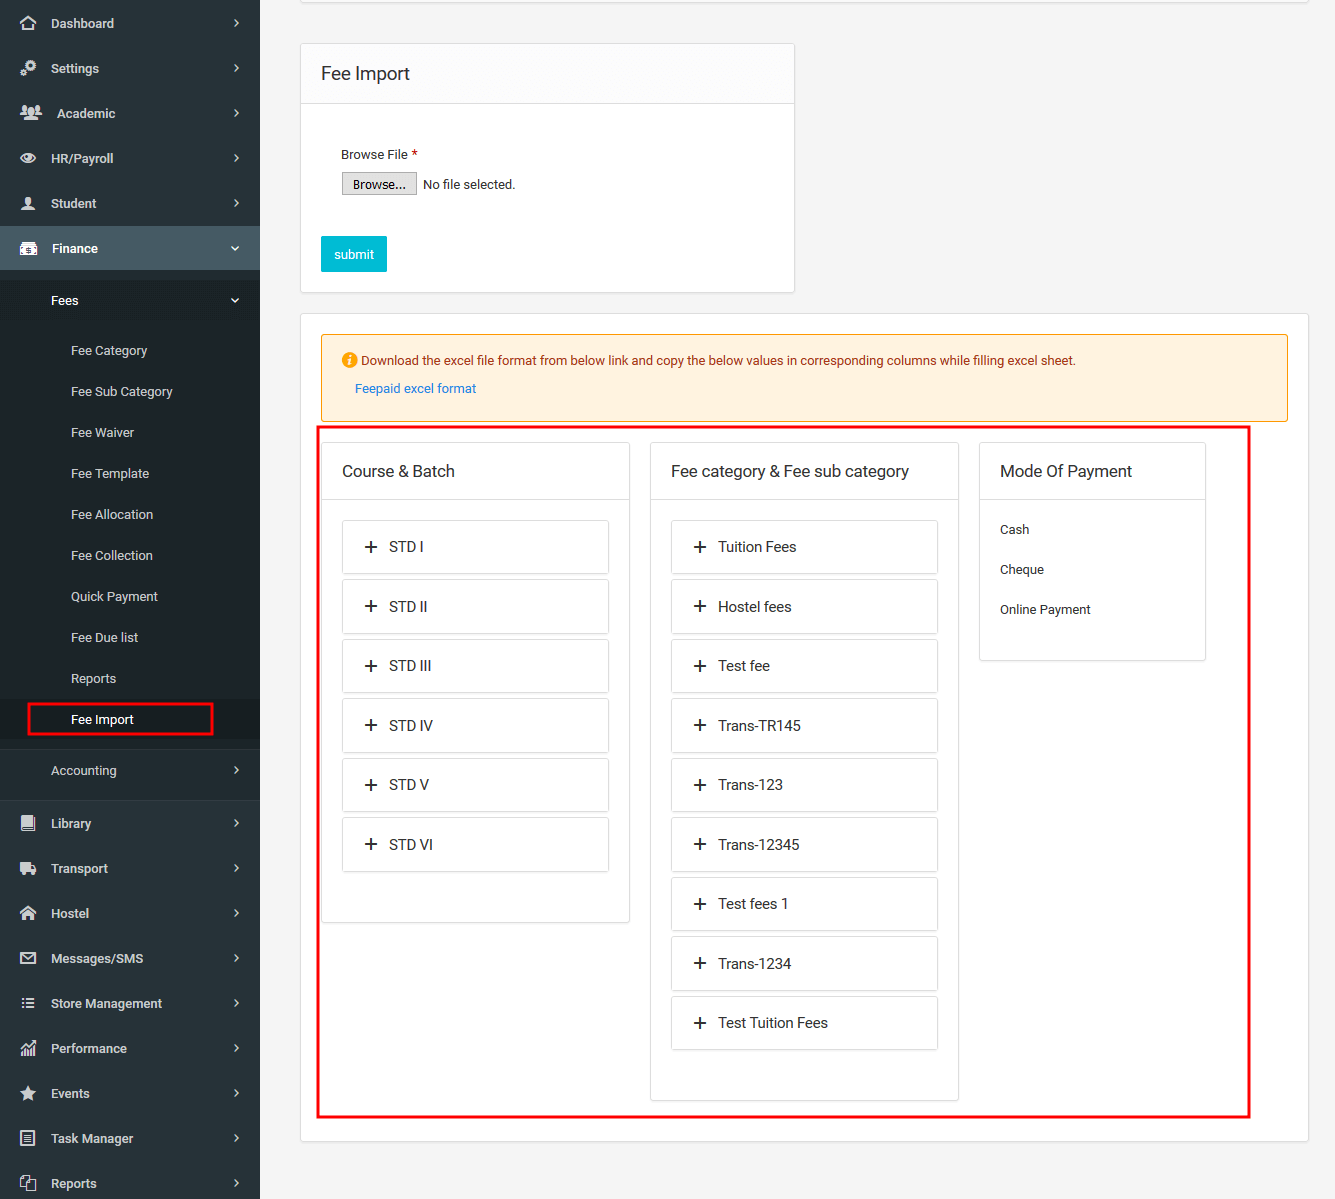
3.5.1.8Fee Import
Here we can import the bulk amount of fee details in excel format.For this, first we need to download the excel format from the given link.Then fill the mandatory fields using the data given in the table.After filling the excel sheet, you can upload it.
3.5.2 Accounting
Accounting or accountancy is the measurement, processing and communication of financial information about economic entities.Here we focuses on financial accounting and uses a double entry bookkeeping system to track the data collection and entry.
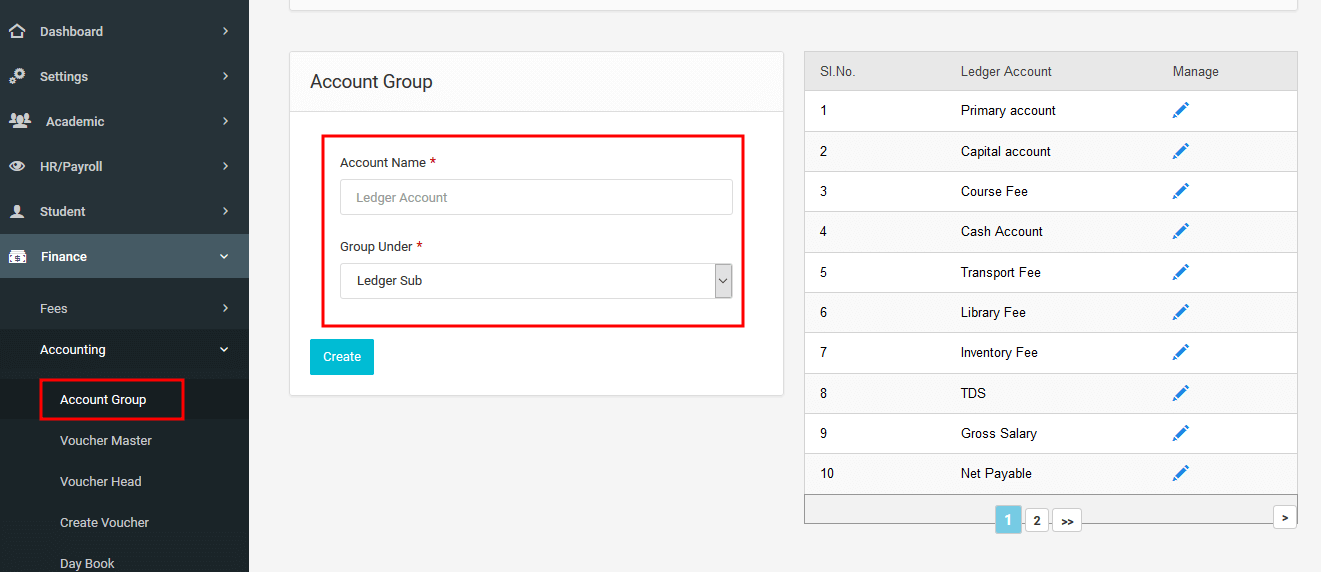
3.5.2.1Account group
Account Groups are collection of Ledgers of the same nature. Account Groups are maintained to determine
the hierarchy of Ledger Accounts which is helpful in determining and presenting meaningful and compliant
reports.
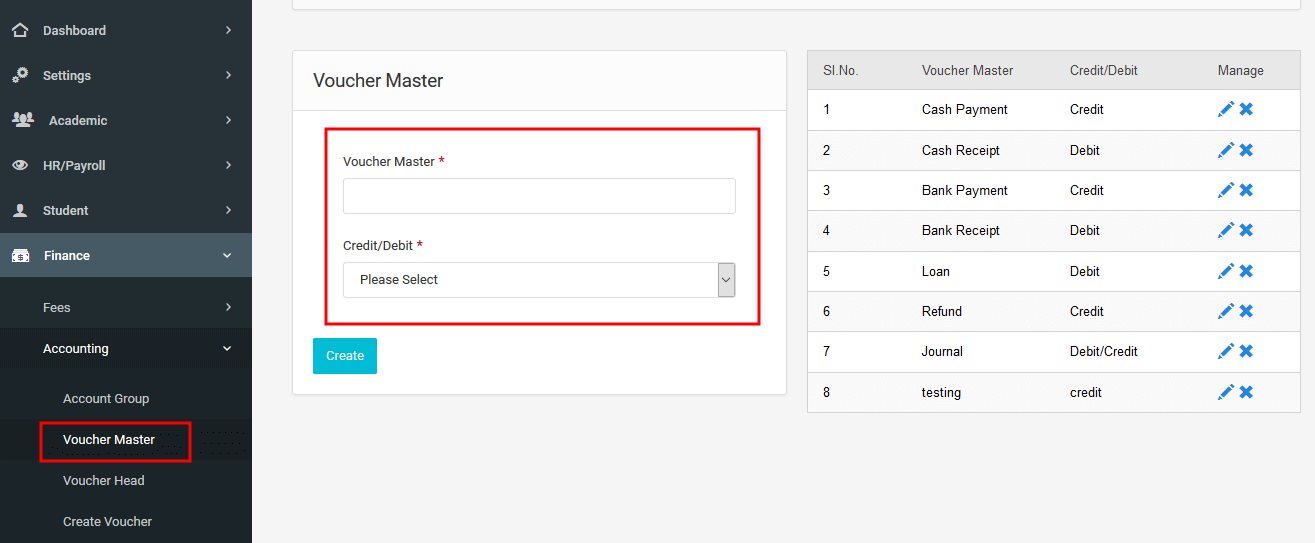
3.5.2.2Voucher Master
You can issue certificates for both employees and Students.
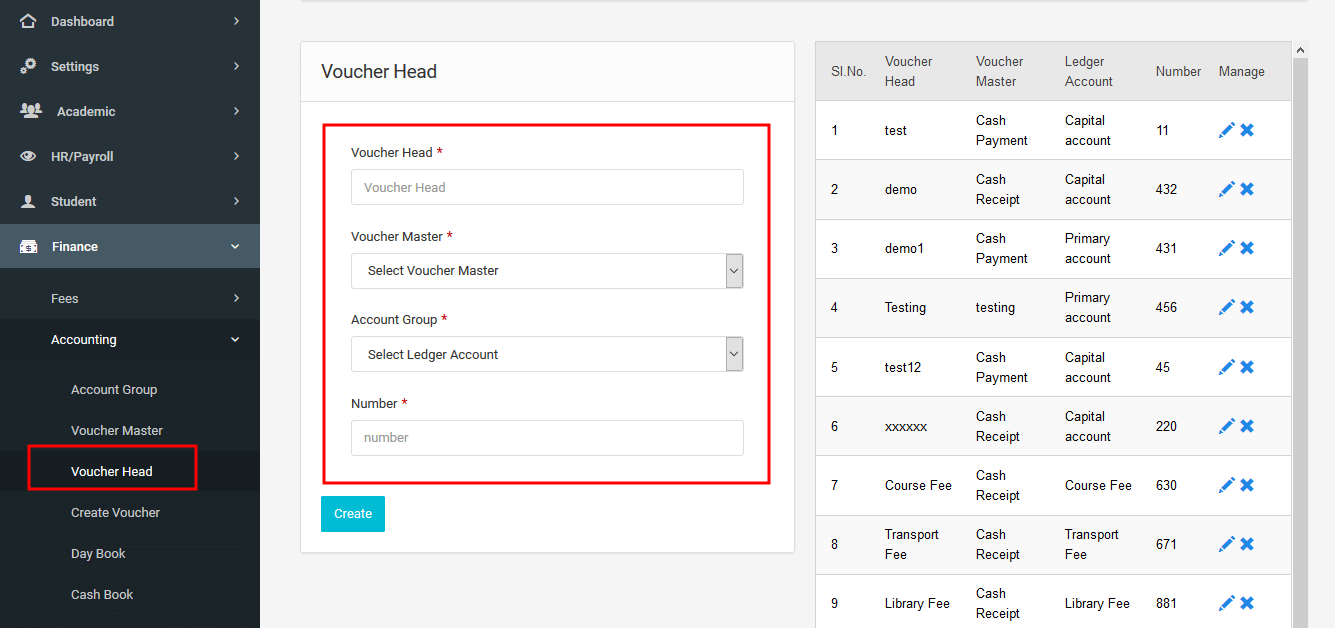
3.5.2.3Voucher Head
Voucher head indicates that, for what purpose voucher is created.
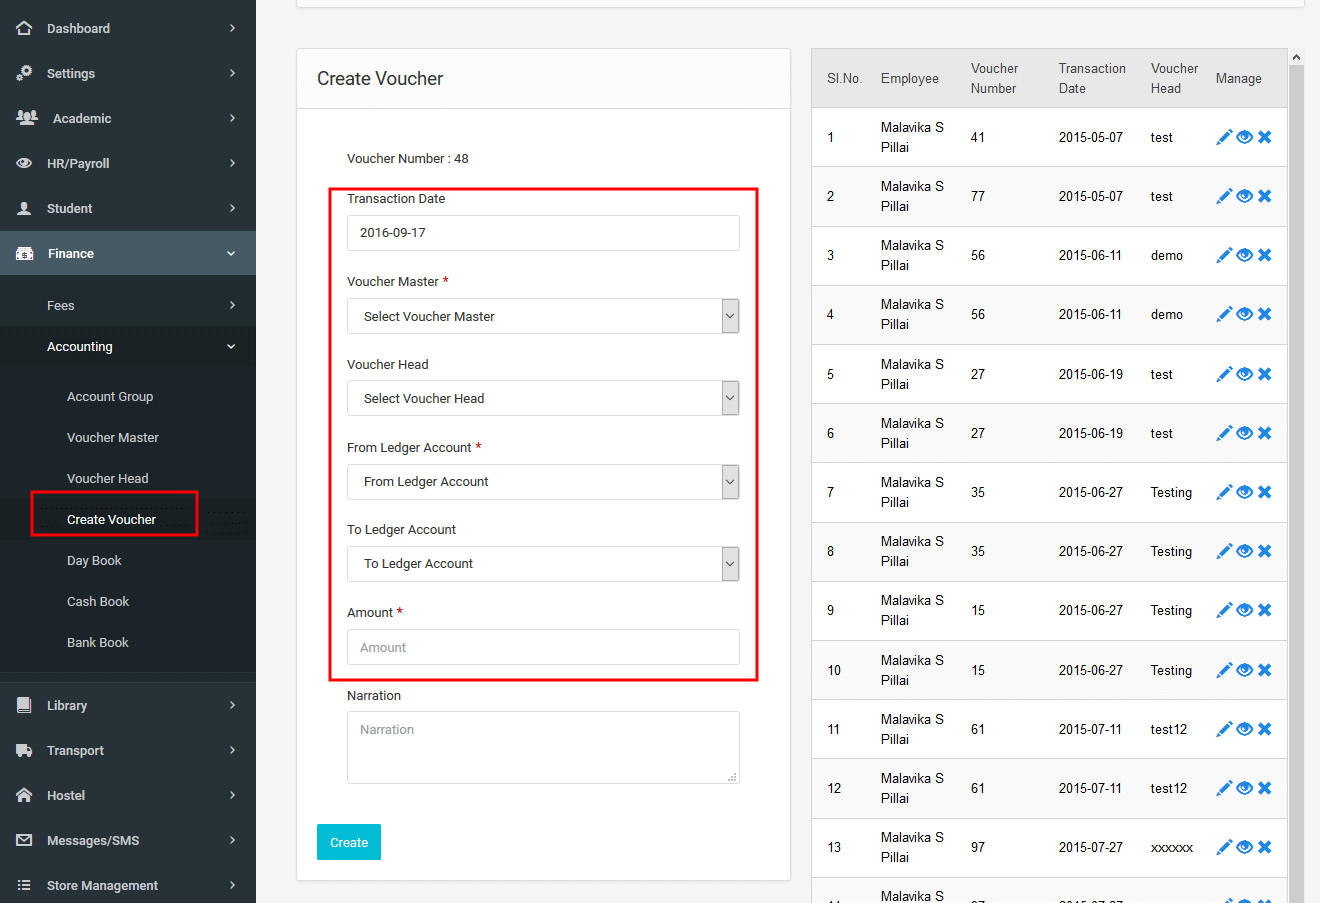
3.5.2.4Create Voucher
Used create a voucher that indicates that the terms of a transaction are met,specifies
the amount to pay to the supplier and a narration about the transaction.
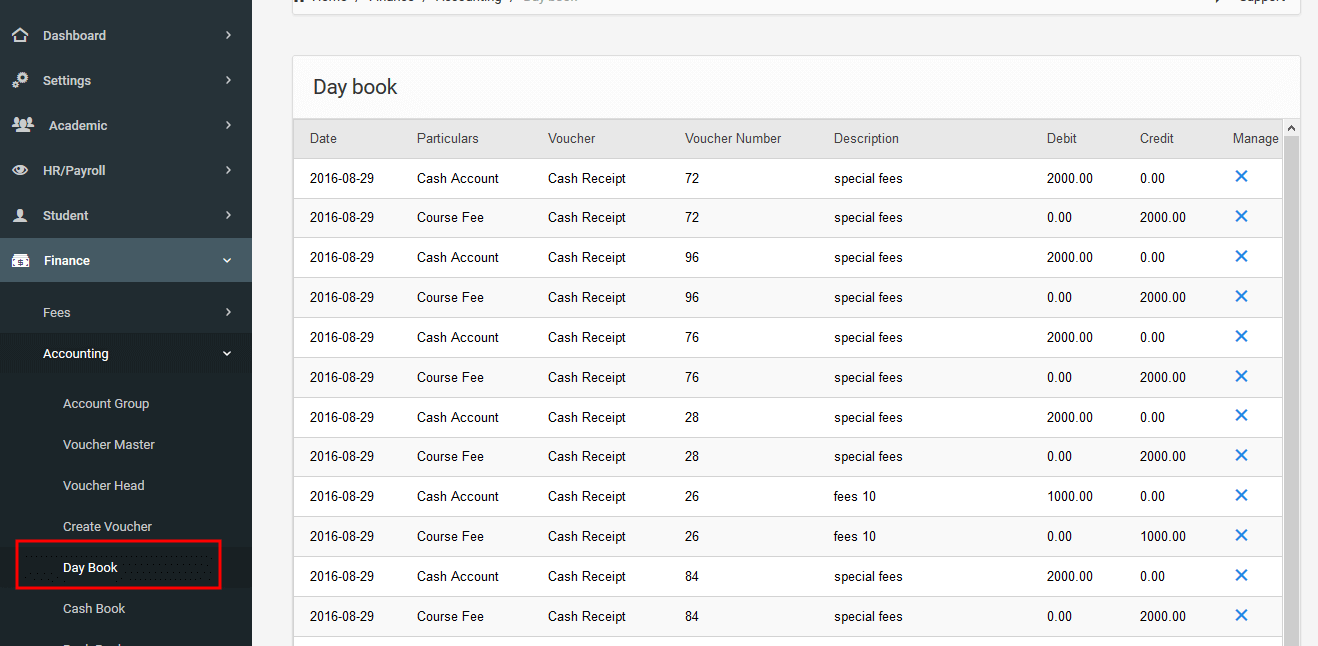
3.5.2.5Day Book
A day-book is a descriptive and diary-like record of day-to-day financial transactions. User can use this for getting the daily financial statement.
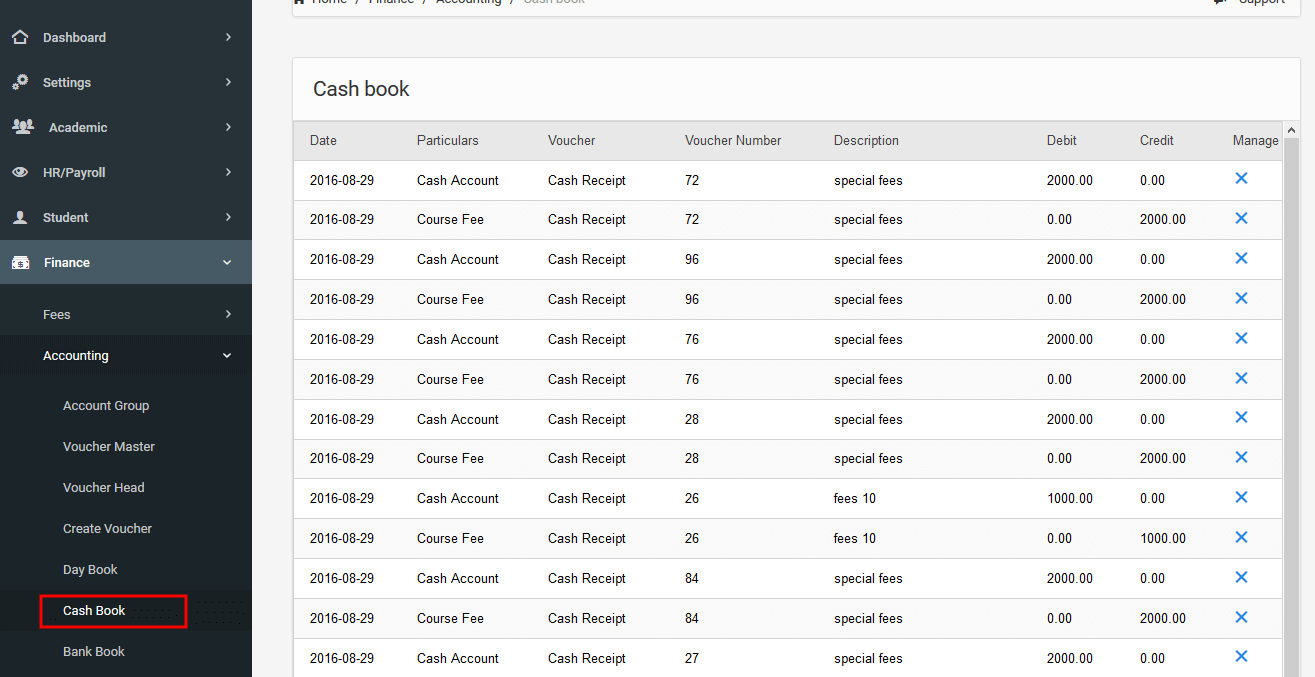
3.5.2.6Cash Book
It is a separate book in which cash transactions are directly recorded.
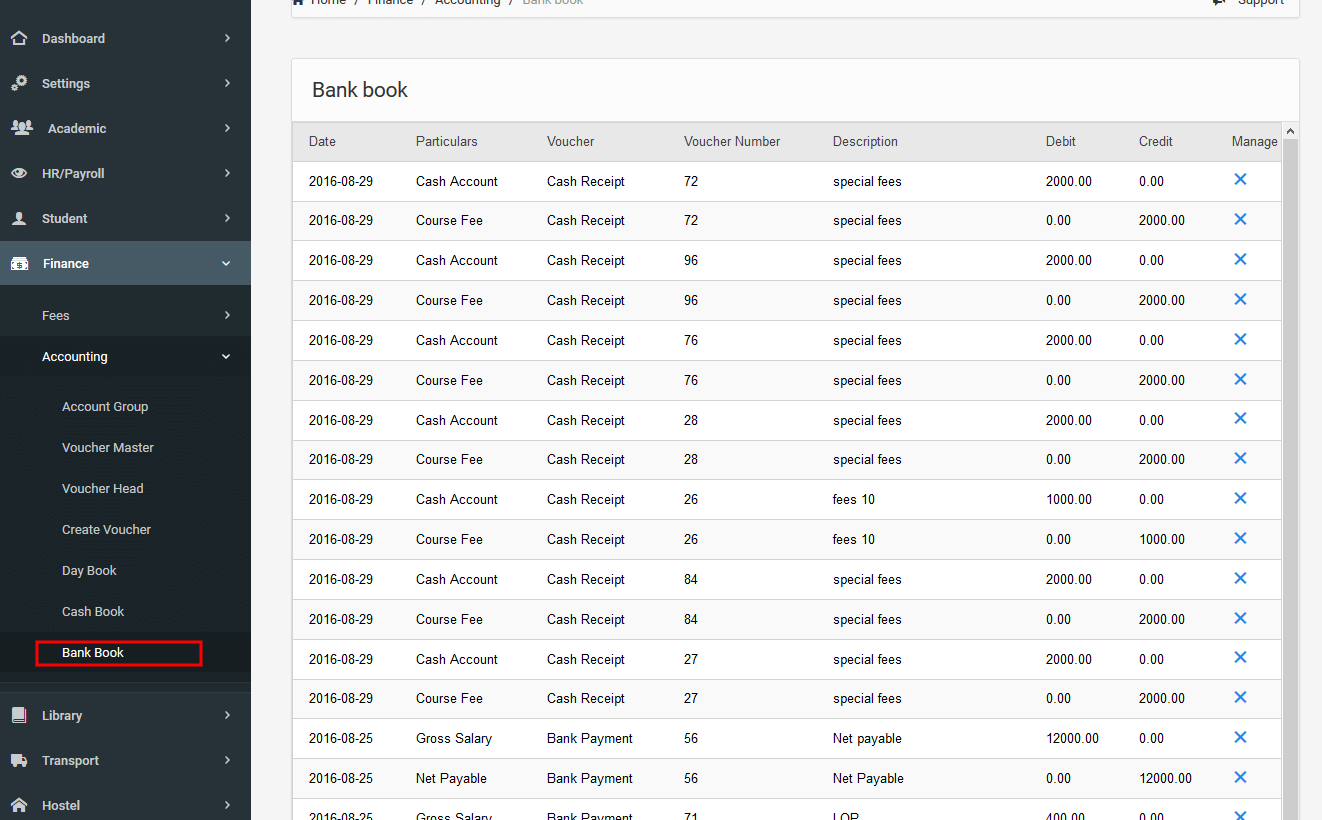
3.5.2.7Bank Book
It is a separate book in which bank transactions are recorded. It is a separate book in which bank transactions are recorded.
3.6 Library
Library module is capable to manage the functionalities of a library.
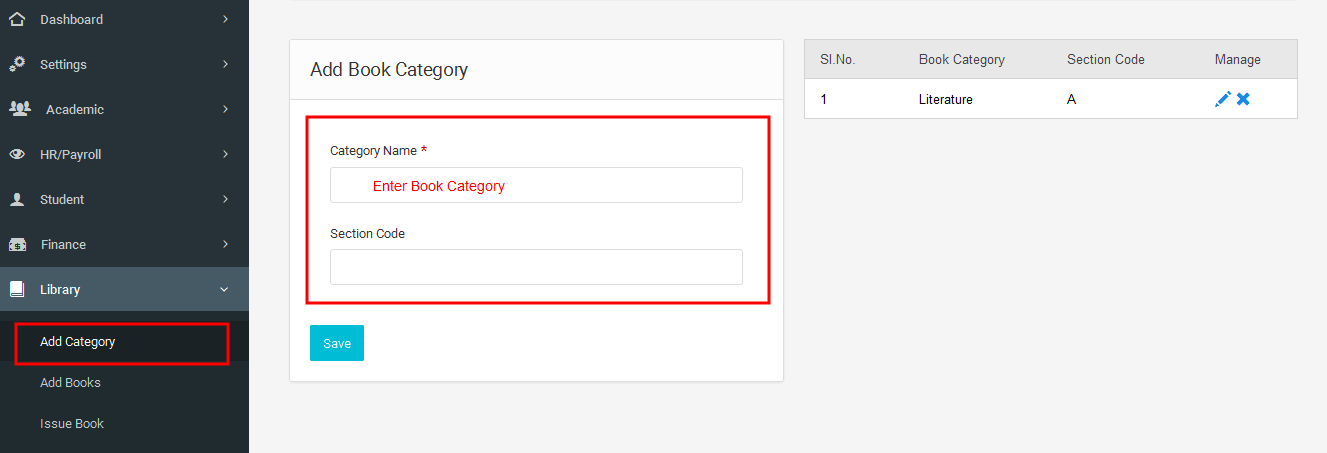
3.6.1Add Category
Before adding books , user has to create the categories.By using this we can create book categories.
3.6.2Add Books
To add a new book in library user need to add details here. Details include ISBN number,book name,auther name..etc.
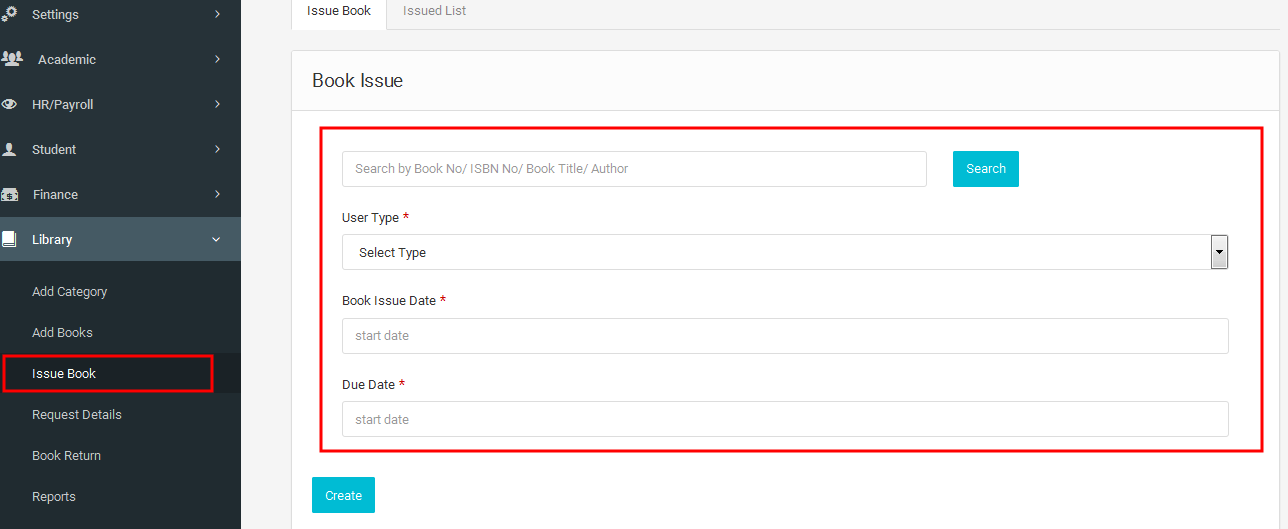
3.6.3Issue Book
Issue Book is used to issue books to students or staffs. At the time of issuing , user can also store the issue date and due date.Here we can search the book by author name,book number,book title etc.
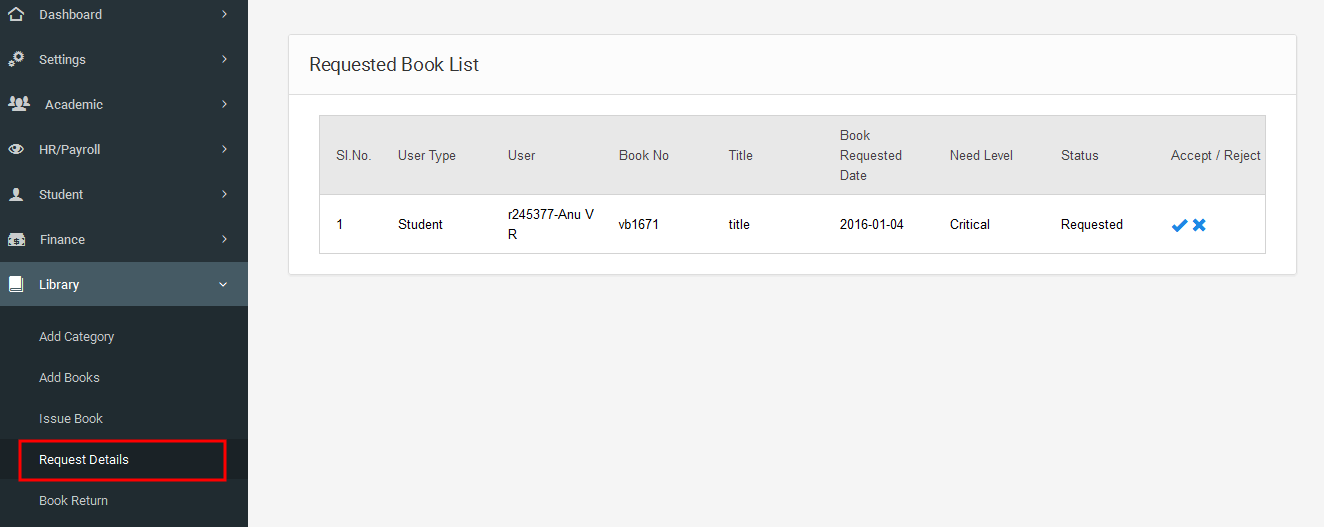
3.6.4Request Details
Here we can view and manage the request.
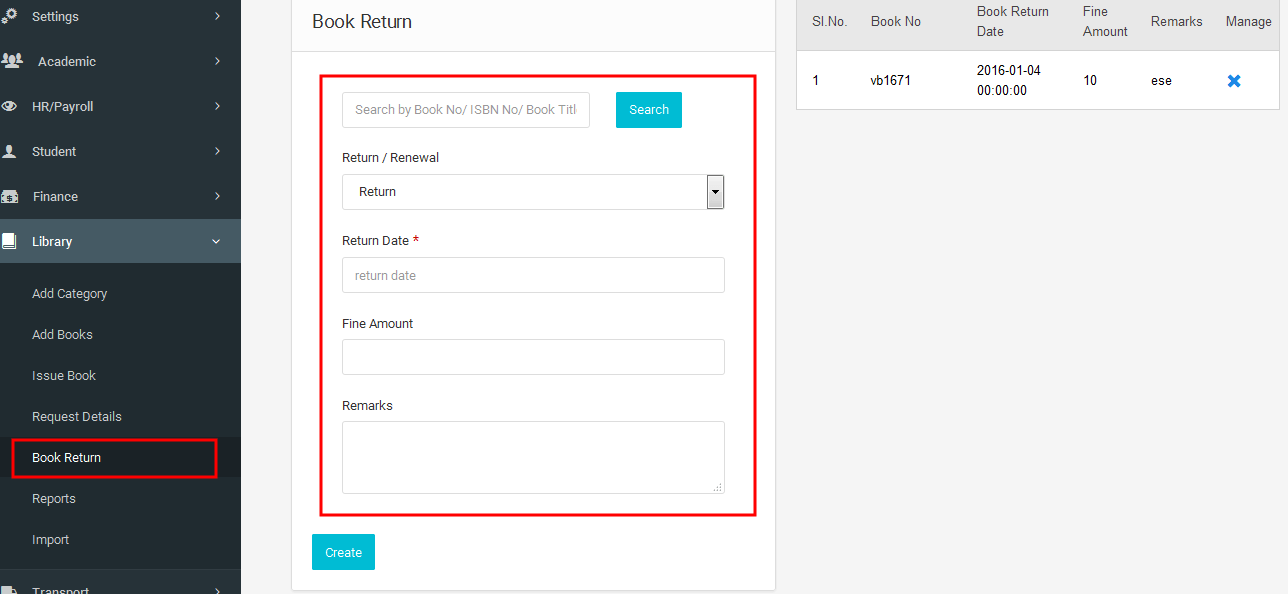
3.6.5Book Return
Book return details are stored here. If the return date exceeds the due date user can add fine at the timr return. Here also we can search the book using book number,book title,author etc.
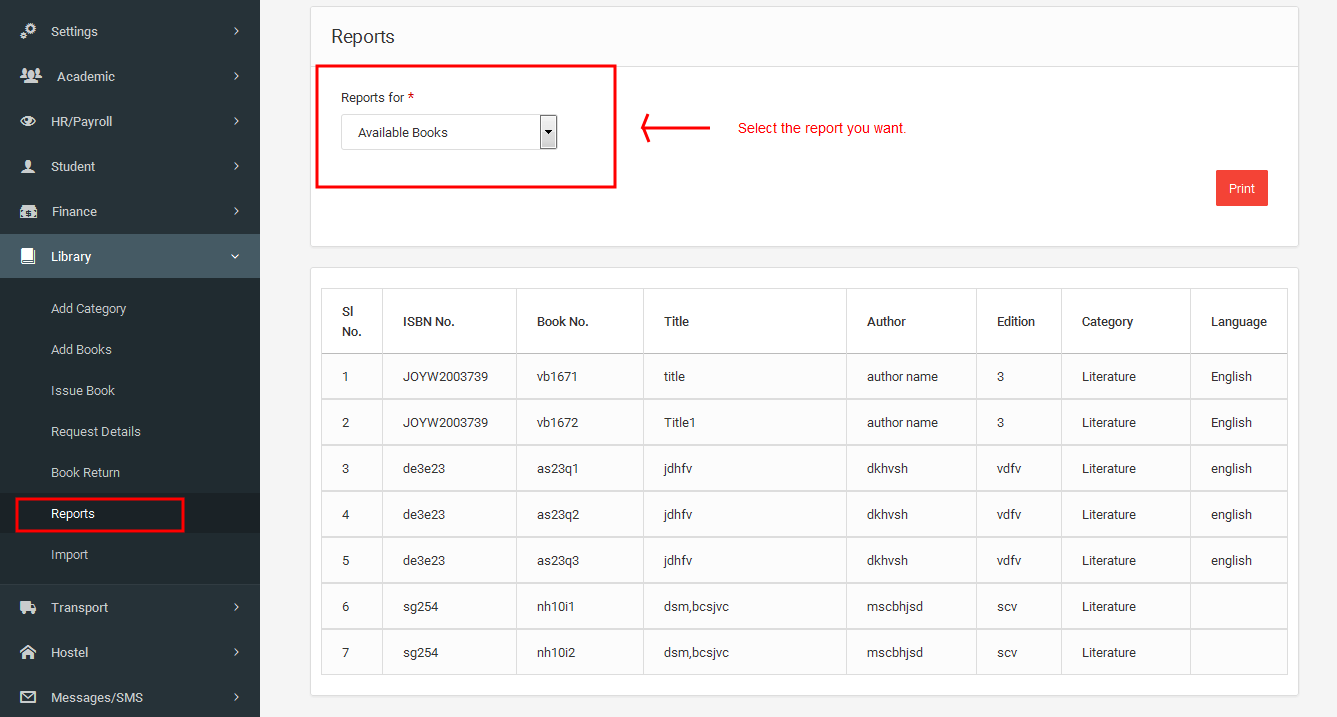
3.6.6Reports
Here we get the reports of available books,issued books..etc.
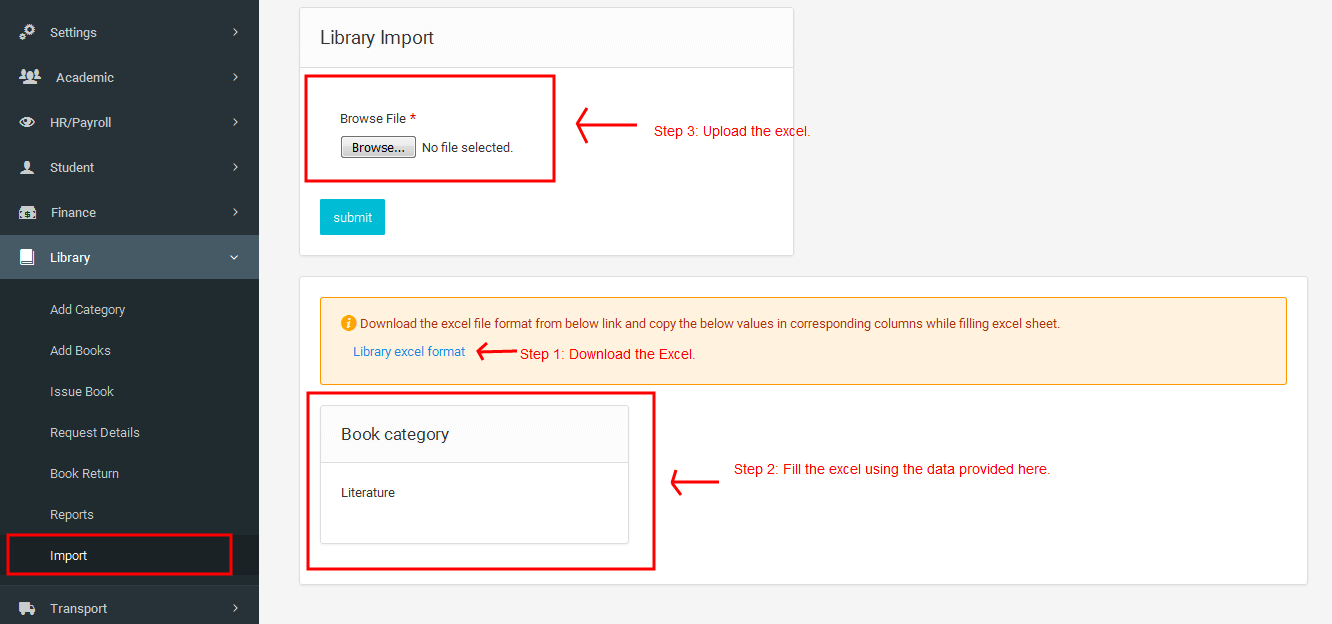
3.6.7Import
Here we can import the details of the books in the library in excel format.For this, you need to download the excel and fill the mandatory fields by copying from the given data.Then upload the filled excel sheet.
3.7 Transport
Transport is used to manage the functionalities of transport division in an institution.
3.7.1Add Vehicle
Here we can add details of vehicles in the institution..
3.7.2Add Driver
Add driver is used to assign drivers for vehicles and also stores the basic information about the driver.
3.7.3Add Route
Add route is used to create the route description for the selected vehicle.
3.7.4Add Destination
Here we create the vehicle timing for the selected route. And also we can add the fee type(annual,bi-annual etc.) here.
3.7.5Transport Allocation
In transport allocation user can allocate staffs or students for the selected route.
Here we can manage the route allocation for the selected student or employee.
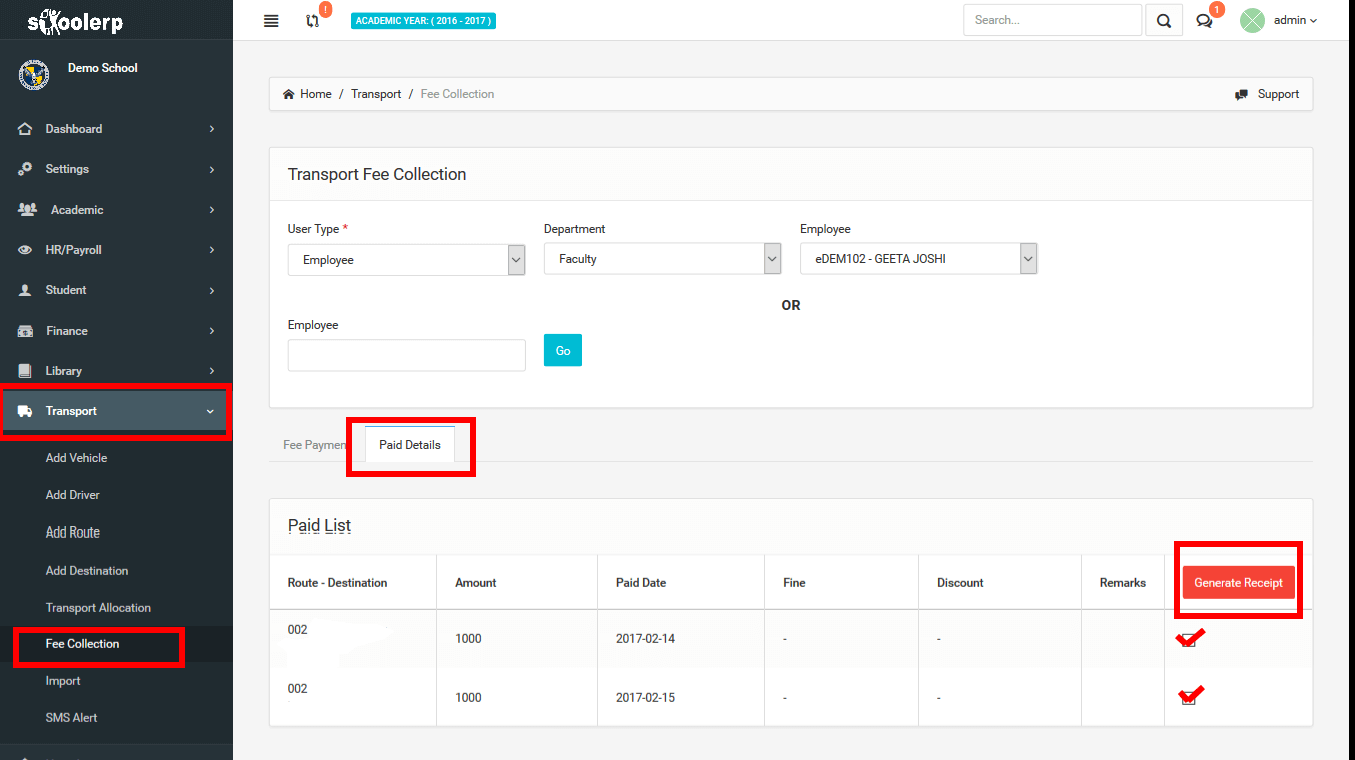
3.7.6Fee collection
This sub module allows you to collect fee (make payment and generate receipt) of the employee transportation.
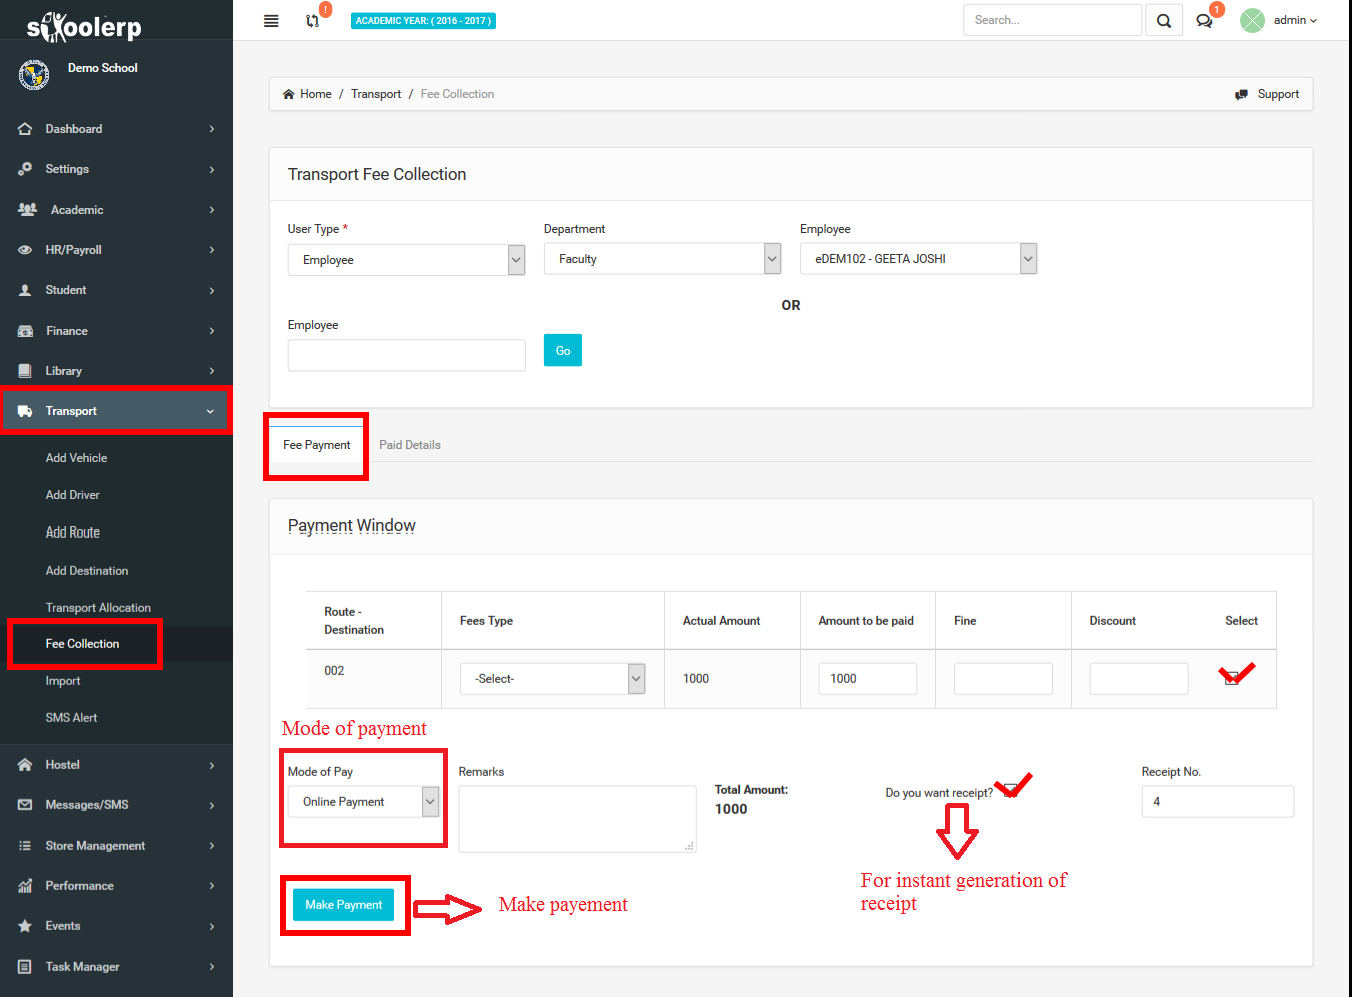
For future generation of the fee receipt and to get paid details, see the following figure.
3.7.8Import
Here we can import the complete details of the route allocation for each student and employee in excel format.For this, you need to download the excel, and fill the mandatory fields by copying the data provided below.After filling the mandatory fields, you can upload it.
3.7.7SMS Alert
Here we can send SMS for students and employees. We can send SMS to all/routewise/destinationwise
3.8 Hostel
Hostel functionalities can be managed by this section.
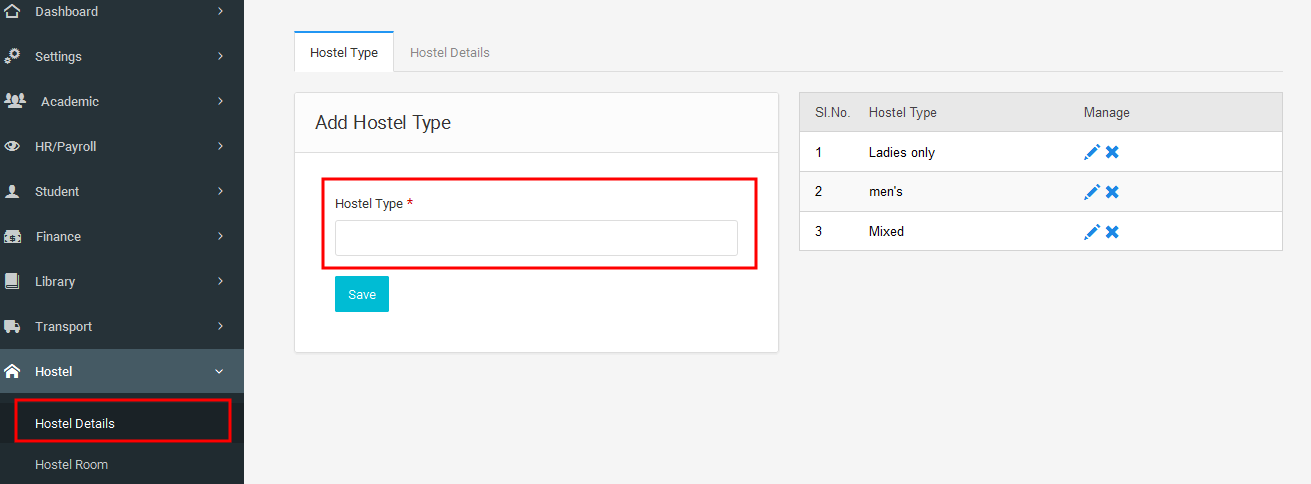
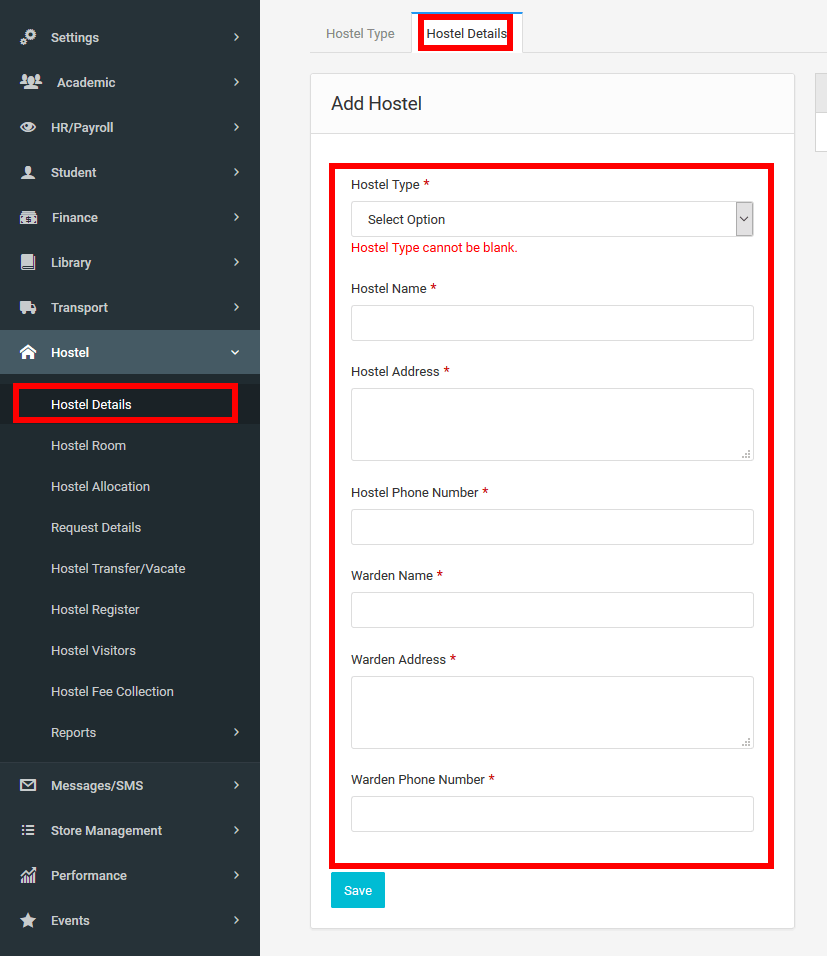
3.8.1Hostel Details
Here we can add the hostel type(ladies hostel,gents hostel etc..)
Here we can add the details of the hostel(name,address,phone,warden name etc..)
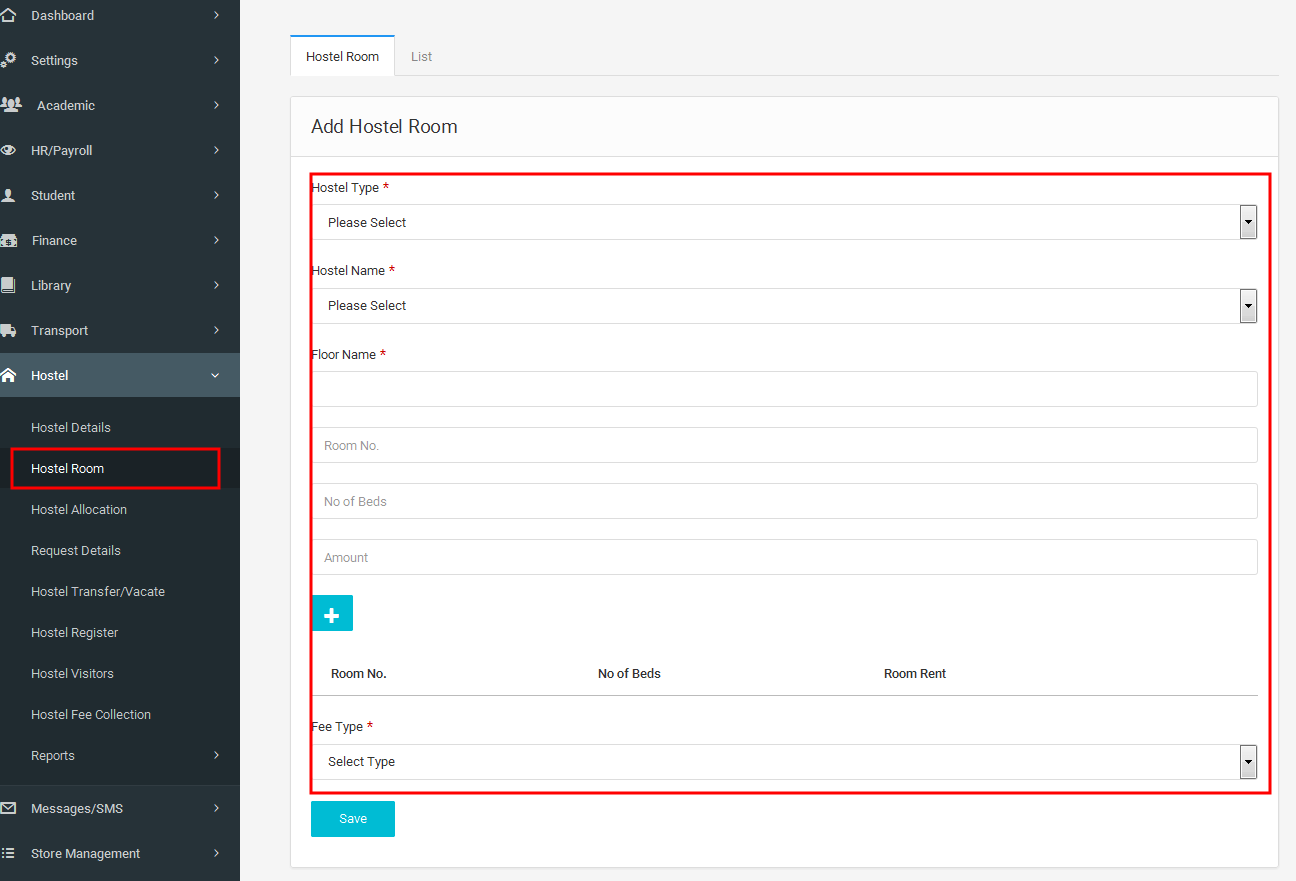
3.8.2Hostel Room
Here we can add the details of rooms in the hostel(number of beds,floor ...etc).
3.8.3Hostel Allocation
Here we can allocate hostel rooms for students and employees.In the allocated list tab, we can see the room allocation list.

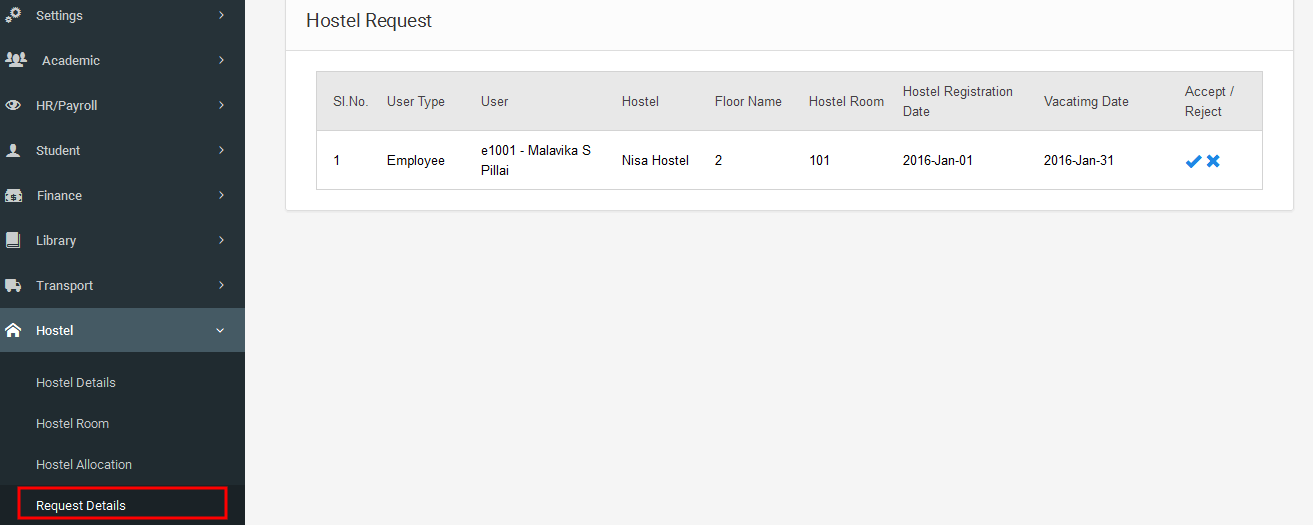
3.8.4Request Details
Here we can see and manage the hostel allocation requests of employees and students.
3.8.5Room Transfer/Vacate
Here we can enter the room vacate details of a selected student/employee from the hostel.
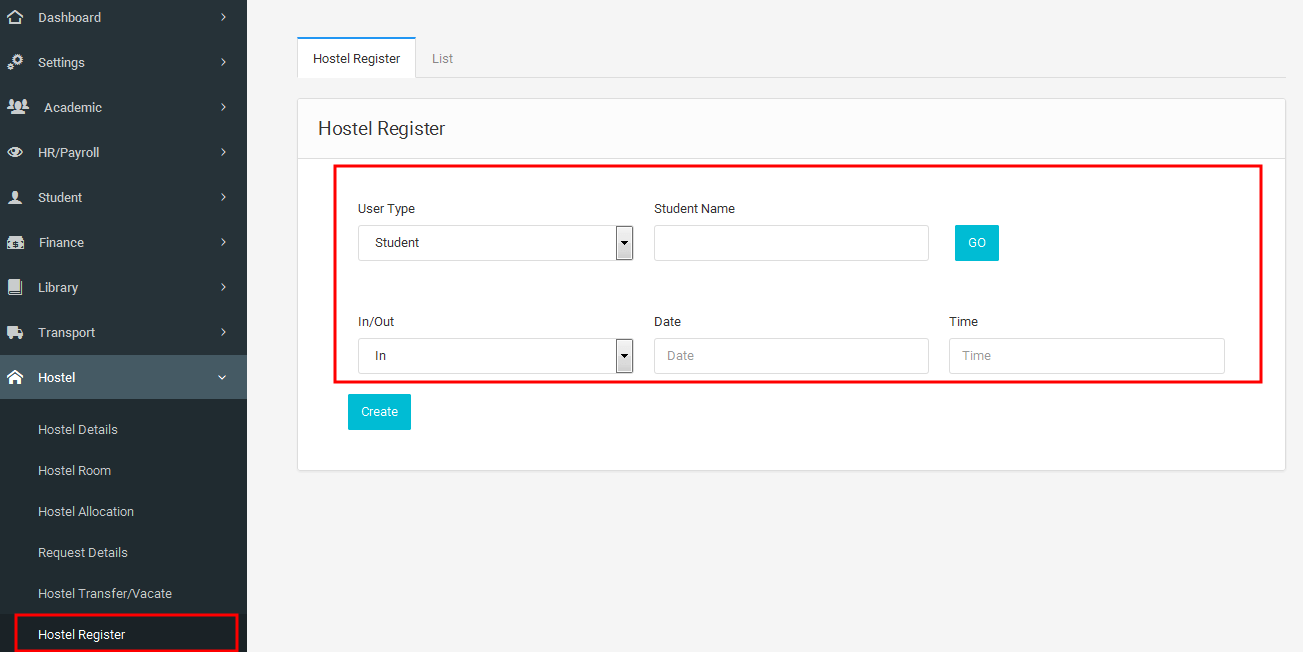
3.8.6Hostel Register
In hostel register, the student/employee can enter in/out details such as day,time..etc
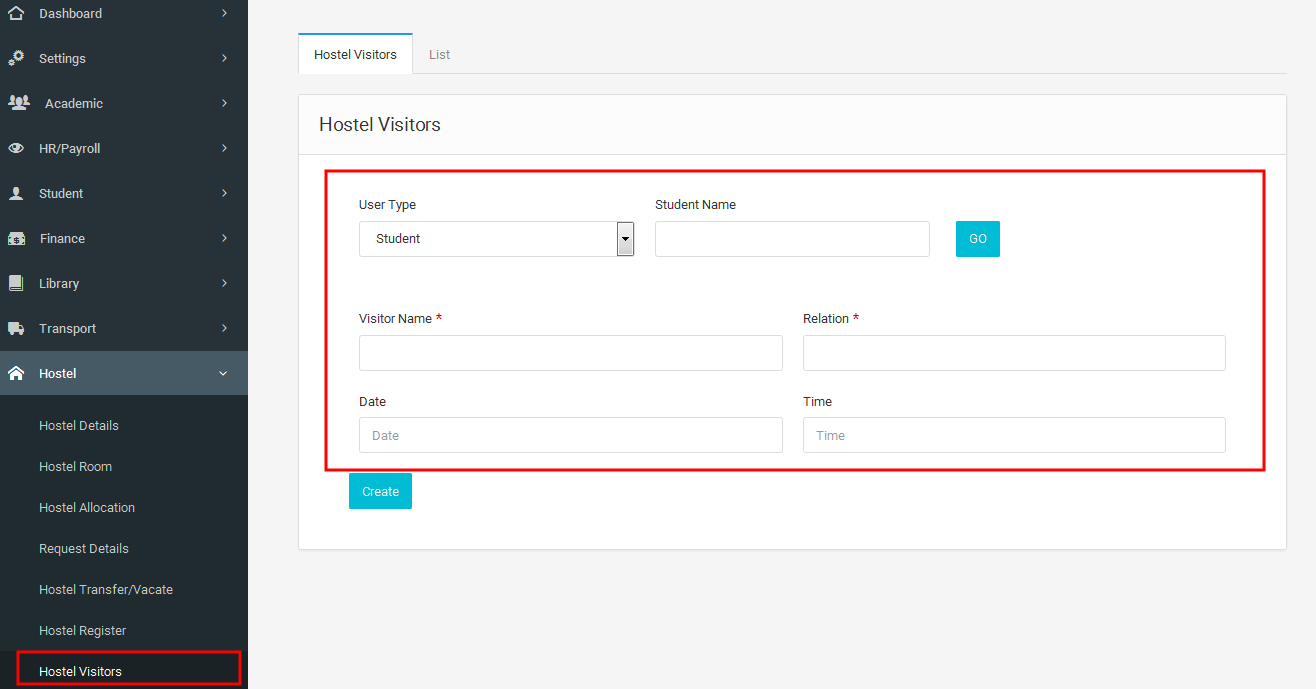
3.8.7Hostel Visitors
In this, we can enter visitors detail of each student/employee.
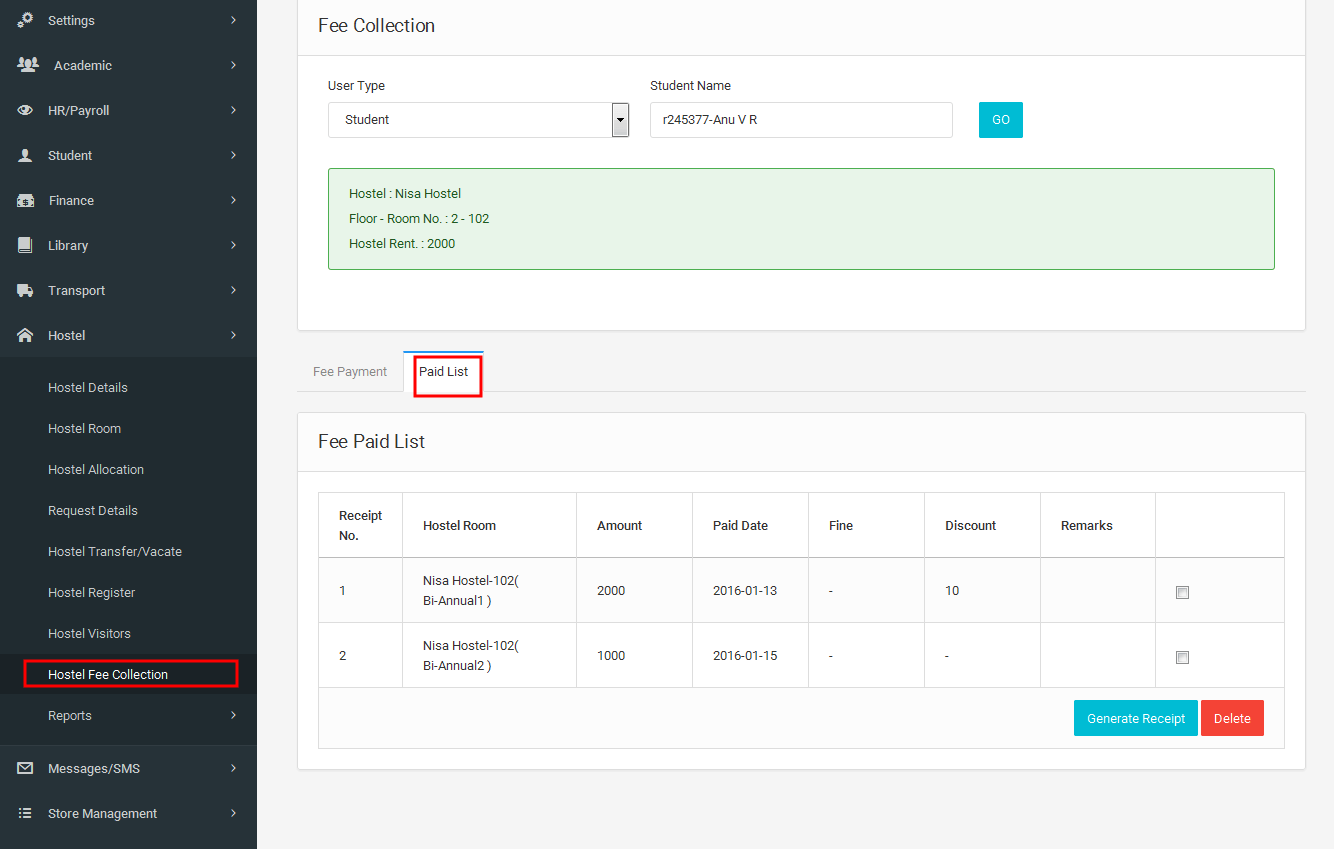
3.8.8Hostel Fee Collection
In hostel fee collection, we can enter the details of collected hostel fee of the selected student/employee.
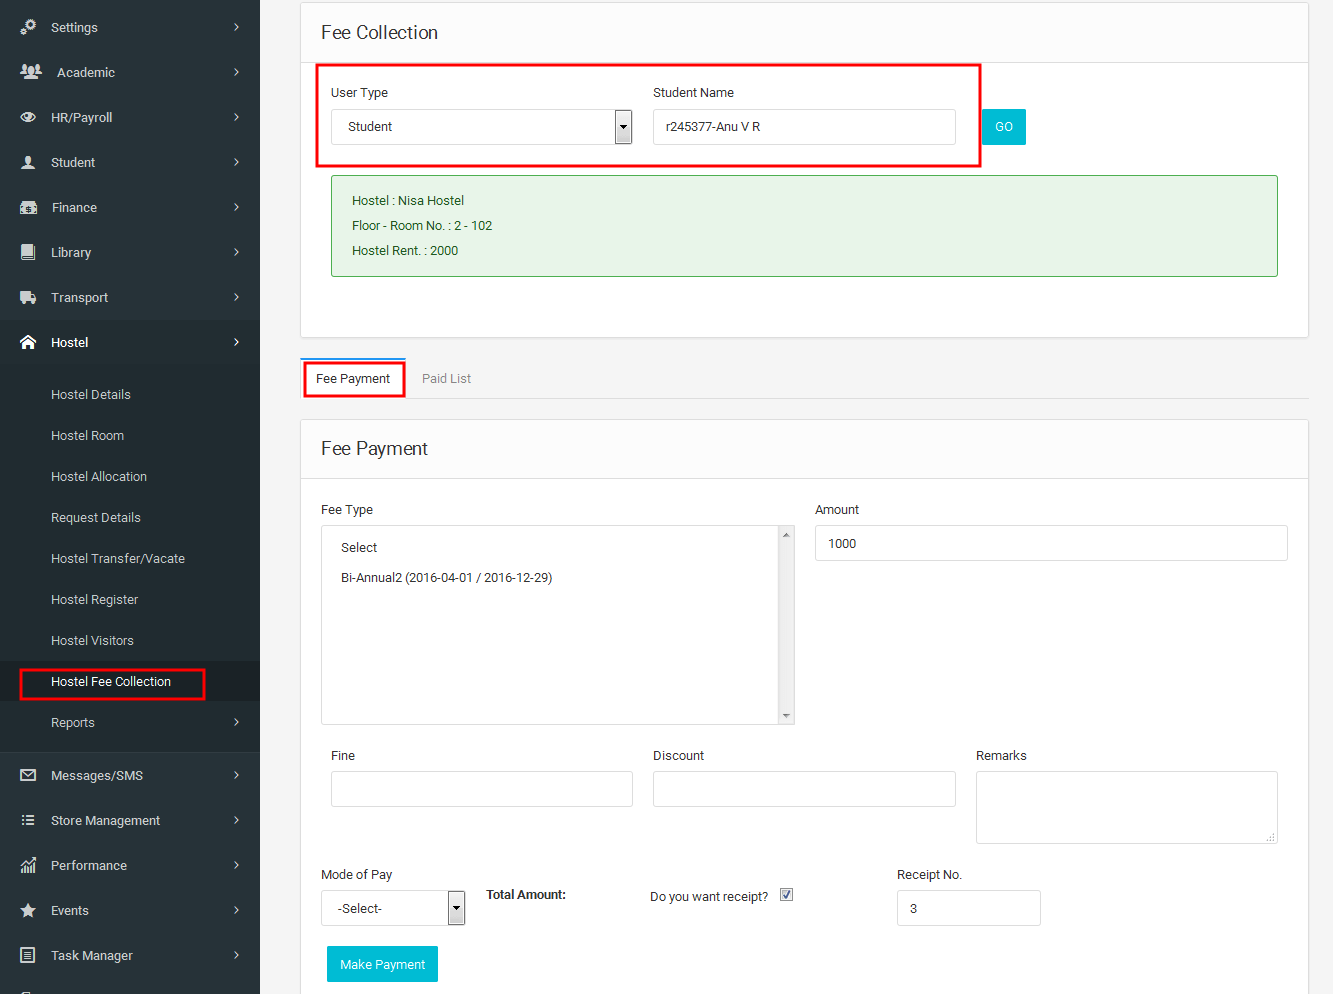
Here we can see the fee paid details of the selected student/employee and we can generate report of the fee collection for the selected student/employee.
3.8.9 Reports
In this module we can generate different types of reports based on the hostel.
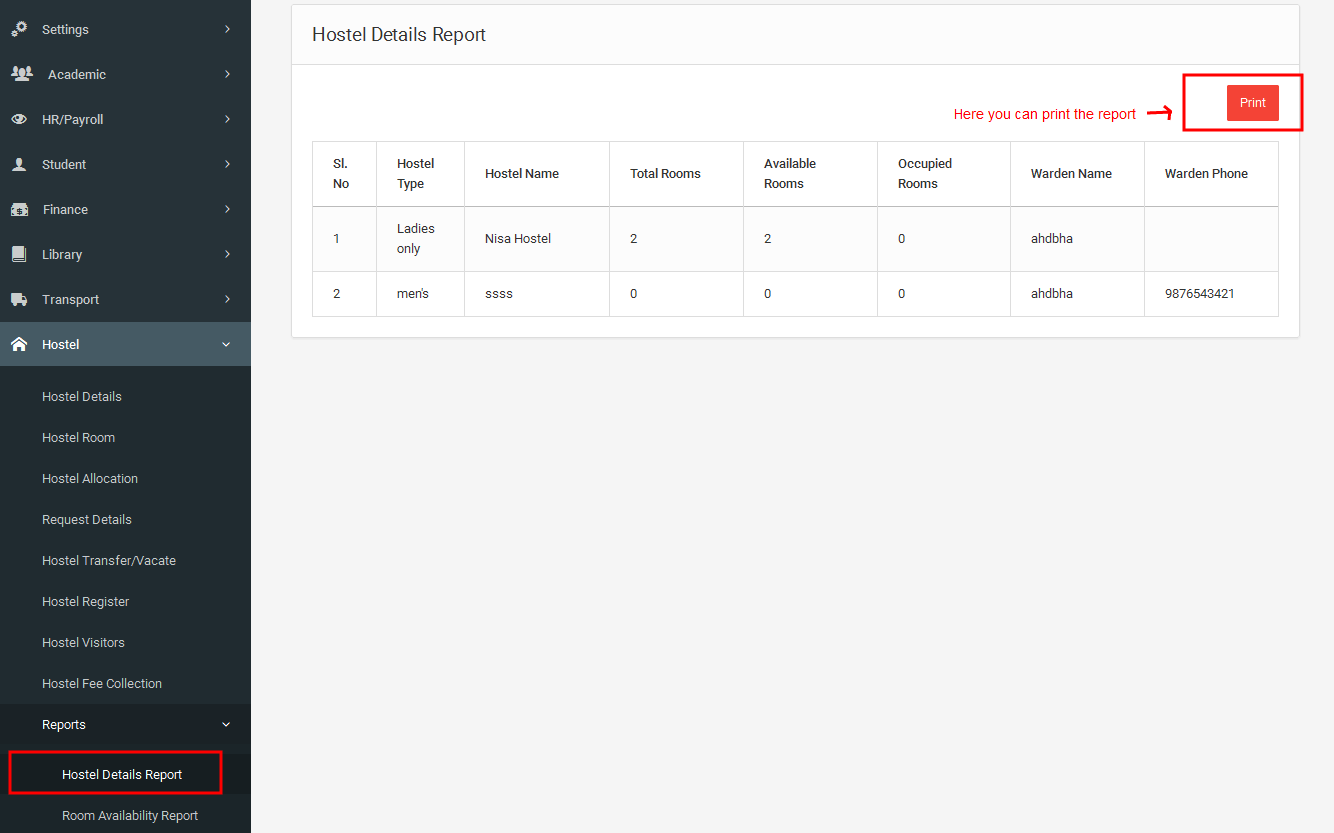
3.8.9.1Hostel Details Report
In this, we get details of all the hostels(hostel type,hostel name,available rooms etc...).
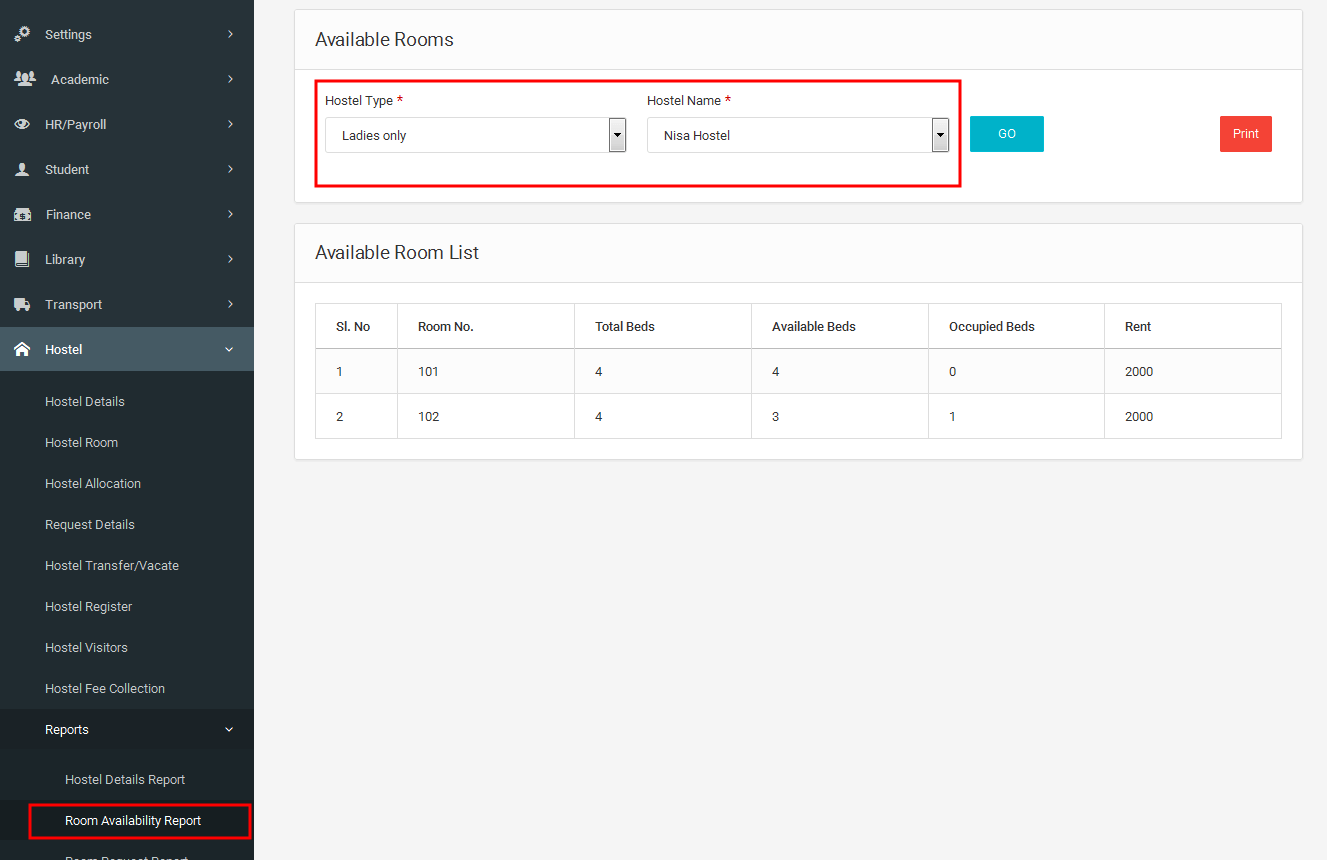
3.8.9.2Room Availability Report
Here we get the details of available rooms(number of rooms,rent etc...) in the selected hostels
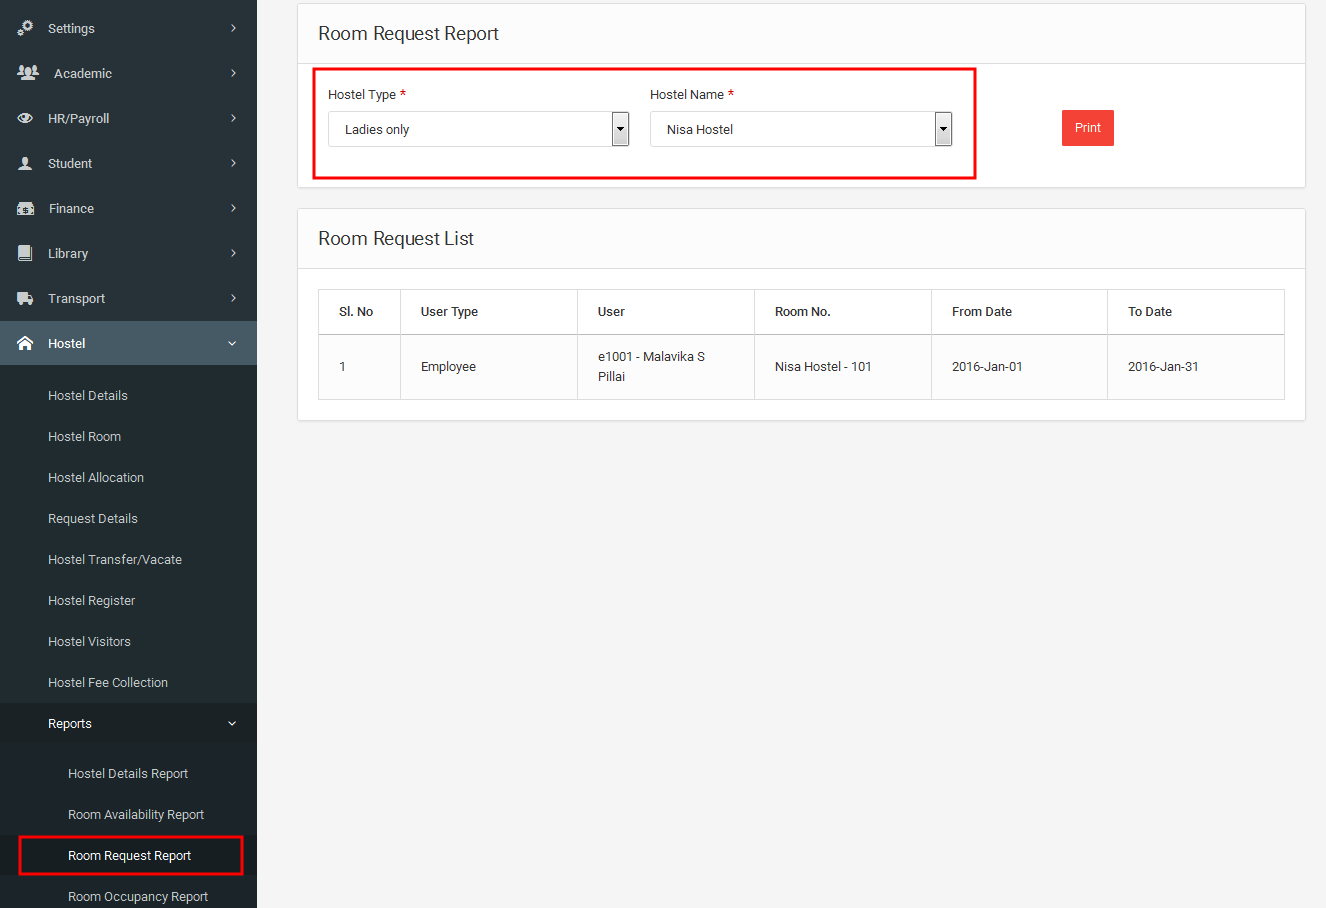
3.8.9.3Room Request Report
Here we get the report of room request for the selecetd hostel.
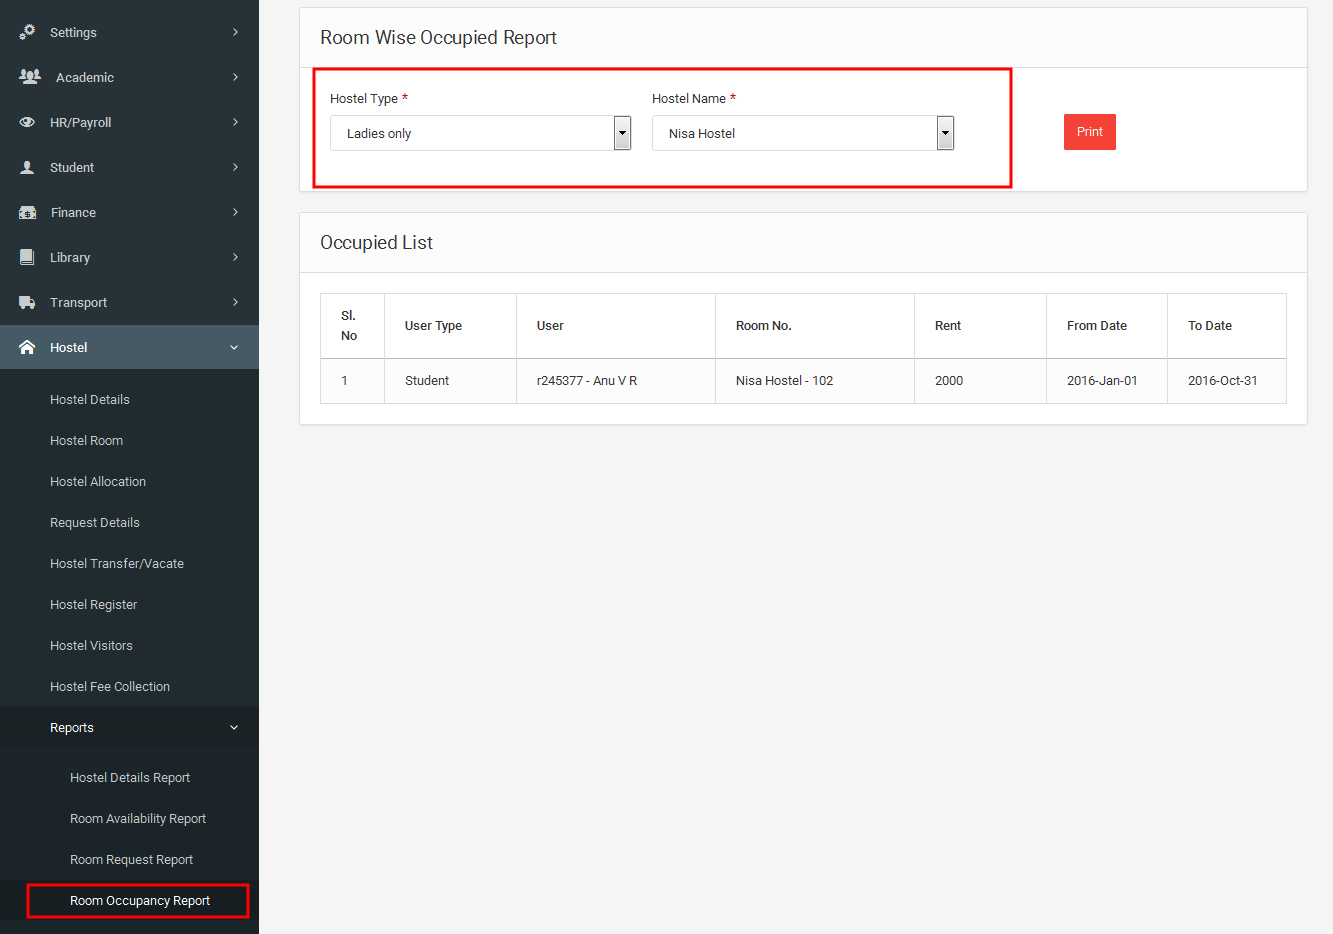
3.8.9.4Room Occupancy Report
Here we get the report of the occupied rooms in the hostel.
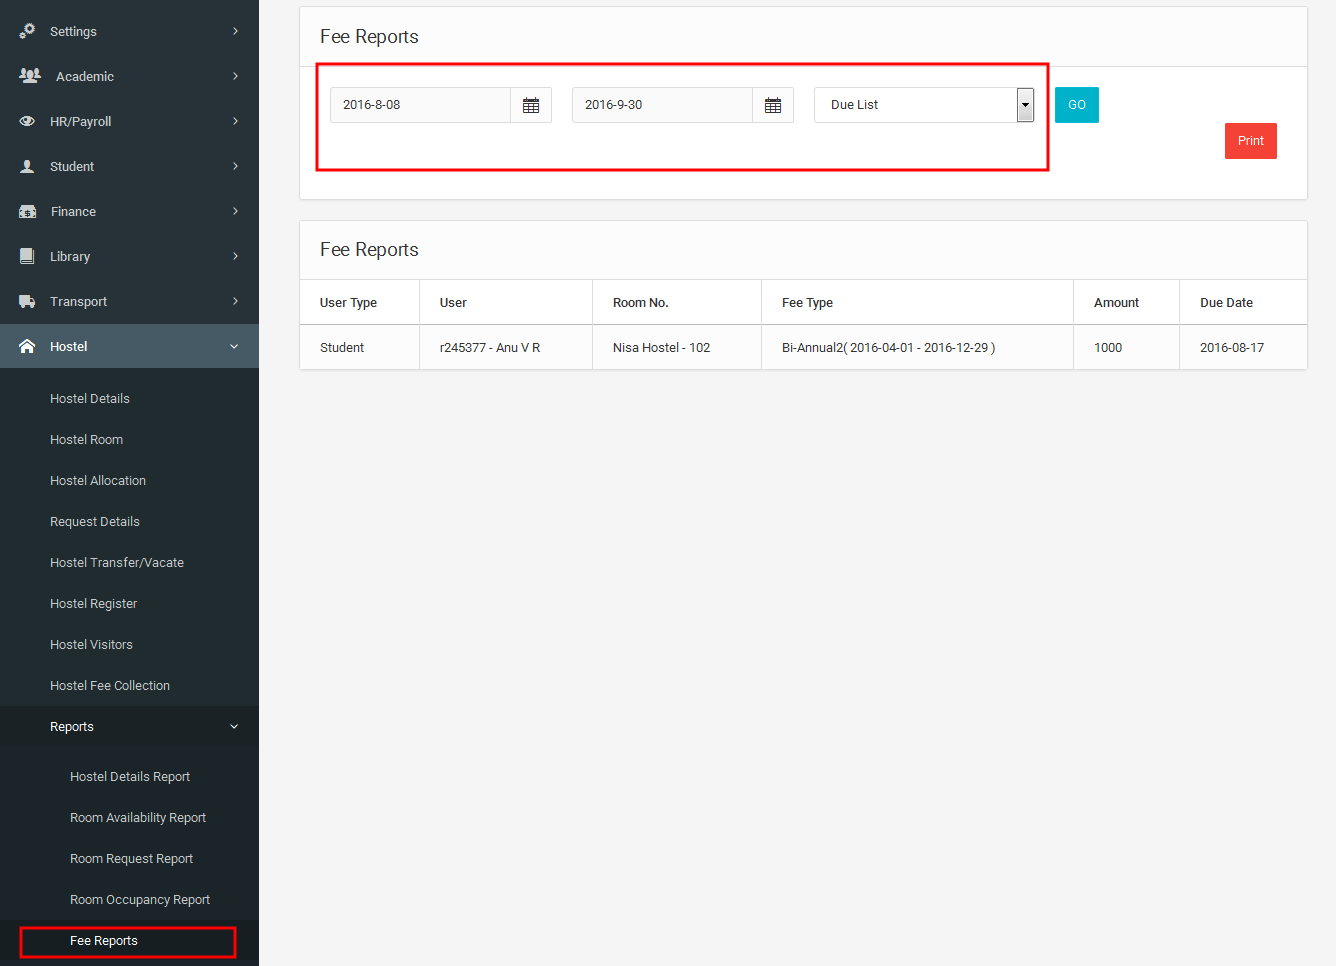
3.8.9.5Fee Report
Here we get the paid and due list of hostel fee.
3.9 Message/SMS
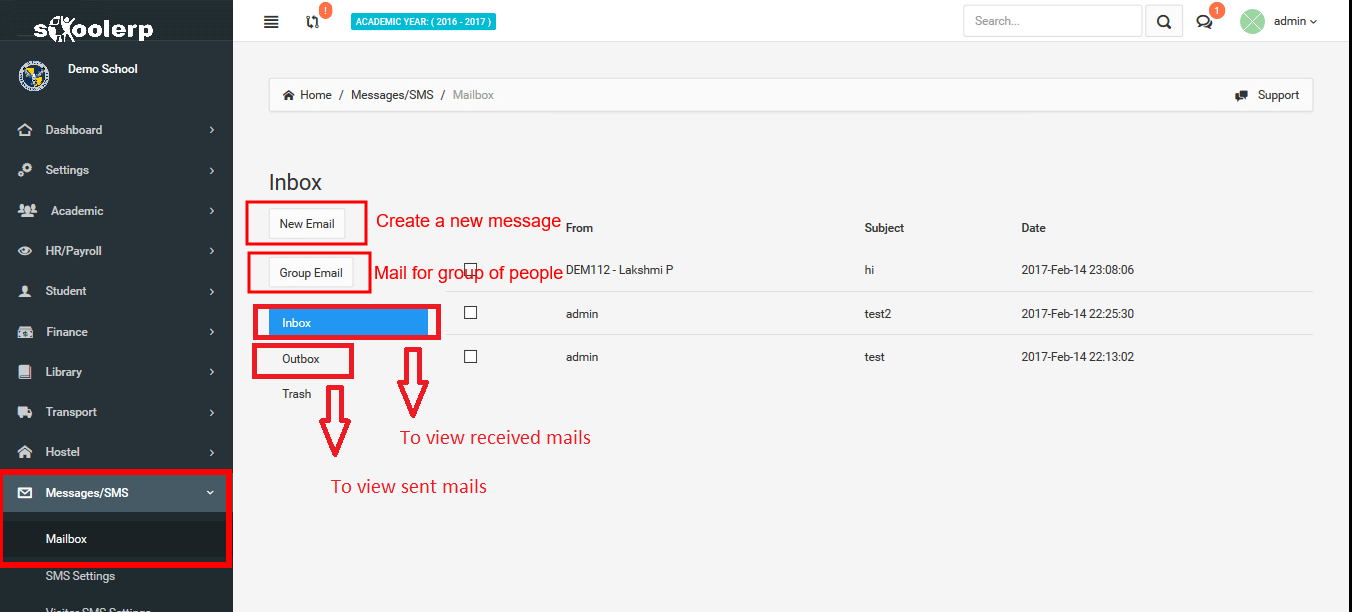
3.9.1 Mailbox
In mailbox submodule, you can create a new message and sent it. A mail can also be sent to a group of people. Here you can view the received and send mails. The deleted mails will be sent to the trash box.
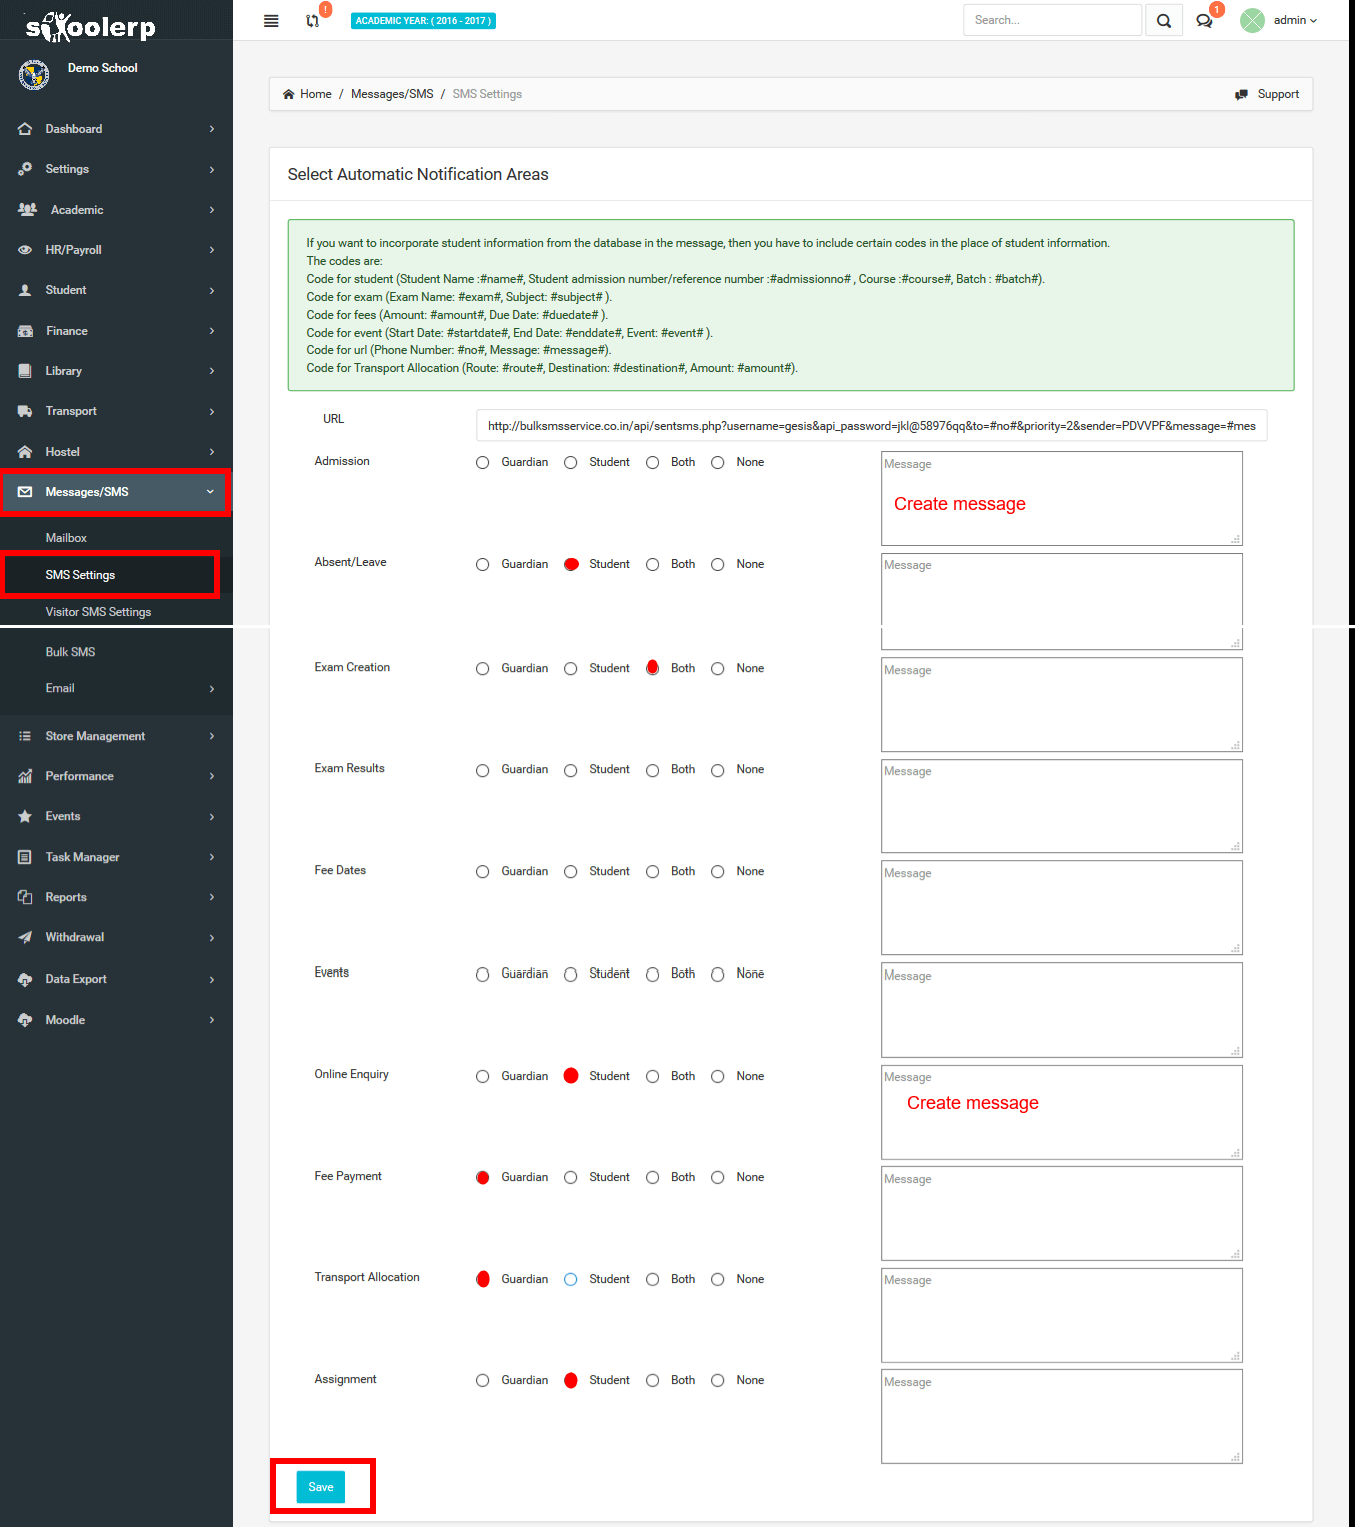
3.9.2 SMS Settings
Here, one can sent message to the selectedrecipient. Therecipient will get the SMS for example when an exam is created.
3.9.3 Visitor SMS settings
In this sub module the admin assign a phone number for each recipient (teacher, principal etc.) so whenever a visitor comes for anyrecipient a SMS will be sent to the assigned number only.
.png)
3.9.4Bulk SMS
Bulk SMS can be sent by selecting the recipient and creating the message.

3.9.5Email
In this module we can configure,personalize and send email.
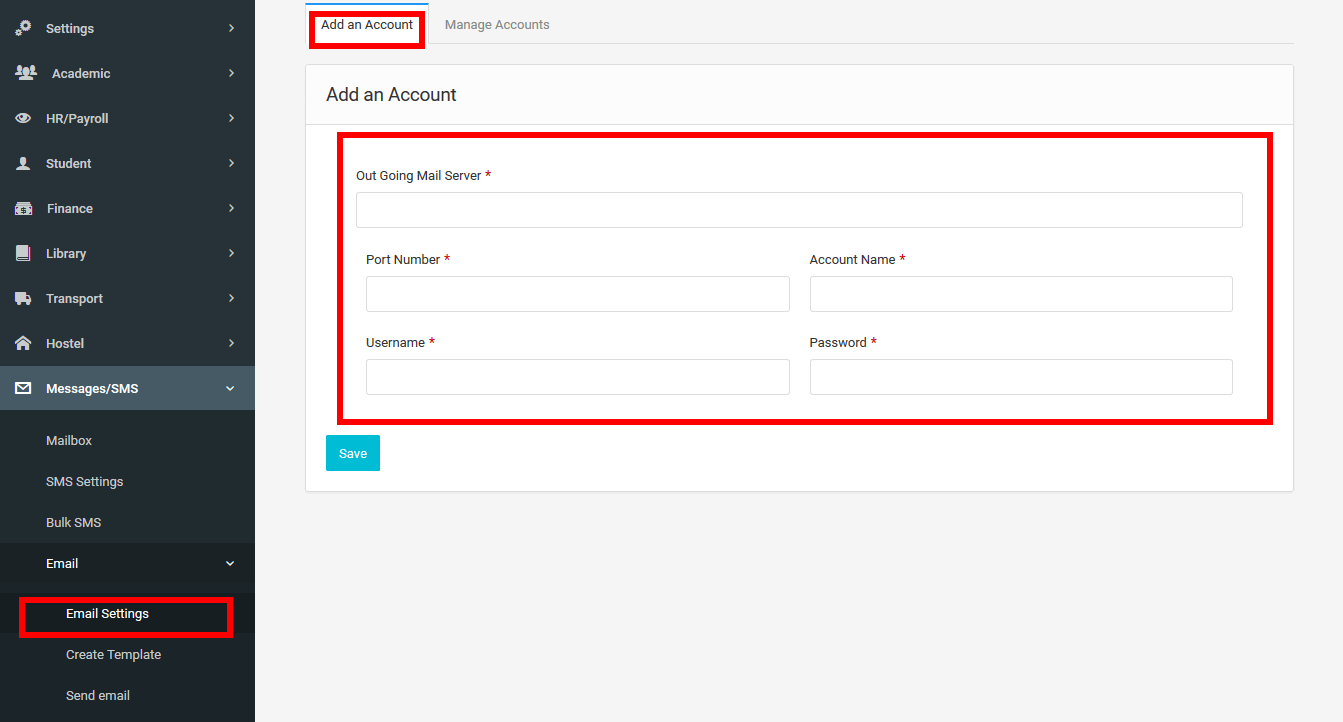
3.9.5.1Email Settings
In Email Settings, we can configure the email account by providing the server name,port number etc...
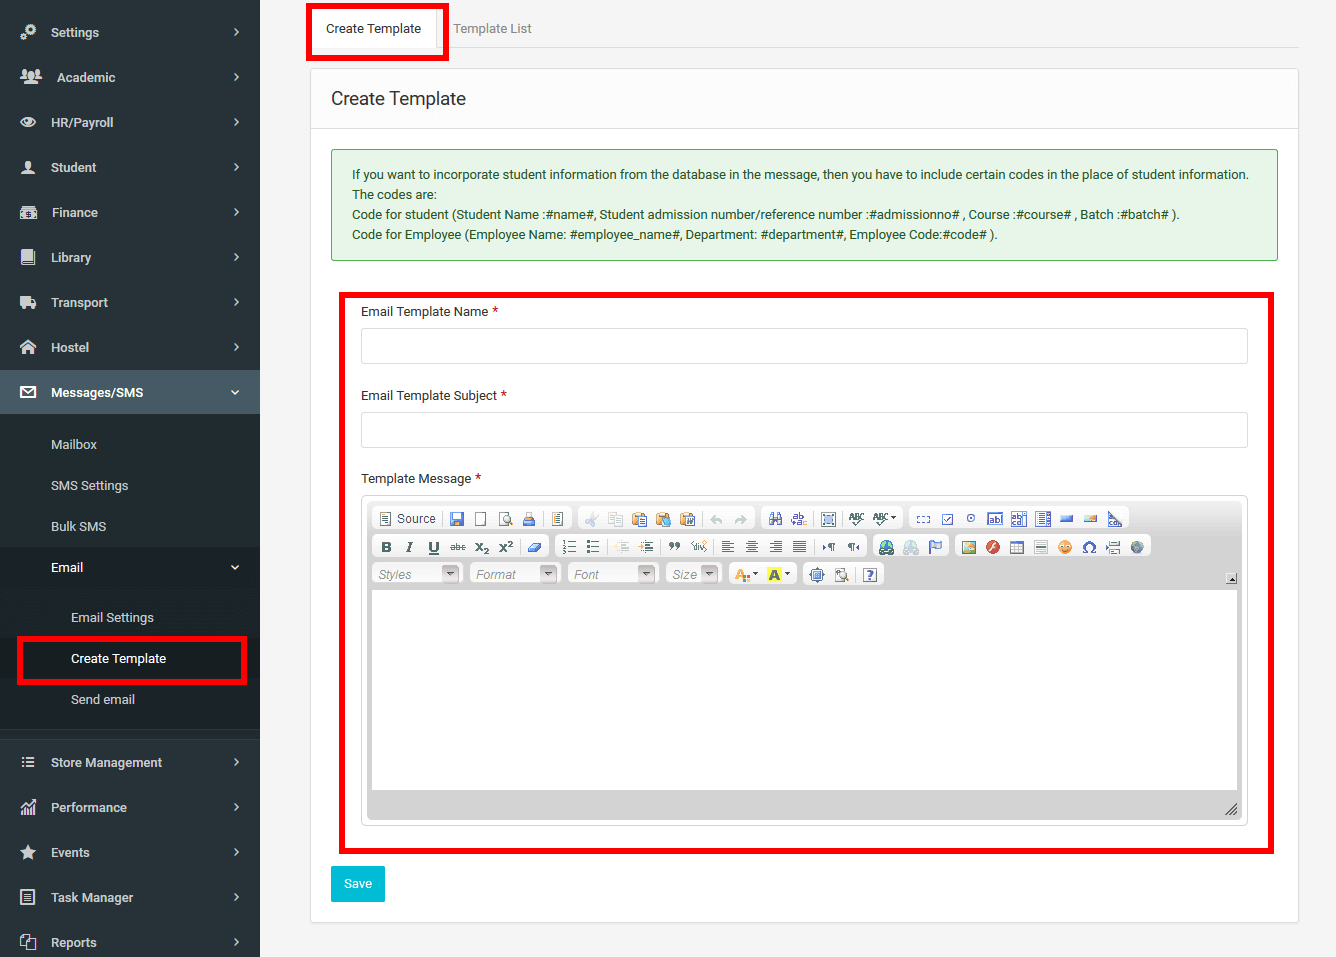
3.9.5.2Create Template
Here we can personalize our email.That is ,here we can create template our email account.
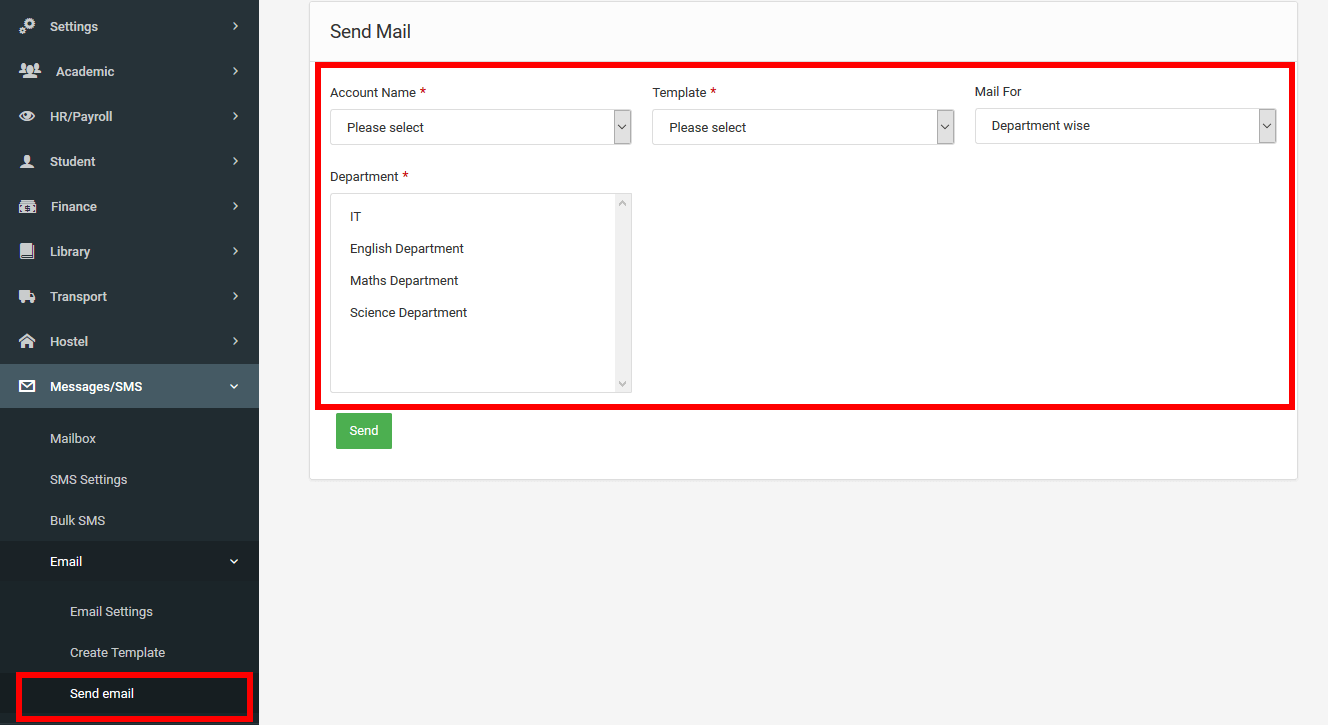
3.9.4.3Send Email
Here we can send email to students/employees.
3.10 Store Management
The Store Management module is from where store items can be managed The inventory also deal with the adding vendor , inventory, order generation etc.
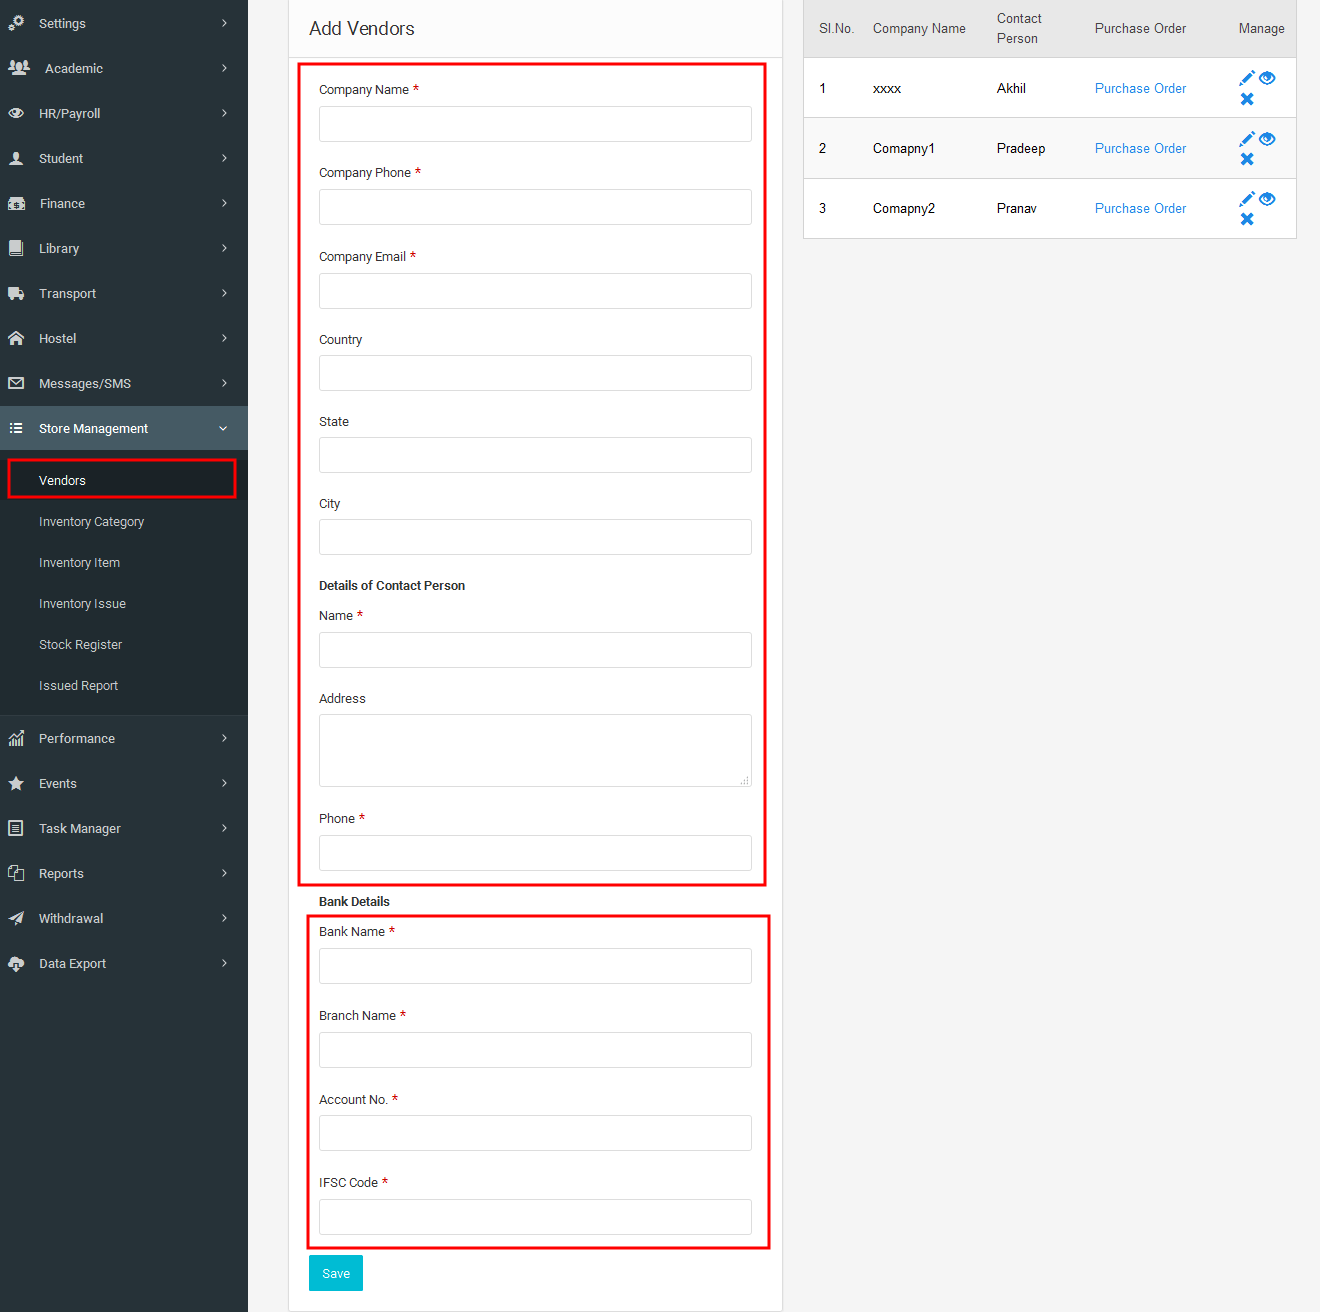
3.10.1Vendors
Here we can enter the details of the vendors such as bank details,contact details etc.
3.10.2Inventory Category
Here we can add inventory item category of the selected vendor.

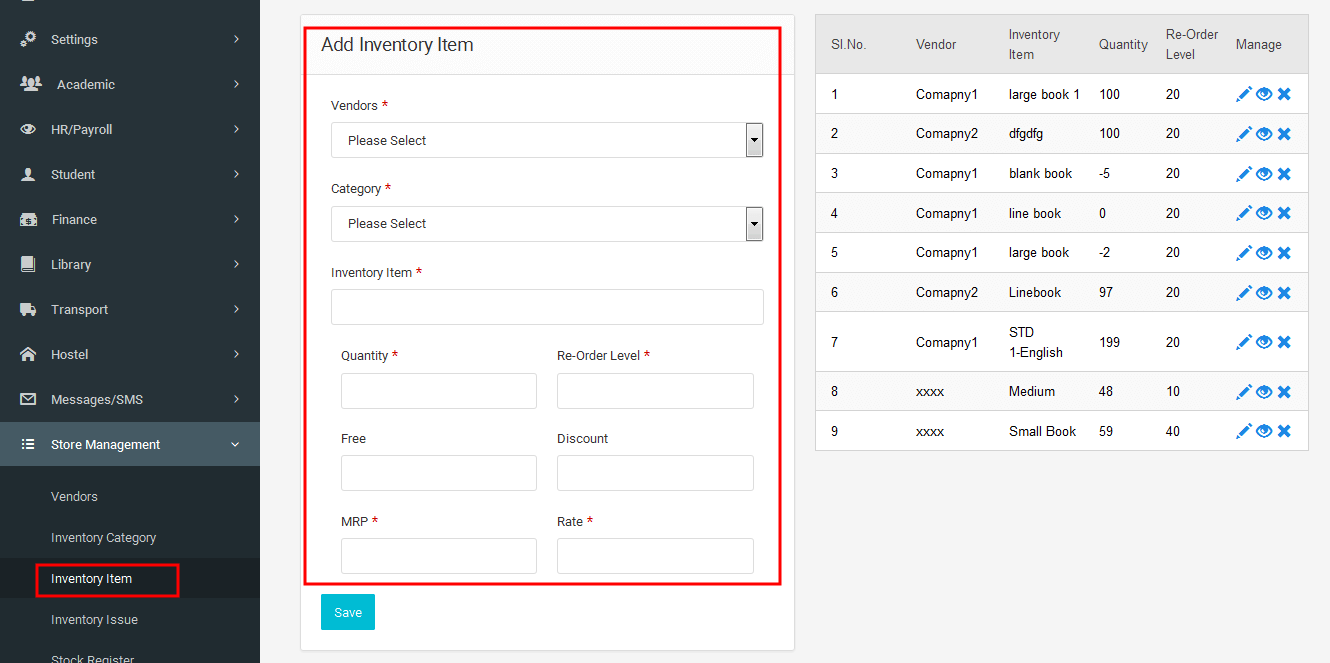
3.10.3Inventory Item
Here we add the details(cost,quantity,rate etc...) of inventory items in the store and also we can view the list of inventory items.
3.10.4Inventory Issue
Here we can store the issue details of a stock.

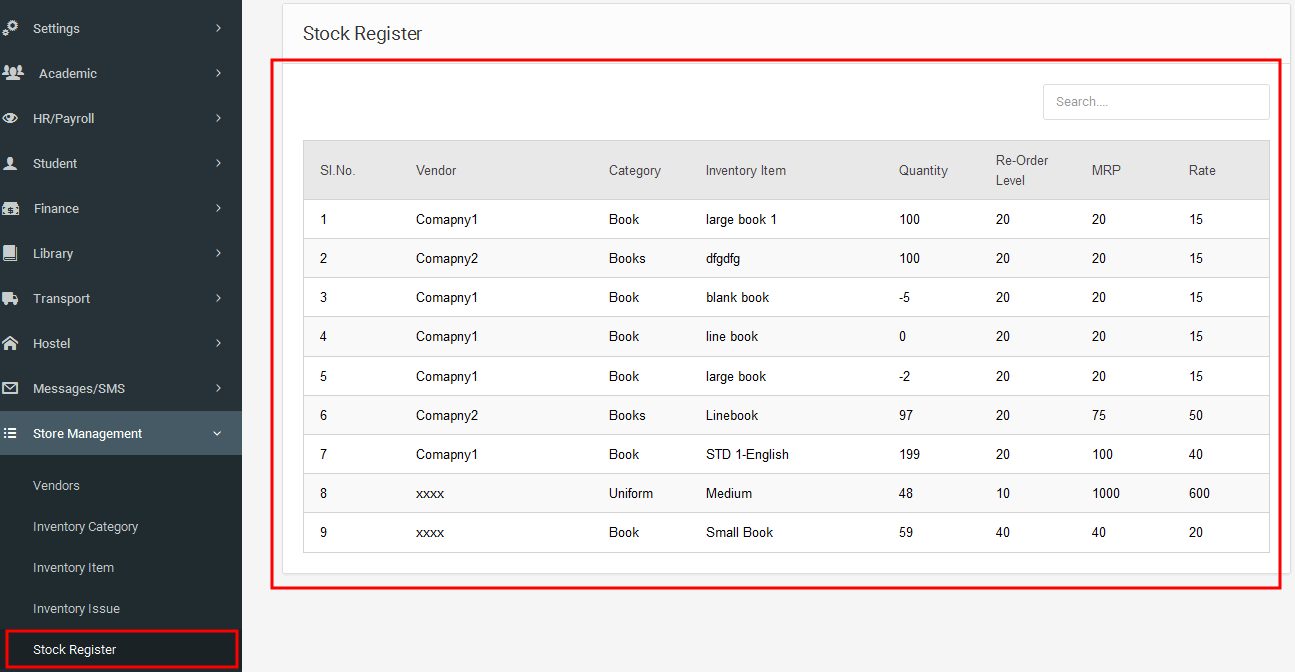
3.10.5Stock Register
Here we get the complete details of the stocks in the store.
3.10.6Issued Report
Issued report gives the complete details of the stock issued.

3.11 Performance
Performance is used to evaluate student performance. It allows user to see the evaluation result as bar graphs which makes more user-friendly. Performance mainly include two sections called GPA and CCE.
3.11.1 GPA
GPA contains Student performance and Course performance.
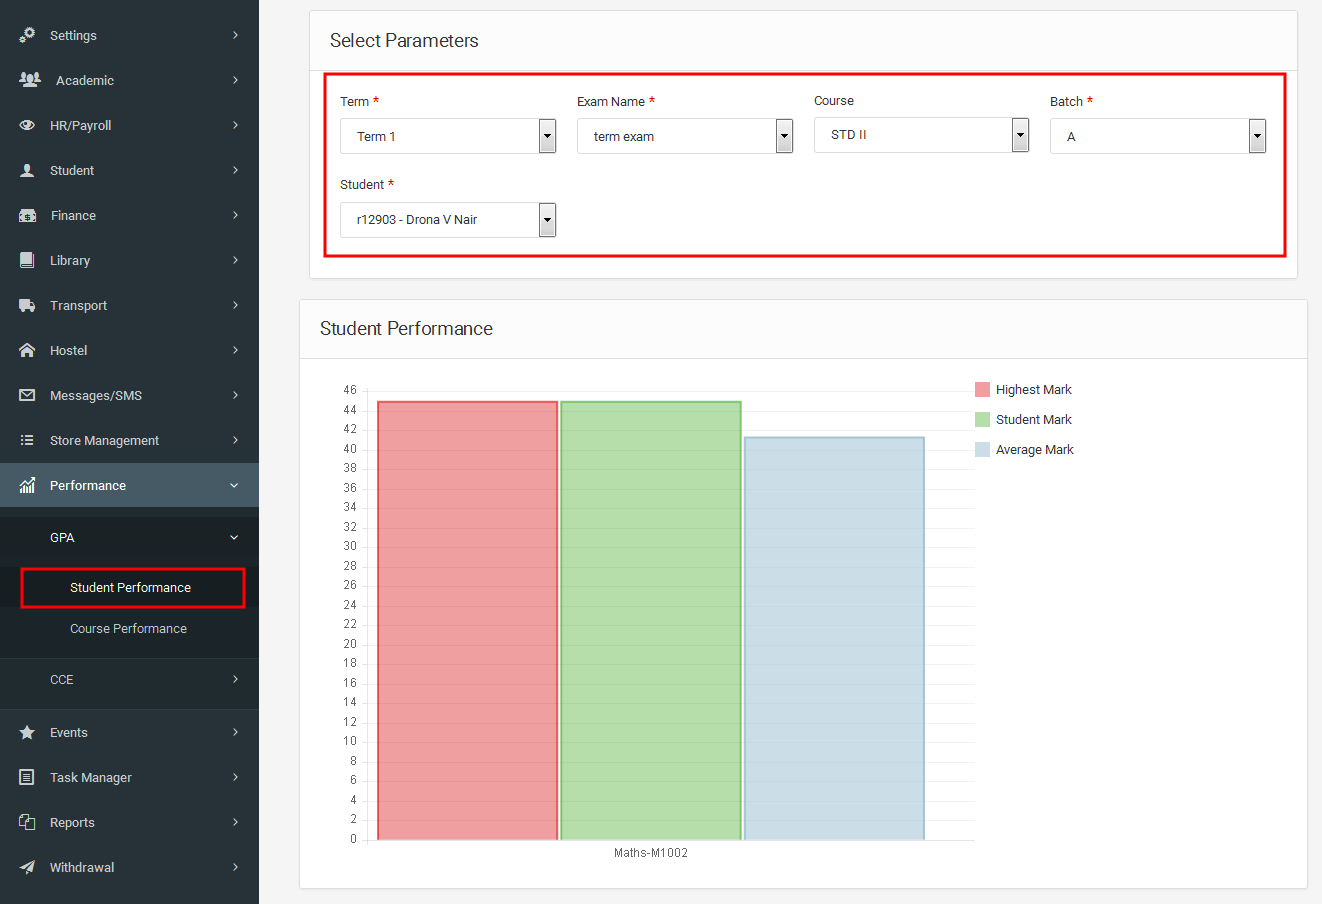
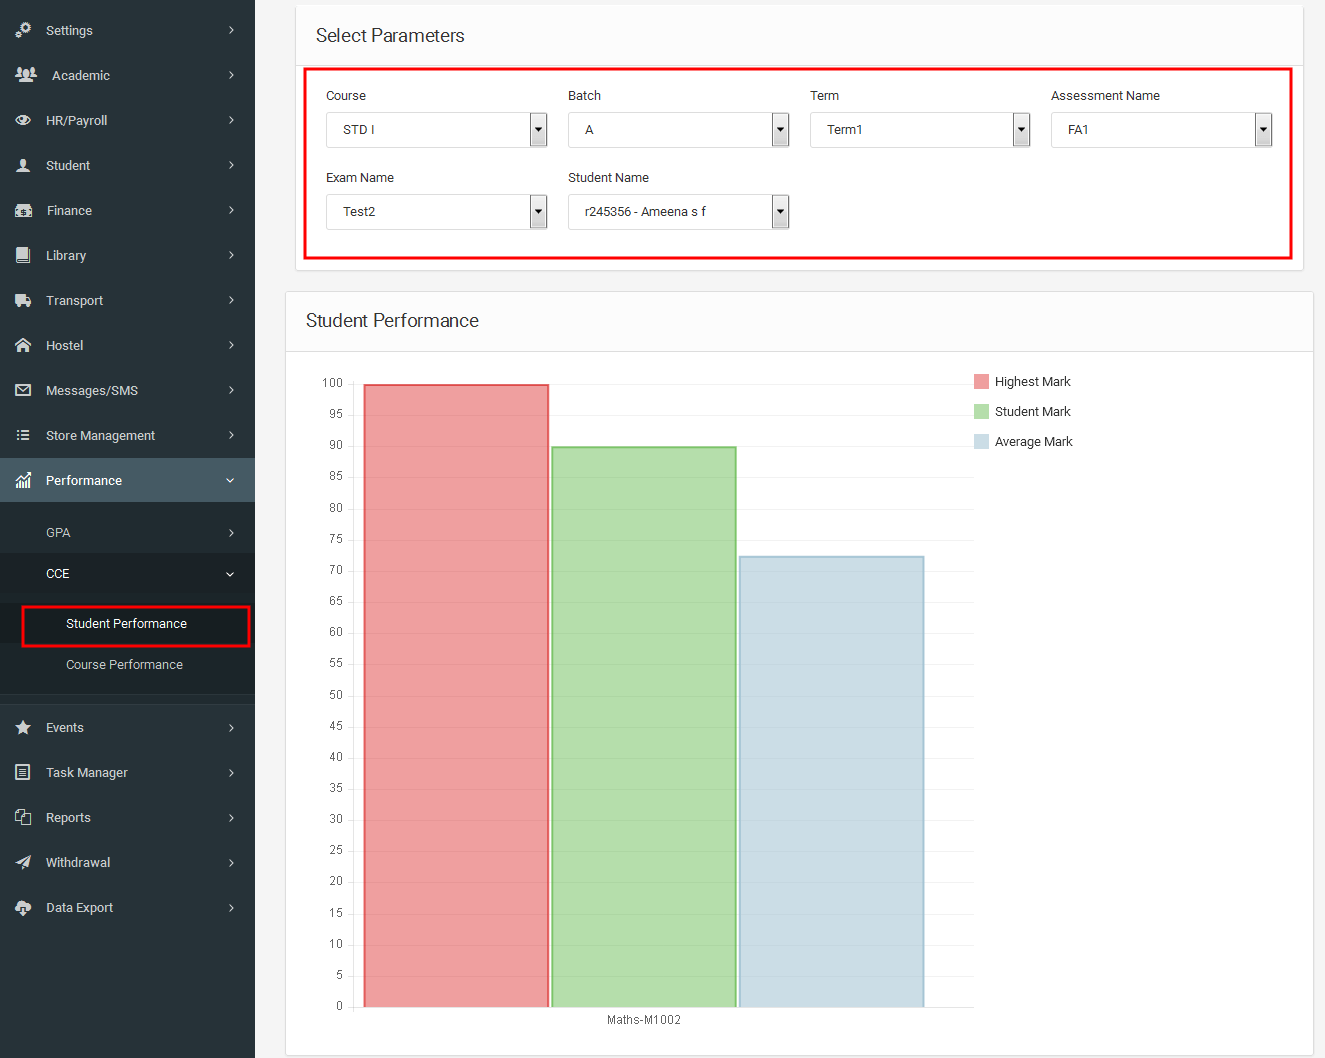
3.11.1.1Student performance
Upon selecting the parameters we get particular student performance for the selected exam.
Graph here used is a Grouped bar chart. For each subject there are three values,
namely students mark, highest mark and average mark. From here parents and teachers can easily compare the student’s performance for a particular exam.
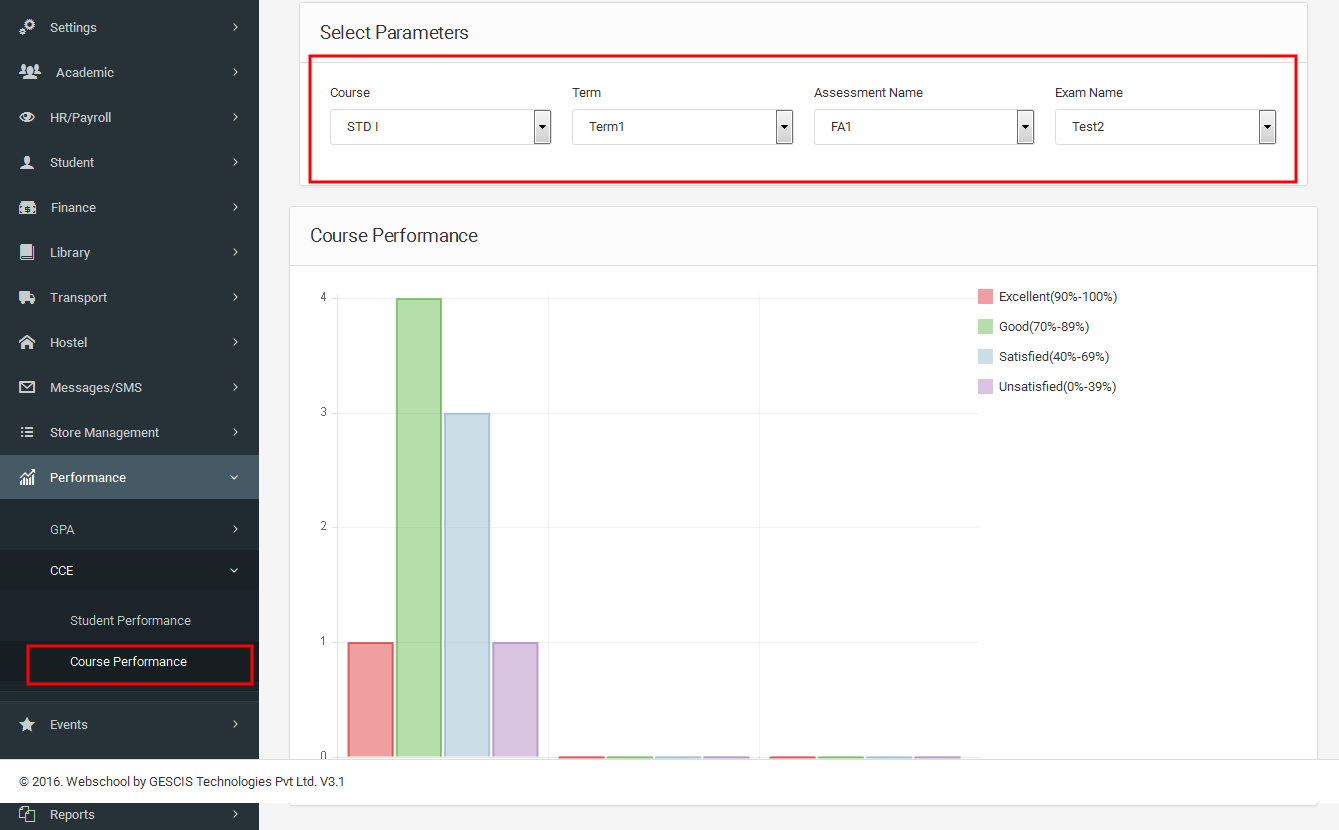
3.11.1.2Course performance
Upon selecting the parameters we get the performance of students in a course for the selected exam.
Graph here used is a Stacked bar chart. For each batch there are four values, namely Excellent,
Good , Satisfied and Unsatisfied. From here principal,head of the department and teachers can easily compare the each batch’s performance for a particular exam.

3.11.2 CCE
CCE contains Student performance and Course performance.
3.11.2.1Student performance
CCE student performance is same as GPA Student performance
3.11.2.2Course performance
CCE Course performance is same as GPA Course performance.
3.12 Events
In this module, we can manage different events in the institution.
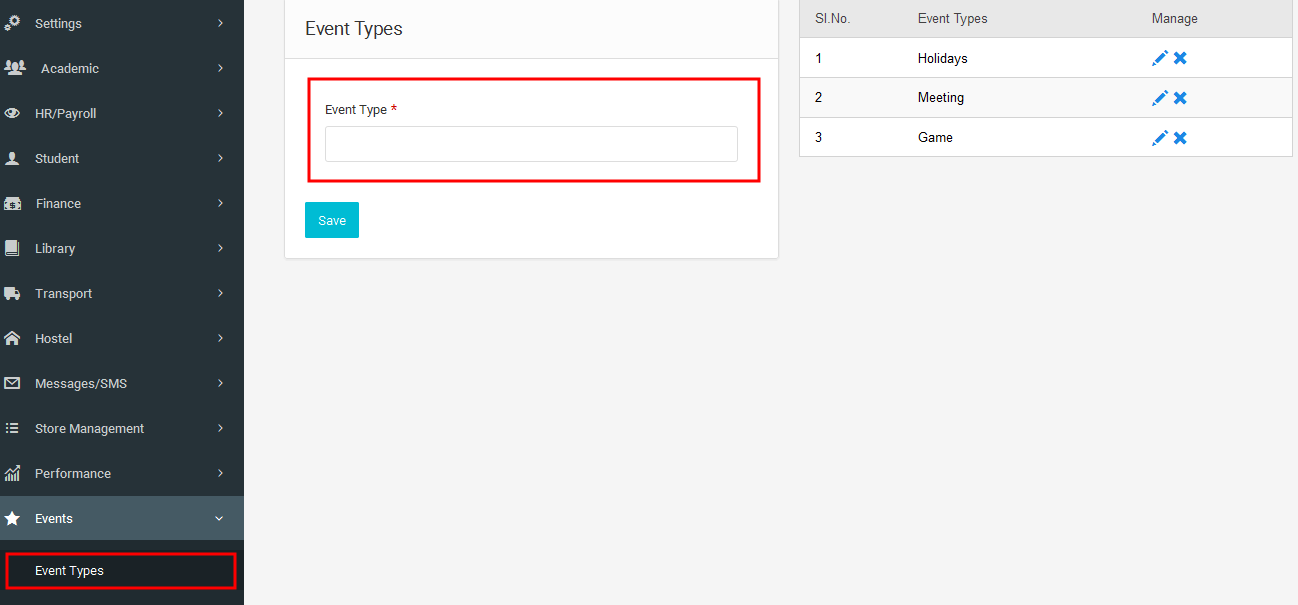
3.12.1 Event Type
Here we can add different event types such as holidays,meetings etc...
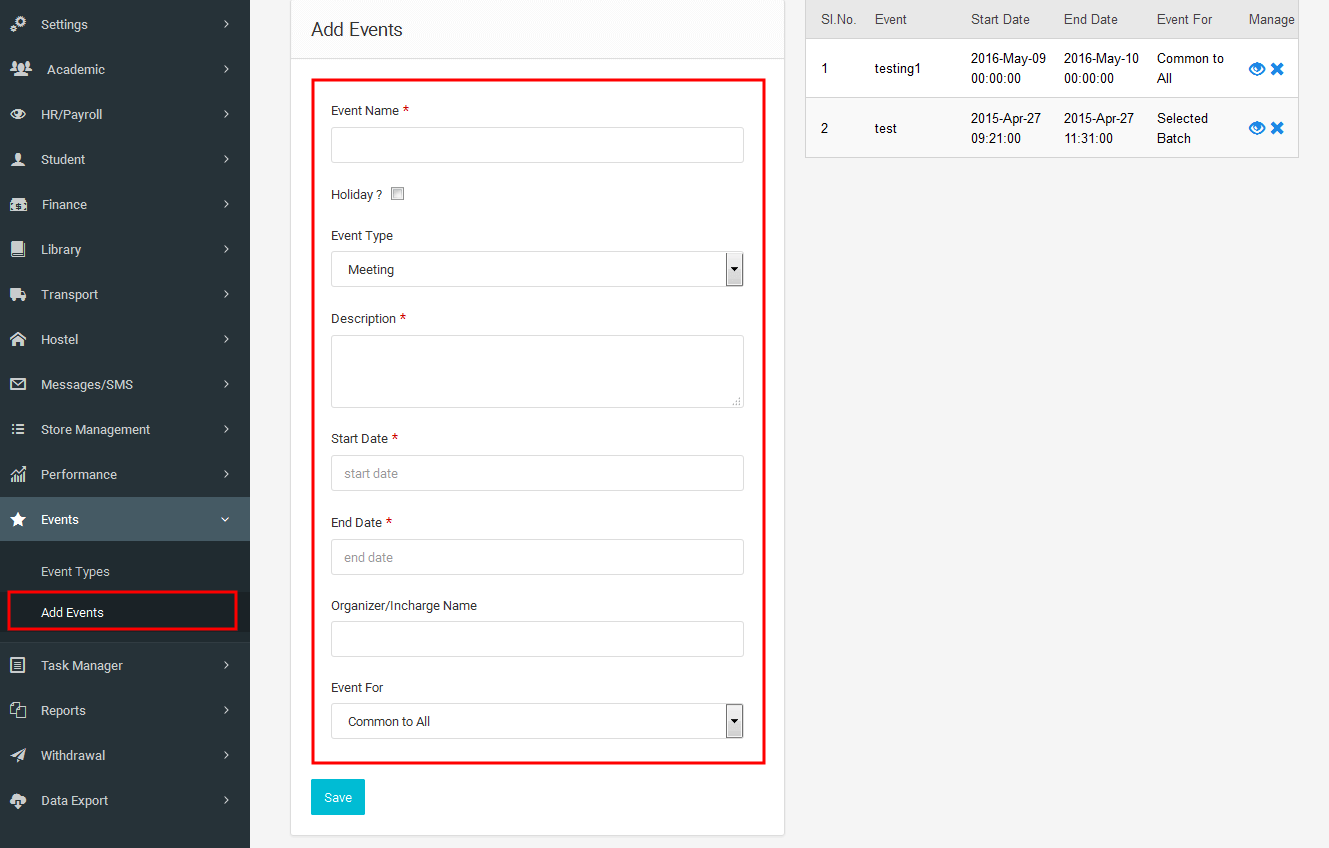
3.12.2 Add Events
3.13 Task Manager
You can manage the tasks and assign the task according to their priority.
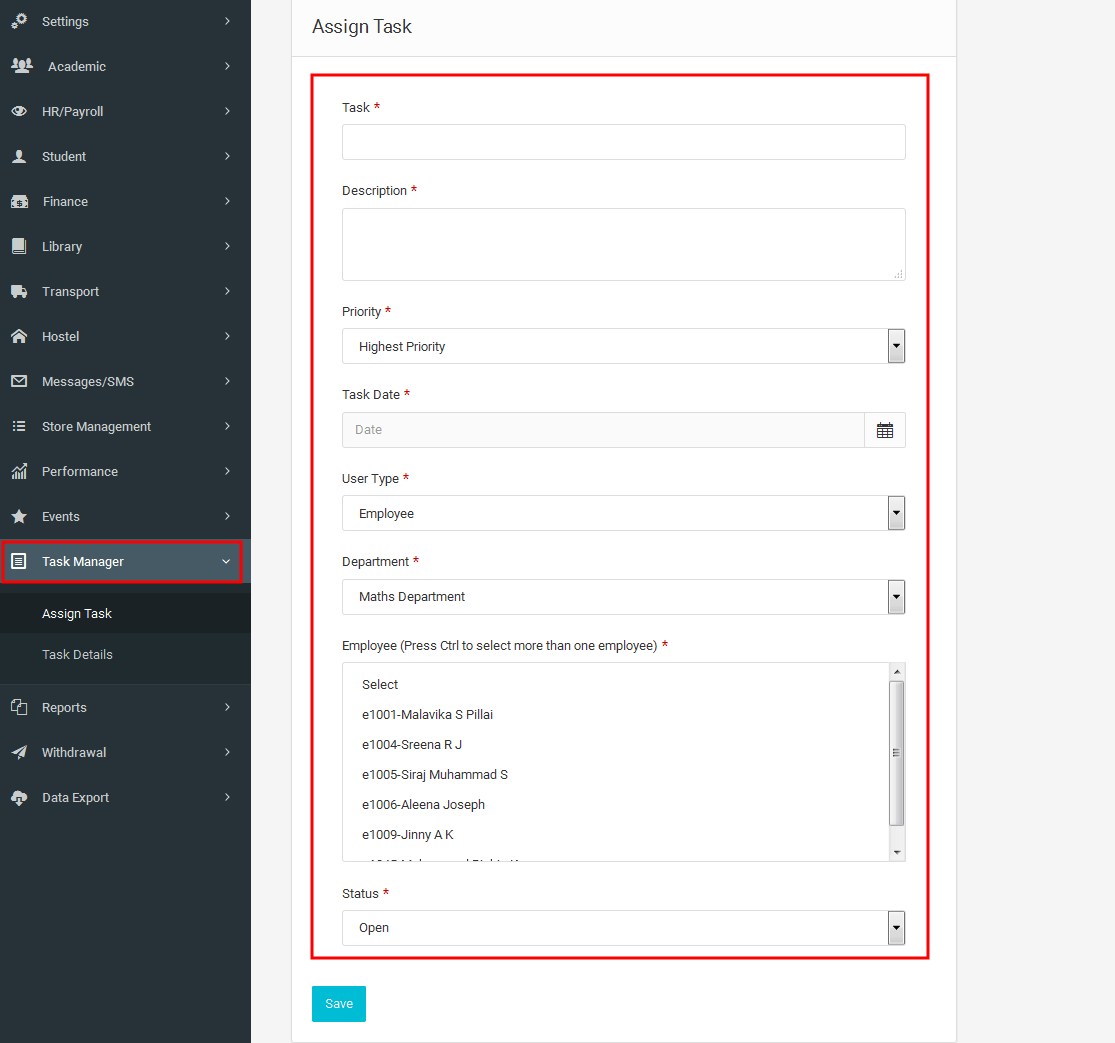
3.13.1 Assign Task
Assign task is used to assign a task for students/employees.
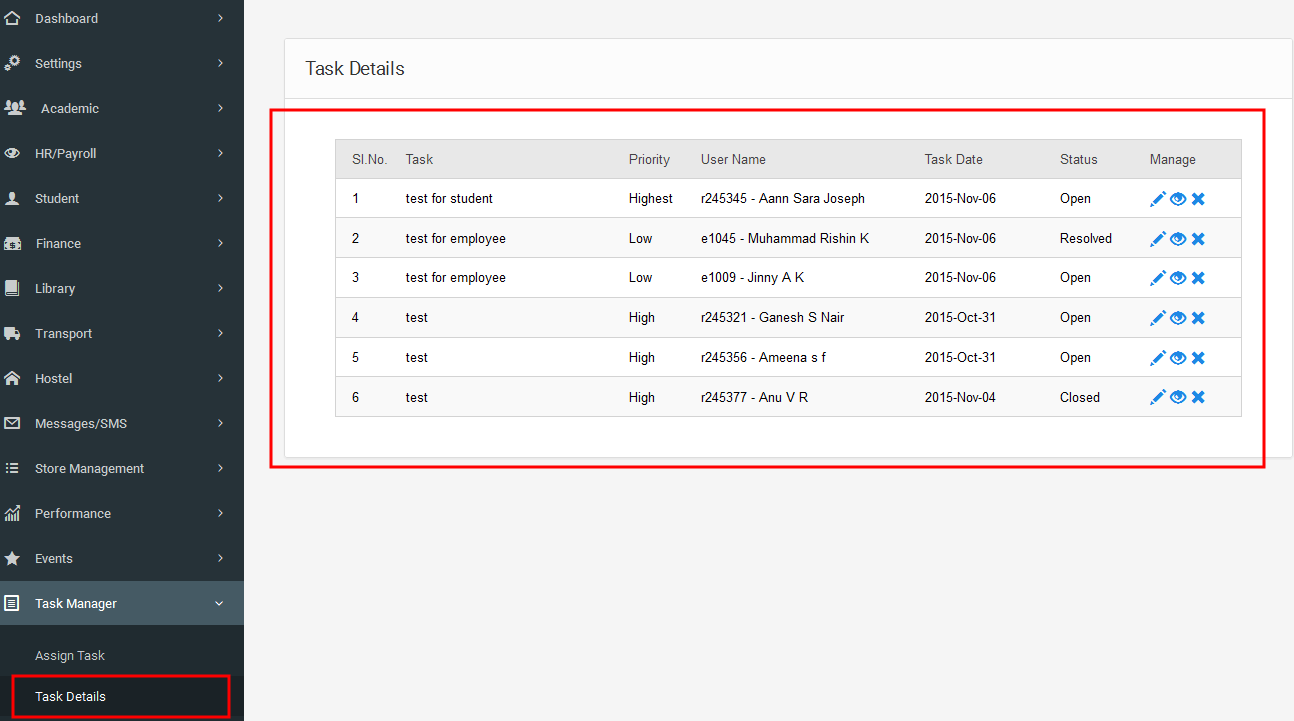
3.13.2 Task Details
3.14 Reports
The report module is helpful for generating student report,fee report etc...
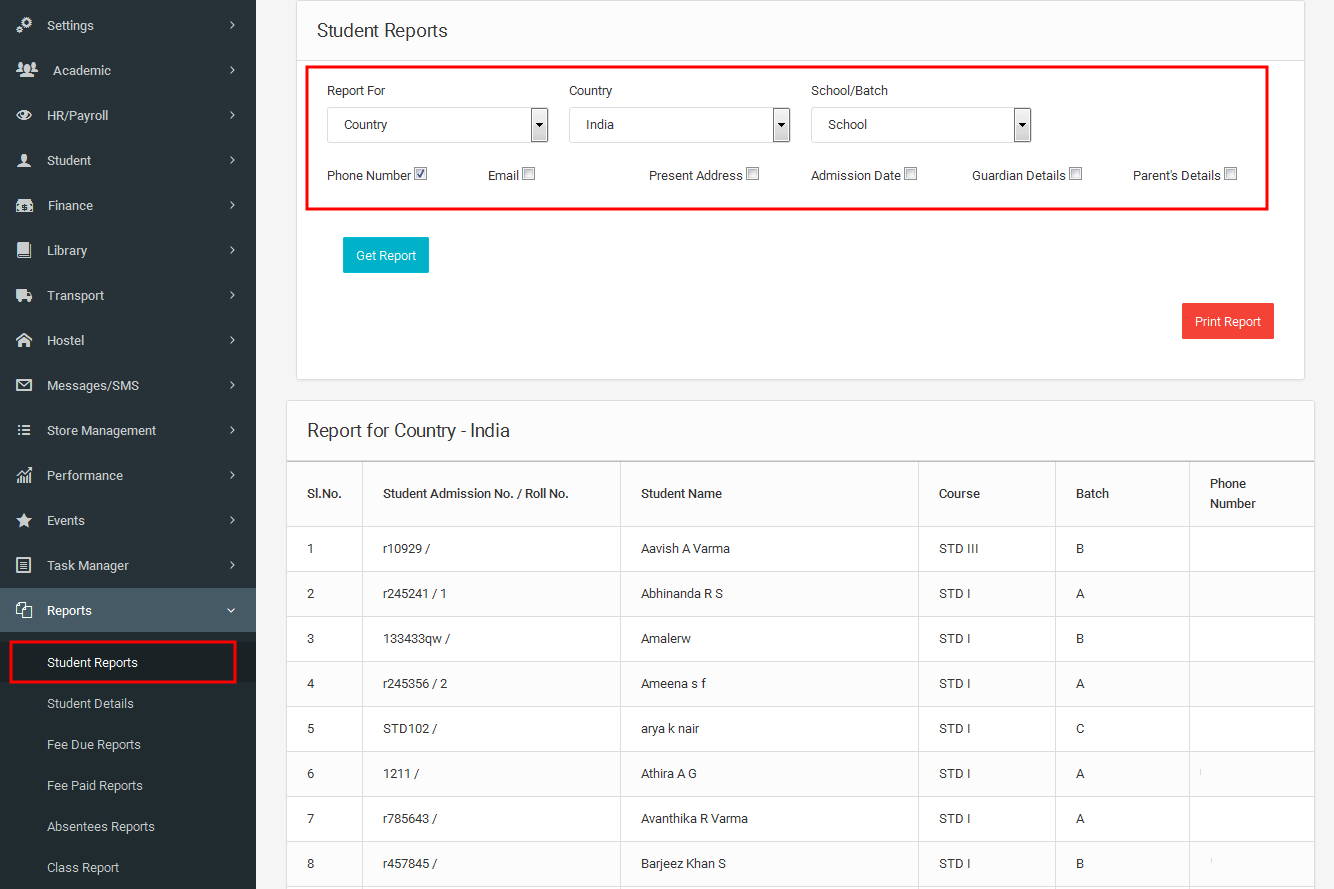
3.14.1 Student Reports
Student Reports is used to generate or view the details of students based on blood group, category, country, state etc...
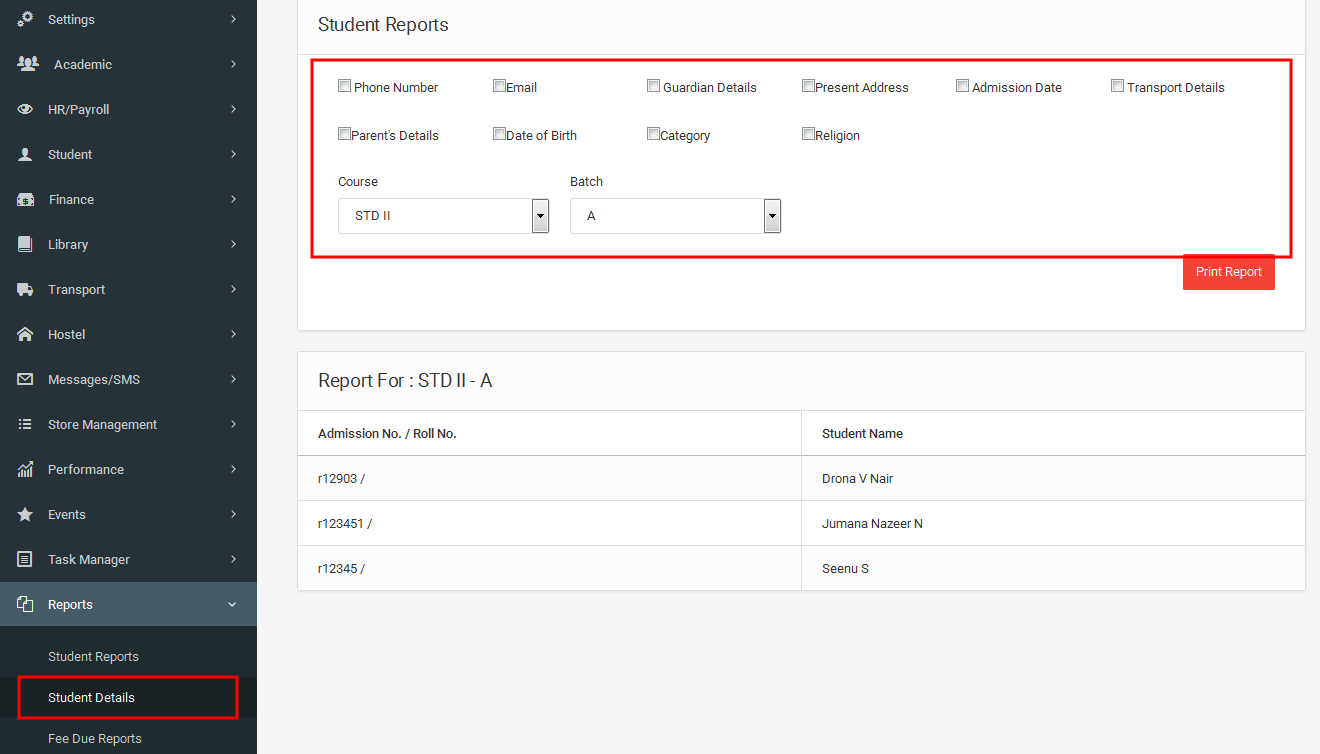
3.14.2 Student Details
Here we get the required details of the students by selecting the given options.
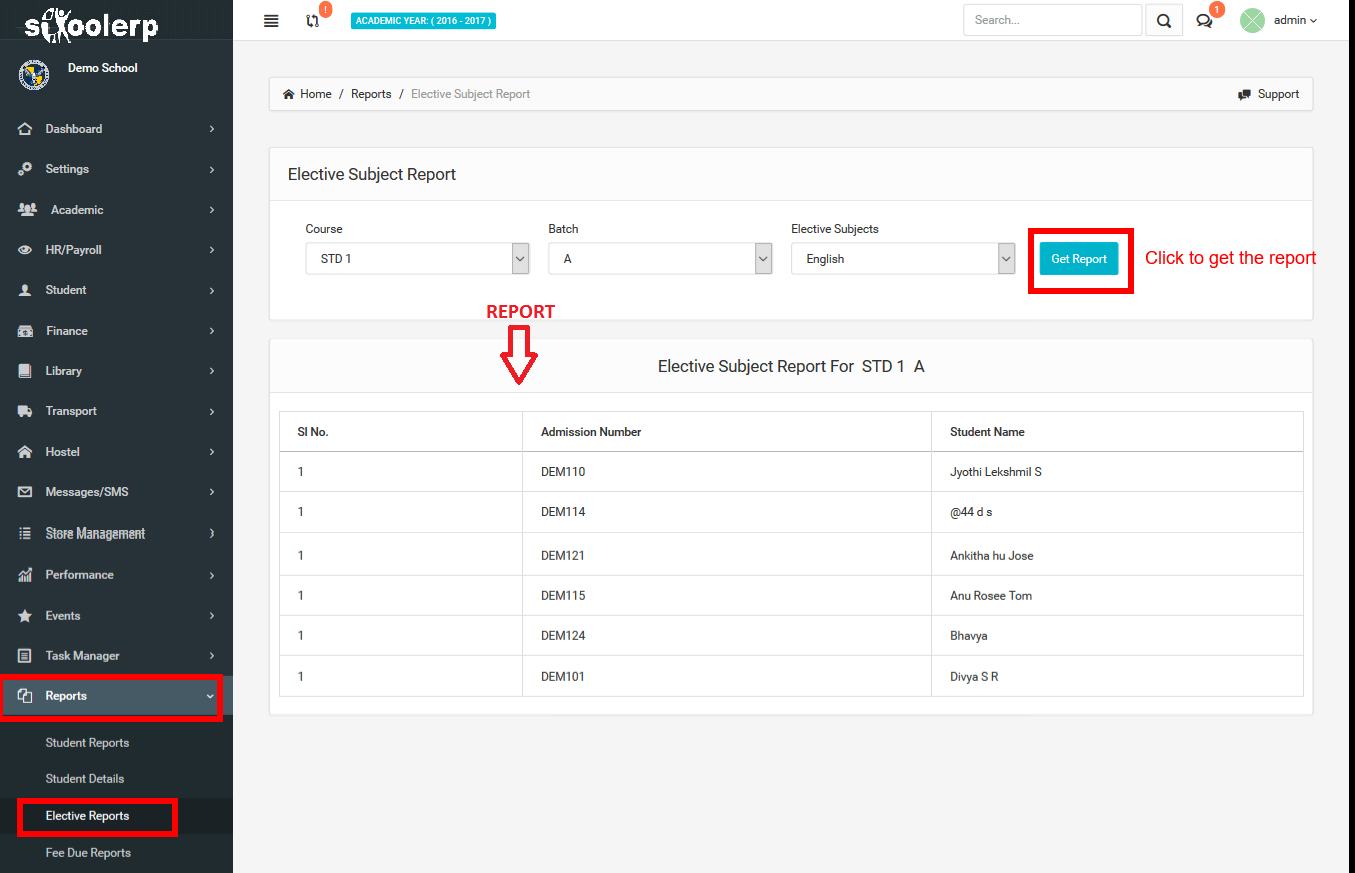
3.14.3Elective Report
Here you will get the reports on elective subjects.
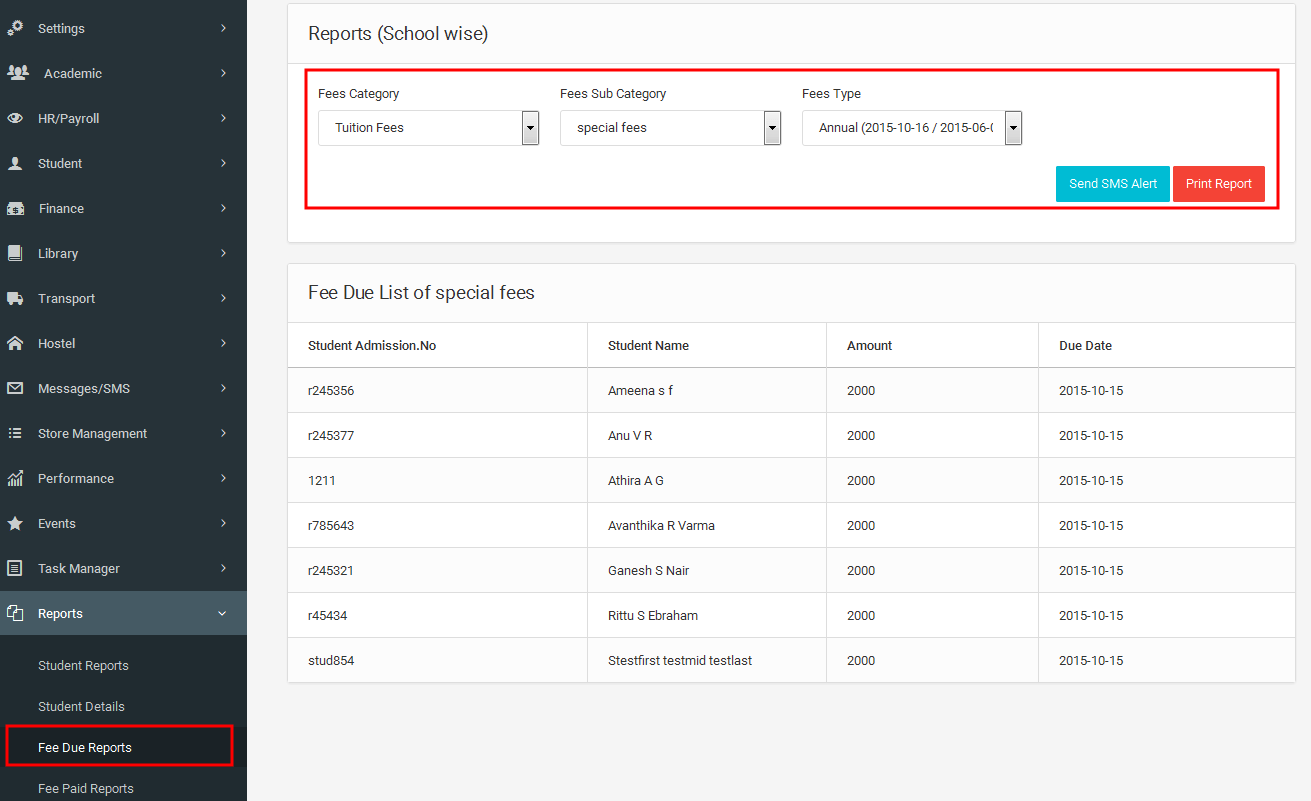
3.14.4 Fee Due Reports
Here we can generate the due list of a selected fee category.
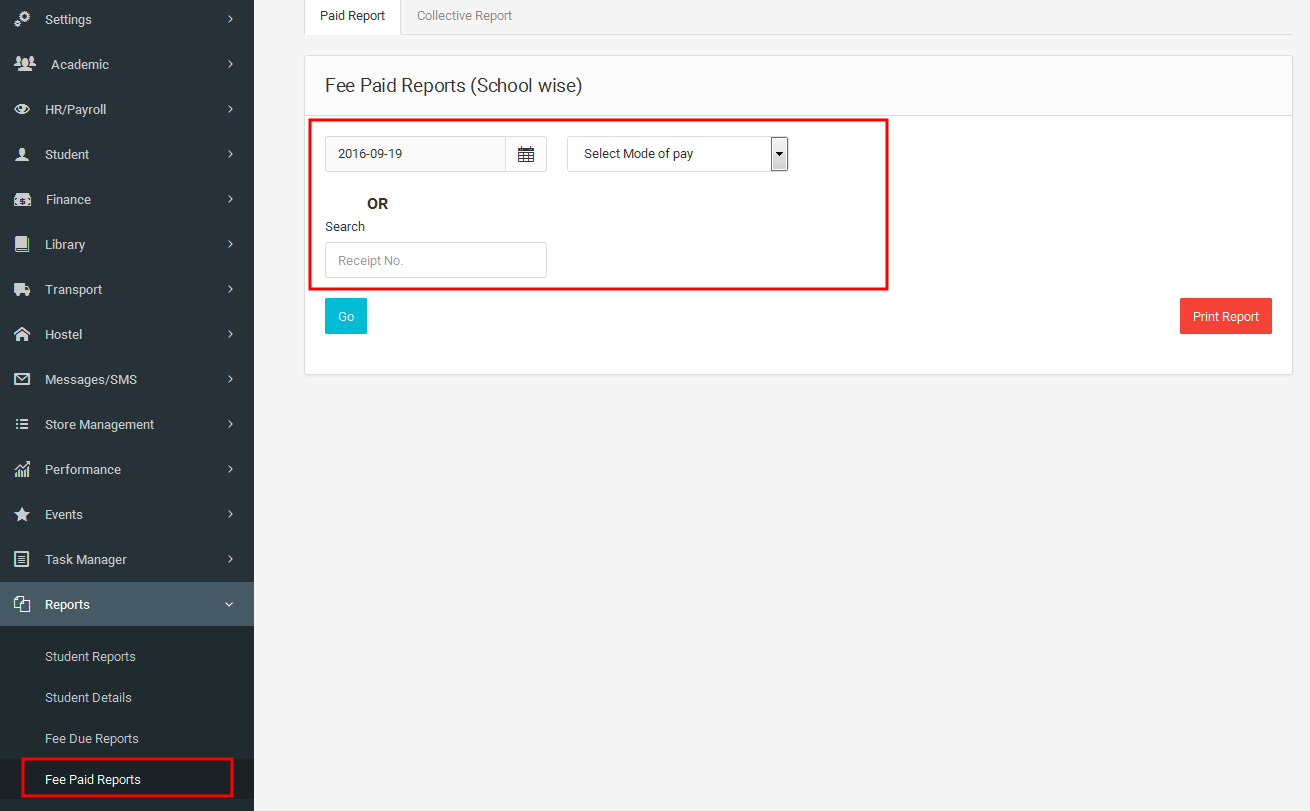
3.14.5 Fee Paid Reports
Fee paid report gives the complete details of fee paid by each student.
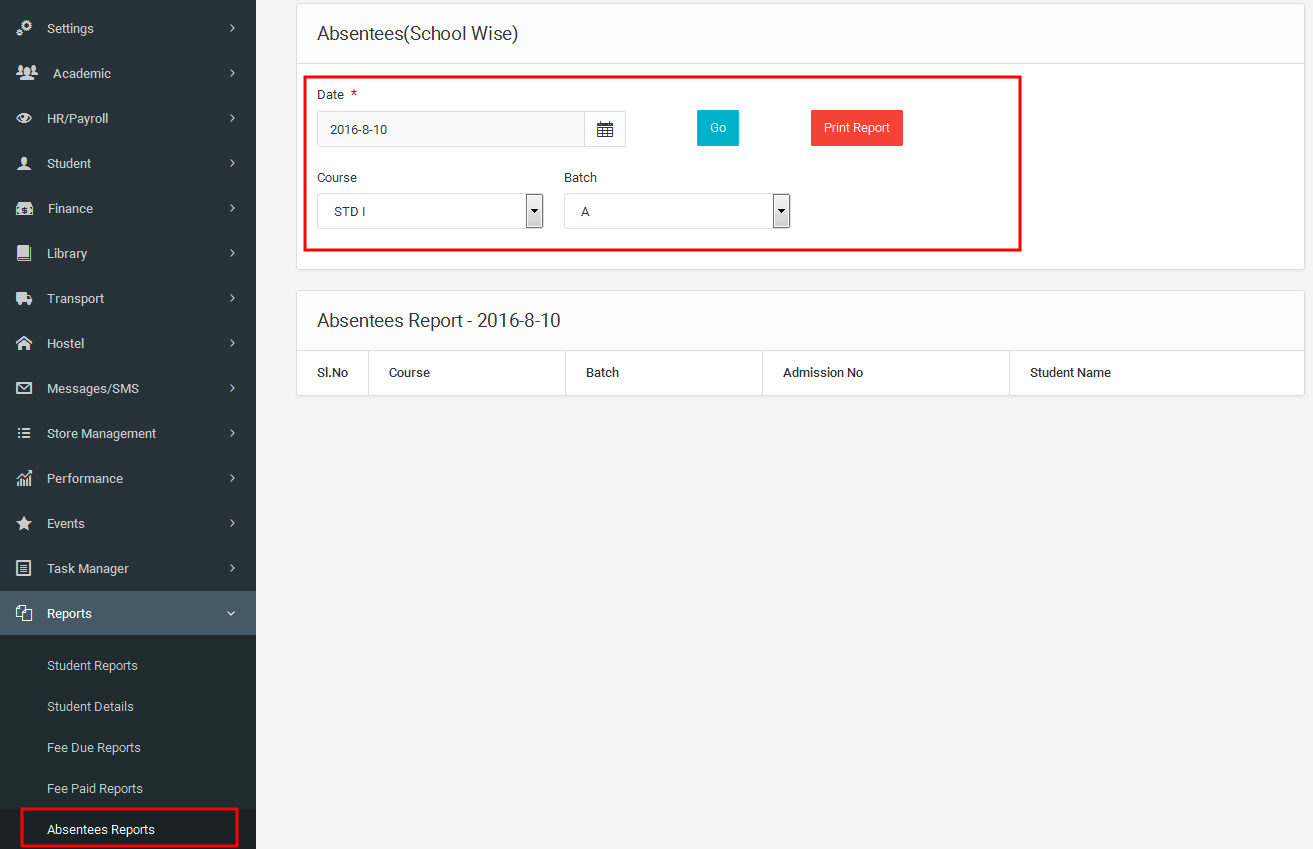
3.14.6 Absentees Reports
Here we get the school wise absentees report of students for the selected date.
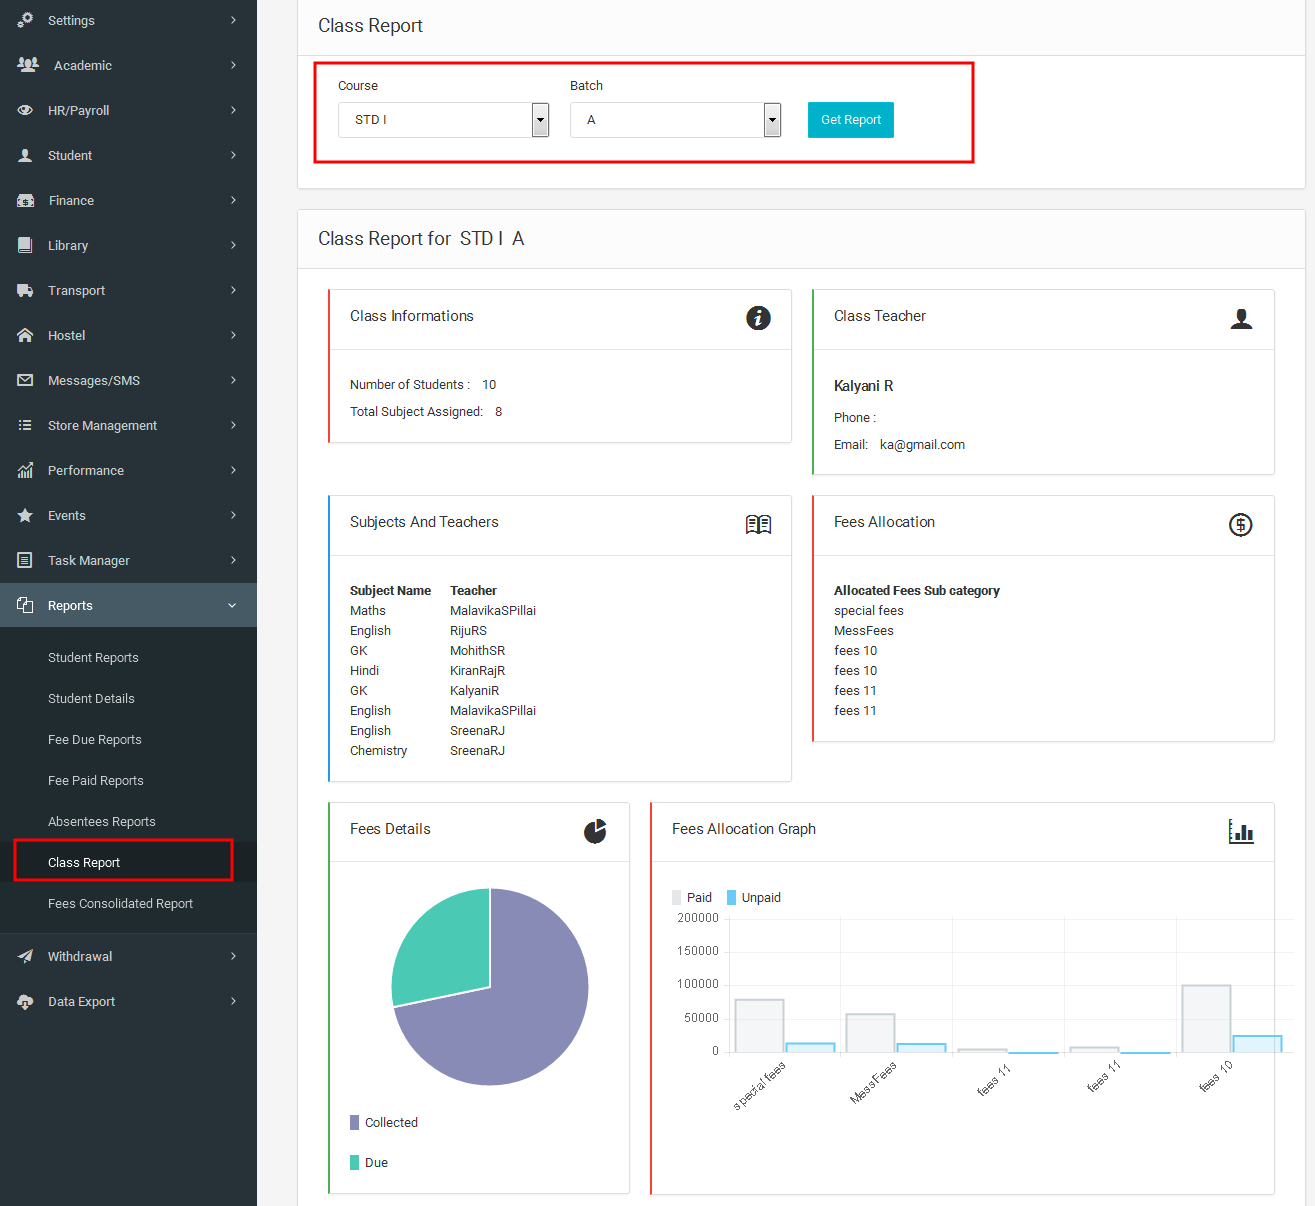
3.14.7 Class Reports
Here we get the complete details of the selected class (fee details,subjects,class teacher etc..)
3.14.8 Fees Consolidated Report
Here we get the complete details of the fee allocated for the selected course,details of fee paid and unpaid. This details are shown by using pie charts.The first pie chart shows the total fees and the second pie chart shows the paid and unpaid fee.
The batch wise fee collection is represented by using a bar chart.

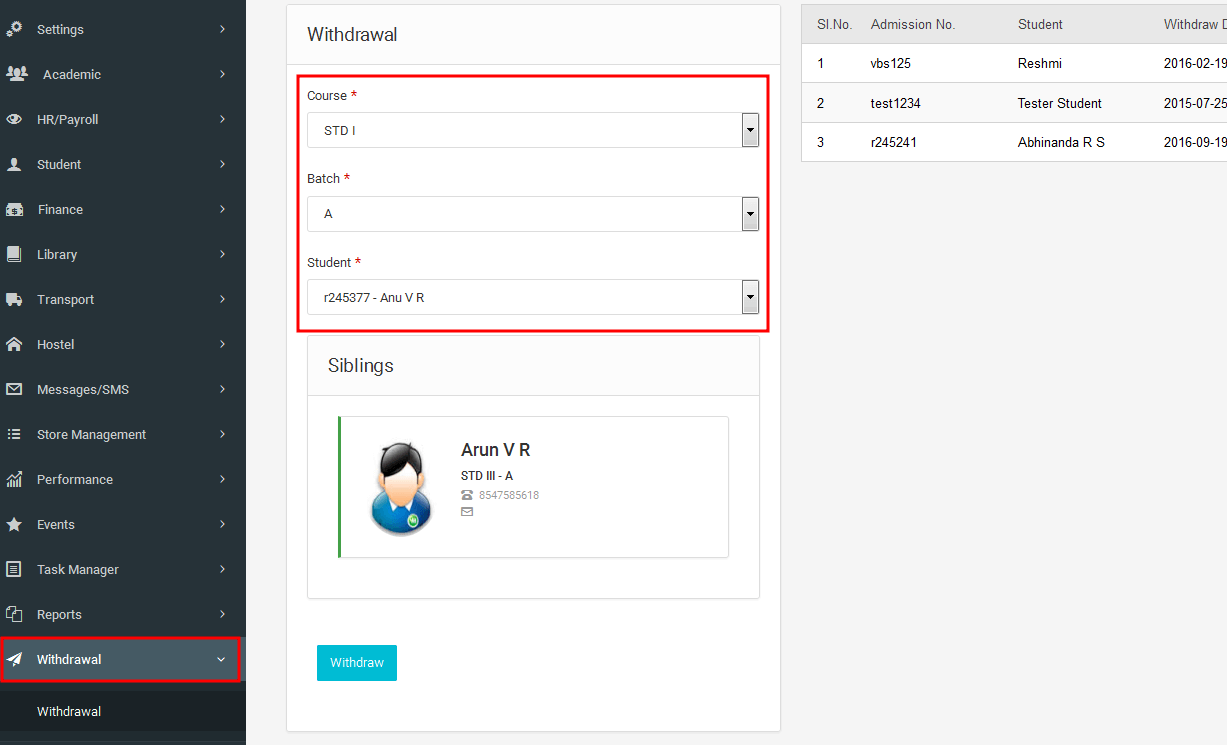
3.15 Withdrawal
3.15.1 Withdrawal
In this module you can withdraw a student from your School as per your requirement.
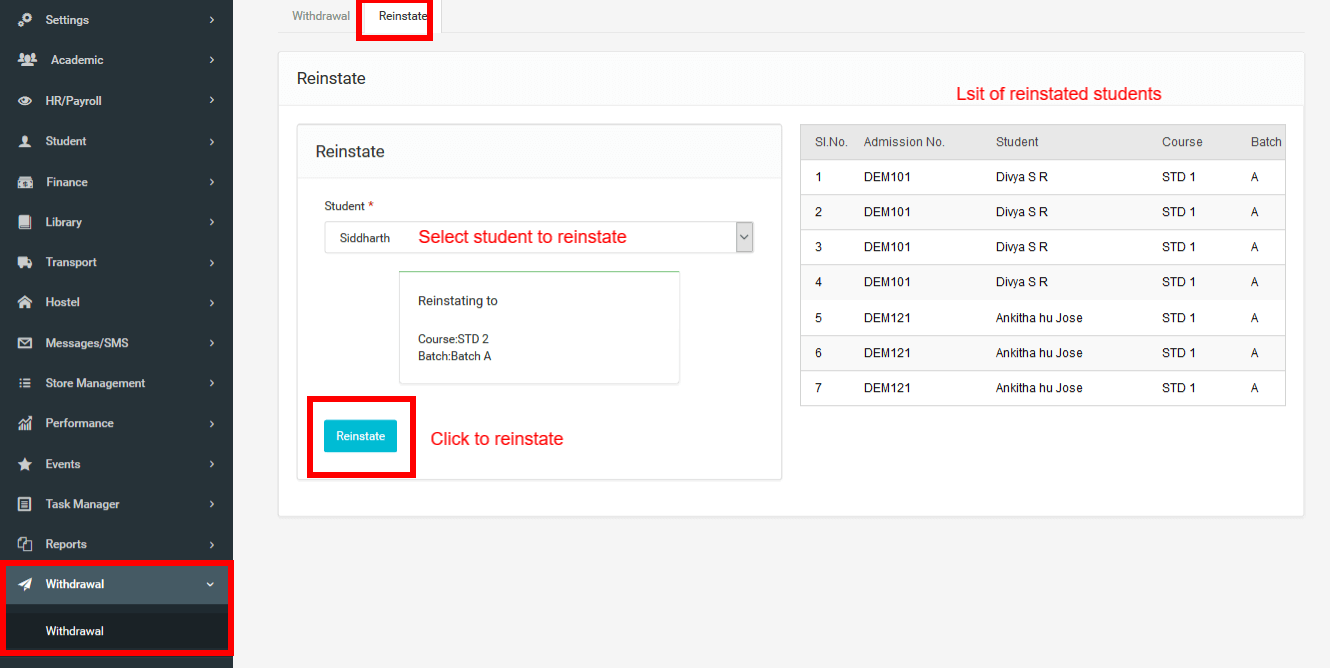
Reinstate
In reinstate submodule you can reinstate the withdrawn student.
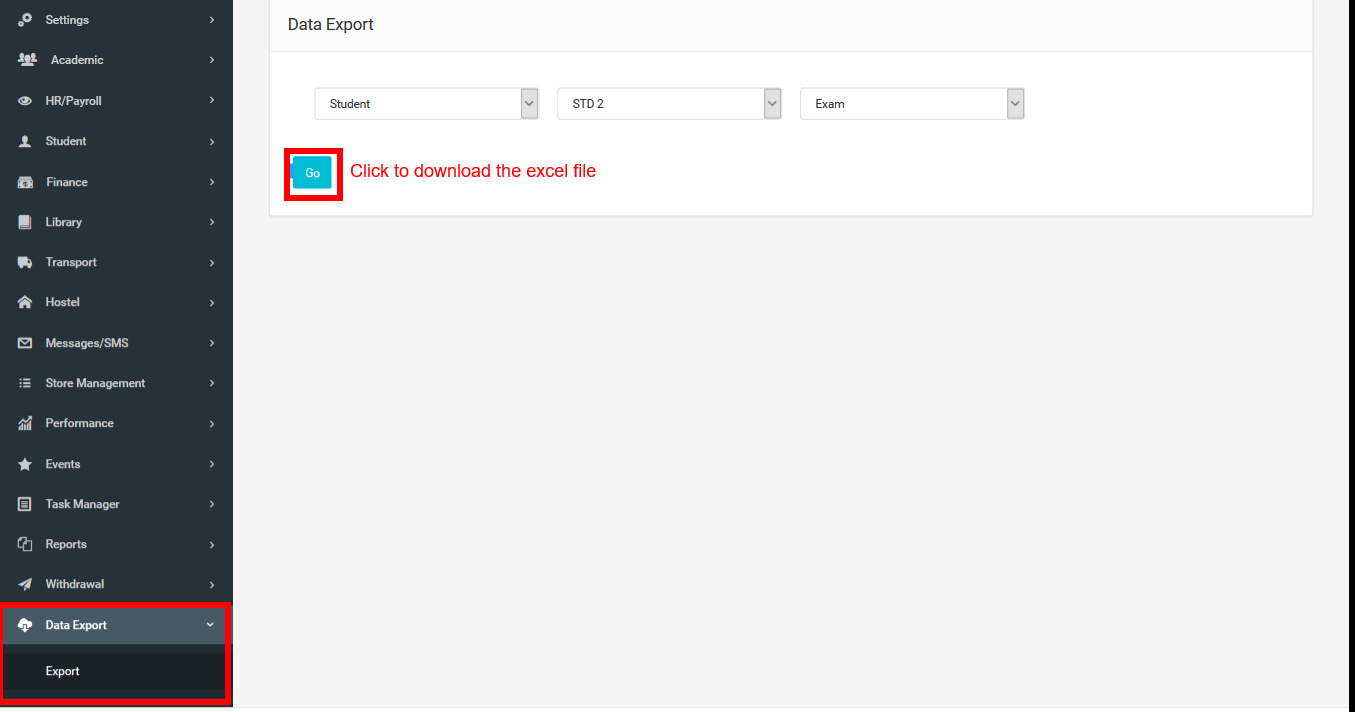
3.16 Data Export
In Data export module you export the data in the excel format for viewing and managing.
3.17 Work Flow
3.17.1Work Flow diagram for the Student Import
3.17.2Work Flow diagram for the Employee Import
3.17.3Work Flow diagram for the Timetable Creation

3.18 FAQ
3.19 Common labels in sKoolERP
Label |
Description |
|---|---|
| Courses | Programme to which student is admitted. This can be like Standard 1, Electronics Engineering, MBA, MS etc |
| Batches | Batches are the subdivision for the courses Ex: Standard 1-A, Standard 1-B, etc.... |
| Subjects | The modules which are taught in the Course / Programme.Example English, Mathematics, etc.... |
3.20 Login credentials for the users
3.20.1 Student and Guardian
The login credentials for the student and guardian are created while we add new student to the system.
By default it will be Institution-ID + Student Register number.
For Ex: If the Student registration number is STU101 then the default-
Username and Password for student will be: 1STU101 where '1' is the institution ID.
Username and Password for Guardian will be: 1STU101g where '1' is the institution ID.
3.20.1Employees
The login credentials for the employee are created while we add new employee to the system.
By default it will be Institution-ID + Employee Register number.
For Ex: If the Employee registration number is EMP101 then the default-
Username and Password for student will be: 1EMP101 where '1' is the institution ID.